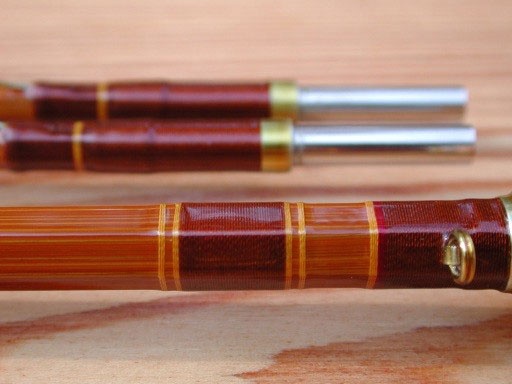
Bamboo Tips - Tips Area |
|
< Home < Tips Area < Post Gluing
Here is a good one to get your sections dead straight every time. After glue up use a board to roll your section to get straight. In the butt section of your forms take the original dimension of the tip or butt and multiply it by 1.72. Now reset the form, this will give the proper taper for the blank tip or butt. Place the section in the form and proceed to compress it with your thumb to remove any twist. Place a heavy bar of steel. I use 2 1/4x2" CRS bar tape together and place it on top of the blank. I check it every 1/2 hour for a few hours and rotate and fine tune each flat. If any twist persist placement of quick grip clamps allow you to lock the proper position in place while it dries. It is actually like placing the blank in a mold. The section comes out twist and kink free! Every time. (Adam Vigil) To keep the Epon from sticking to everything, wipe it down with white vinegar right out of the binder. Roll a 1/2" thick piece of plywood over the blank several times to get it straight, apply pressure with my thumb along each flat to remove any twist. Place in preset form and give it a couple strip with the ole thumb again and place the bar on top and walk away. I check it every 30 minutes or so and flip in the form. With Epon you have several hours to work with it. If there are any persistent twist I place a quick clamp at one end of the blank and take the twist out, then place another clamp at the other end of the twist. And reset the bar on the rest of the blank. The whole procedure takes minutes to do. Credit for this idea goes to Carol Connor of Canada. (Adam Vigil)
I was hoping for some advise. This is the first time it has happened but, I have a major twist in the butt section of a 45". The twist from one end to the other is a full flat. What do you guy's think, should I try to straighten it (I don't even know how that process works) or would it be easier to make a new section. (Doug Hall) Straighten it!! It's not too hard to do. Use the heat gun on the lowest setting. No gloves. Never get the section too hot to hold. Work on a small area. Get it warm, then over twist in the opposite direction and hold it till it cools. You should be able to accomplish the task in an hour or so. (Harry Boyd) If you can identify the beginning of the twist it will help you, too. Lay the blank down on a flat surface, and work your fingers down the topmost flat until the blank no longer jumps from side to side, or rocks, as it tries to twist. When you hit the spot it quits jumping, that's the beginning. Start heating from this spot, working your way out toward the end. Let's hope you don't have multiple twists. As Harry indicated, don't get carried away with the heat. It takes very little actual heat to do the job, but what you have to do is get it deep into the cane. This means you use low heat and it takes time. A good way to tell if it's too hot is to press it against your chin, below your lip. If it burns you then it's too hot. Of course, this is all academic, as I've never made a blank with a twist nor a bend. ;o) (Martin-Darrell) If you try to save it and screw it up, you are still ahead of the game. If you make a new section you have lost time if you could have straightened. Follow Harry's advice and go for it. (Ralph Moon) Before you get into heating and untwisting look to se if the twist is between the butt and the first guide, the stripping guide. if it is, the is no functional problem. if you decide to untwist, I would suggest you fire up your oven and when up to temperature I would place the blank in the oven for a couple of minutes and untwist it, gently. you need a buddy to help you. I have done it. I hate to do it. it won't take long in the oven for it to heat thru. good luck. (Timothy Troester)
I'm making my second bamboo rod and have a problem. I started sanding after gluing one of my tips and about two inches from the tip one of the flats didn't seat right. Looks like the binding thread caught it and twisted it about 15 degrees. Can I heat to break the glue bond and reglue? If so any suggestions would be most appreciated. (Dennis Aebersold) Do you have enough extra length in your blank to cut off the 2" problem area and shift the section down 2"? I'm only on my second rod, so I leave 5" on each end to fudge with. I know the experts on the list leave only an inch or two, but I'm not that sure of myself yet. I don't think you can unglue it and get it back together. Is the entire section twisted, or just one spline out of position? If the section is twisted you may be able to warm it with a heat gun and twist it back. If a spline is twisted your best bet may be to replane another set of splines if you can't shift the section to get rid of the problem. I used URAC glue. (Kurt Clement) I think you will have major problems trying to unglue. The advise to slide the section up so the twist is in the cutoff section is probably the best. Remember that you will also lose about 3/8" at the tip for the end guide and you can often finish the butt slightly short inside the reel seat if necessary. You then have a choice, one tip for a heavier line, I use a different color silk on the end guide of the designate the heavier tip, or (heresy here) you can sand down the tip to get the original dimensions. (This makes very little difference provided you are not removing more then about .008 and many of the famous rodmakers got their tapers this way). (Ian Kearney) The tip is a goner. URAC will debond only after the cane is a crispy critter. (AJ Thramer) I would just use as much of the bottom part of the blank as I could. I usually leave two inches at either end of the blank. This allows me four inches of adjustment in cutting the blank to size. The finished size of the blank may allow you to cut it off below the problem area. If not, you have three options. Start over or fill any voids and sand it into shape as is or heat it up and try to rewrap it back together. The later is kind of risky and I would do it only as a last resort. The second option would be my choice if the rod was for me and not a customer. (Jim Harris) Lesson learned is to leave more space on the end and triple check after gluing but it is worse than I first reported. The problem starts at the -guess what- node that is located 5" from the intended end of the rod. I gave myself 2" to work with so this is really 7" down the rod and I don't have that much at the butt. On spline is twisted up for about 3 inches with the adjacent spline tucked under and then goes back into place. One suggestion was fill it in with glue and try to sand it out so it looks half way decent. It will be a gift to my assistant and she might use it 3 times a year. Your thoughts, will it be so brittle that it will break. I suppose I can throw a dozen casts and give her a one tip rod if the sucker doesn't make it or be a real professional and keep it myself and start over. (Dennis Aebersold) If this is a gift, I would not let it go that way. A gift is shown around and someone will comment on it. It could reflect on the type of work you do. It bothers you now, I think it will bother you more later if you let it go. I would either let the rod go with one tip or make up another tip section. Keep that bad tip for yourself. Make a butt section from leftovers to go with it. This can be a rod that you don't worry about. Just make it to fish. Not too much of an answer but that is what I would do. (Tony Spezio) Try sanding whatever flat surfaces you have without over sanding the bamboo surfaces that might protrude, then do the best you can on the tucked spline. Tape some guides on it and put it through the rigors. If the displacement isn't too big and glue filled the interior displacements adequately, I bet it will hold together. What are the diameters at this point? Your first guide will be in this general area, and that will help with strength integrity and maybe cover up the worst of it. (Chris McDowell) Come on guys. I have done this and I just bit the bullet and tossed the sucker away. It is just like my fly tying. I cannot ever stop finishing a fly even though I know it is a toss away. I've had a dozen god tyers tell me to unwind and start over or just to chuck the thing. (Ralph Moon) It's just one section, and not even finished! It's just a piece of bamboo, not neuro-surgery on your first-born child. This is called paying your dues. If you don't mess up once in a while, you aren't going to learn! (Steve Weiss) A true measure of skill in any craft is not weather one makes mistakes, but how gracefully one recovers from them. This includes throwing bad tip sections in the burn pile with a full twisting back flip. (Jim Harris) I would not let the tip go. Make a new one and be proud of your finished work. Those gift rods do get shown around and you want that good image reflected on you. Keep for yourself and do what I did with one that didn't go my why when done. I just the tip section that I didn't like cut out the bad area and turned the tip section into a UL Spinning Rod then gave the new rod away. The new spin rod looks great cast wonderful and I got big smiles from the new owner. (Robert Holder) I would suggest you sand it flat, fill any gaps with epoxy, and put a thread wrap on it. If possible, hide it under a guide. I think you will be OK functionally (Tom Smithwick)
How do you hang glued up blanks AND how much straightening is required afterwards? (David Smith) I hang glued blanks in my drying cabinet. I have some plastic sleeving that works like Chinese handcuffs, and I slip this over the blank. I try to get the glued blanks so straight beforehand that I have to do little, if any, straightening afterwards. (Martin-Darrell) I recall a statement attributed to Wayne Cattanach "Straight is straight." There is no such thing as partly straight. Also, I have never really believed that hanging a weighted rod had any effect. Just my thoughts. I like to straighten the rod right out of the binder. and avoid any post gluing straightening. (Ralph Moon) I, too, do not believe that hanging a weight results in a straighter blank. The reason being that the strips need to slip against one another to be able to relieve the crooked condition. I tried encasing the blank full length with the mesh tubing, then hanging weights off the end. It didn't matter one whit the amount of weight I used. If there was a crook anywhere in the blank when you started, it was there when you finished. And, I agree: It's better to straighten in the string, and not later. (Martin-Darrell)
I started using a 6" long sanding block to remove the glue from blanks and have ended up with an undersized rod. The individual strips were right on. I thought that I quit sanding when the enamel was gone. Any thoughts on this? (Dennis Bertram) You obviously sanded into the power fibers. Try a steel block 3/4" X 1/2" x 2" long. Cut your sandpaper with a cheap pair of scissors. I think you will have better results with something like this. (John Long) You might want to try flat-filing the glue residue instead of sanding. I lay the blank flat on my bench and use a 6-inch mill bastard file. Hold the file parallel to the bench and at an angle of about 45 degrees to the length of the section. Now just move it lightly down the flat. Rotate one flat at a time. The glue flakes away because it is actually being cut off by the file rather than being rasped by sandpaper. You should not be able to measure a loss of cane at all if you wiped the section fairly clean after the glue-up. The biggest advantages of filing over sanding are that you can protect the corners perfectly, while also removing only the very thinnest film of material. And, speaking of protecting the corners, when you DO sand, try laying a full sheet of paper, back down, on your bench and pushing the rod section back and forth across it, as you would move a pool cue. Hold the section flat down with the finger and thumb of your other hand. I use only 400 grit paper for this. Easy does it, with long strokes. And be especially careful on the tip sections. (Bill Harms) Thanks for the idea of using a file to remove the glue. I'm going to try it. My practice has been to scrape and/or sand the enamel just before final planing as I want to get a flat surface rather than a arc to fit against the form. However after removing the string and sanding off the glue residue, I still see what looks like patches of enamel in random places along the flats. It almost looks like there was a slight hollow and therefore the enamel was not removed via sanding. Hence my choice of a 6" sanding block to keep from hollowing, which of course got me in trouble with an undersized blank. I guess the real question is: How do I get rid of the dull random patches, or better yet what causes them in the first place? Very rarely are them near a node. (Dennis Bertram) Just read your email again and noticed that you said you "quit sanding when the enamel was gone." I think it is a far better practice to scrape or file the enamel prior to planing away the last few thousandths of your strips. You don't want the final measurements of your strips to be based on some compensating factor that "allows" for the thickness of the enamel. Get rid of that stuff so that your final measurements will be dead on before you glue. Then wipe the excess glue from the string so that you will have only the thinnest film to file away later. (Bill Harms)
Something I have done but never heard any comments on is the following. I use Titebond II glue and I wipe off any excess before glue dries. I pull the string off and then I use stripper (same stuff that removes varnish) . I then scrape down to enamel with a soft plastic card (like a thin credit card). The glue comes off and it is easier to see the enamel for sanding and scraping. Works for me. (Rex Tutor) I use URAC glue and wet wipe as best I can after binding. After string removal, the best thing I have tried for scraping is the side (non-cutting edge) of my plane blade. It is also easy to touch up with a file and get a bit of a burl on the edge. I scrape until the enamel is almost gone then lightly sand with 220 grit then 400 grit using a small piece of steel for a sanding block. Haven't had any problems avoiding corners or oversanding. (John Long) What is the reason for leaving enamel on a rod, to be scraped or sanded off AFTER the rod has been built? This, I don't understand. (Bill Harms) Someone once told me that the enamel acts as a "release agent" to make removing the glue easier. I remove all enamel EXCEPT for a very thin haze before final planing. This I leave until after glue up. It also helps keep you from removing the power fibers when removing the glue. (Marty DeSapio)
Does anybody have any nice straightening techniques to help with straightening the blanks after it is sanded. I was a sheet metal mech for a while and I was always good at taking a warped sheet of metal and benching it flat but I am having a hard time getting the blanks straight. Any help would be appreciated. (Bob Venneri) I have a flat work table that I put the blank on and roll it, looking at the light coming under the blank. When I find a high spot I make an 'X' on the apex with a pencil or white china marker. I mark all the high spots. Then I heat the blank over a heat gun and straighten it by gently bending it until it is straight. I sight along the blank with good light and a dark background from each end to see how I'm doing. I cuss much and mightily. I burn my fingers and cuss with greater enthusiasm. My wife yells at me that I'm causing permanent harm to the children's psyche. I mumble that they should skip the intermediary steps and try to straighten this damn blank if she wants to see psyche damage. Then I go back to work. Marking. Heating. Straightening. Sighting. Cussing. Mumbling. Lots of mumbling... (Brian Creek) In my experience, this is an integral part of rodmaking, without which proper rods cannot be made. Don't reserve it for just straightening duties, as you're selling yourself short. Learning to effortlessly vituperate with a lengthy, invective stream of expletives adds to the ebb and flow of rodmaking, bringing with it a new dimensional experience. I'm out in the country, and yet each of the neighbors is well versed in the proper vocabulary for rodmaking. What a service I've performed for them! Rodmakers, we bring good things to life. (Martin-Darrell) I place my sections into the opened planning form and after making sure they are setting straight place socks full of bb shot on them for 24 hours. Then I treat the final tweaking with a stream of hot air and expletives. The wife goes up to the third floor and gets out the ear plugs and locks the doors. (Jim Tefft) Straightening starts with gluing. I have an old planing form that was overcut and is suitable only for planing salt water trolling rods, so its been dedicated to being a bench support for holding sections when sanding, scraping or GLUING. You can get the same effect by opening up your planing form. Right out of the binder I place the section in this form and wipe the section firmly with a damp rag to seat it snugly in place. I rotate the section one flat and wipe again, repeat, repeat again, until all six flats have been wiped. At this point the section should be fairly flat and straight in the form. I now pass my heat gun over the section a dozen times or so, rotating the section as I do this. This partially sets the glue up while the section is seated in the form, and the section is straight, rigid and firm enough to now transfer to my oven. The sections are now heat set at a @250 degrees F. setting allowed to cool to room temperature. The sections come out quite straight, but still need a little bit of "tweaking" to "perfect ??" straightness. (Ted Knott) You are certainly right. I couldn't find the weight I usually use to set binder tension once and just guessed at the tension. Was way to tight and ended up with almost a spiral rod. Howells' book has a pretty good discussion of gluing and straightening. (Brian Creek) For tip and thin mid section, clothes iron is a good straightener. Place a section on a flat wood bar and run a hot iron on six flats slowly. It works great especially for straightening twist. Japanese traditional method of straightening doglegs, "Tamegi" is also a neat tool. To make this, prepare a wood piece with 1"x1"x1' (length), and make a groove on it with 45 degree angle against the side of the wood, at about 2~3" apart to the end. Please see below picture. / / is the groove, though the angle of groove is opposite if you are right handed. (there is no reverse character on my keyboard). Depth of the groove is about a half of the wood width. ------------------- Width of the groove should hold the thickness of blanks. So you may need three width's of groove, for butt, mid and tip. For tip, the length of wood piece will do in your palm size. Heat the blank at a dogleg, put the part in a groove and make a lever action to unbend. For slow and long bend, heat the length of bend and move the lever as if you polish out the bend. You can do it by looking the blank through against the light of window. (Max Satoh) The very best way to ensure that your rods are straight is to use an epoxy glue. The epoxy will give you all the time you need to just about get the rod perfect before the rod sets up. I use Epon because it's easy to use but Nyatex also will give you all the time you'll need to get the blank straight. Actually Nyatex will give you even more time then the Epon although Epon will give you a couple of hours working time which should be plenty. With Epon you don't have to rebind or heat cure (some guys don't) and the straightening is easier then with Nyatex. I used URAC for the first dozen rods I made and it was pure hell. Since changing to Epon I feel like I died and went to heaven. As to the straightening of the blank, I use a toaster for heat and a 4 ft rule and my wrist watch for a sense of timing to straighten the blank. It's slightly slower but after ruining a blank with a heat gun I like the toaster much better. Cussin does help. (Jim Bureau) I am also using Epon and happy with it. I'm rebinding the blanks after wiping out the excess on the surface by vinegar about 6 to 8 hours after glue. Do you mean that you can straighten the blanks at the time of wiping out, and no need to rebind? I am threatened to try to straighten while no binding threads are holding the strips. If I can straighten the blank at that time and the blank will not delaminated, it is great. Could you give me a little more explanation? (Max Satoh) After I bind the blank I immediately clean the bound rod with vinegar. About forty five minutes to one hour later, after the blank has had time to get slightly set up I straighten the blank which is still in the binding string. After the straightening I hang the blank, still in the binding string, for about 12 hours. Then I remove the binding string and sand the remaining glue off the blank. The glue sands off easily but is slightly gummy. I usually do any final straightening a day or two later on as I'm sick of it all by this time, cussin included. (Jim Bureau) My heat gun flamed out in a most spectacular way, I guess it was just it's way of swearing but this being my second flame out I decided to try an alcohol lamp and I have to say I like it better for all straightening except for those sweeping curves and even then it's not that bad. (Tony Young) I scrape the blank and then straighten prior to sanding. First I take out the twists from the butt to the tip, then I mark the butt end of the section with an 'A', 'B' & 'C' on adjacent flats. I then straighten them from the butt to the tip in order. After that I let the section cool as I am doing the usually other 3 sections. Following the cooling off period (usually the blank but sometimes) I straighten the blank again to take out any kinks that were reintroduced or simply popped back due to insufficient heat. Done! Sometimes 5 minutes, sometimes 45 but usually 10 or 20 minutes will do it. If a section becomes too trying I will put it down and go on to the next. Since withdrawing from society to become a rodmaker I find I use the more colorful invectives in the English language only rarely. At that only a 'bloody damn thing' once in a while. (AJ Thramer)
Is it absolutely necessary to rebind the blank before heat treating blanks glued up with Epon. This last blank, I took out of the string 24 hours later and popped in the oven for 2 hours at 200 degrees. Everyone talks of rebinding but the Epon seemed pretty well set up after 24 hours. Am I missing something or tempting disaster? (Tim Wilhelm) I don't know if it is absolutely necessary, I do rebind. Here is my reason. I had a blank that I glued up with Epon. When cleaning it up after 20 hours of hanging I noticed two small glue lines. I re- bound the stick pretty tight and heat set. When I took the sticks out of the oven the glue lines were gone and there was a fine line of hard glue where the glue lines were. This tells me that the strips can move while heat setting. If for no other reason, I do rebind the sticks. (Tony Spezio) I was in a hurry and didn't rebind my last rod butt section. I did the usual 18 hours wait before scraping off the glue then I hug the rod in my heat tube for further drying. Well it now has a big bow in it that wasn't there when I glued it. From now on I will rebind. (Mark Dyba) I rebind as well... or rather I was rebinding, but now I don't bother to take the binding thread off until the Epon is cured. On my first use of Epon I left a small bit of leftover epoxy in the mixing cup. I noticed that after 24 hours the residue was still somewhat soft... I could dig my fingernail into the Epon. (Quite the experiment, don't you think?) I reasoned that if the Epon was still somewhat malleable, then the strips could shift around. I am as concerned for the bonding as I am for the straightness of the blank... (my first few rods were not very straight) so I now leave the sections bound up for about 4 days. I used to removed the thread after 24 hours, clean, and rebind. I don't do that anymore, I just wipe the blank with vinegar a couple times immediately after it's been glued and bound. I don't heat set the Epon, either. I wait 4 days, then remove the thread then sand off the residue. (Eric Koehler) I use Nyatex, and do not rebind. However, I am pretty careful about when I take off the string. I check after exactly 24 hours, and leave it on if things don't feel "set". It the string comes off without difficulty, I then check every three hours or so until it is time. I have never had a delamination, and my rods are fished hard. Of course, I have to glue up very early on both a Saturday and Sunday morning for this to work. (Jeff Schaeffer) Sounds risky to me, cleaning a blank before the adhesive has cured. Seems like the pressure applied for scraping the excess glue off of the blank could push it out of shape. I don't rebind nor do I risk using vinegar to wipe off the excess. I'm too accident prone for that! I very carefully wipe off the excess right after binding. I mean very carefully! I'm probably the only one that can snap off the very tip end of a rod section (tip section), trying to wipe it down. I then lay it on a paper covered bench top and wipe it down clean with a clean soft cloth. I have very little trouble pulling the binding cord off, after heat setting the adhesive. There's very little left to sand off. And it seems to stay a lot straighter. (David Dziadosz) I can only speak to my own experience, so the one and only time that I did not rebind, despite being advised against it by Harry Boyd, the blank split at the seams in several places. Also, I have noticed, and it was Harry who first pointed it out to me, a weeping of the adhesive at the seams. Despite the blank having been cleaned of all excess adhesive, then rebound, I have noticed, on several occasions, traces of adhesive. No, I'll rebind, thank you. (Martin-Darrell)
I'm looking for ideas on straightening after glue-up without using a planing form (have a handmill). Any interesting jigs/setups? Photos of same would be real helpful. I'm familiar with whacking and rolling to get the blank straight but was wondering what variety of things people do to keep it straight while the glue sets up. (Bill Walters) I use a variety of techniques but when push comes to shove, I use a clothes iron on a flat work bench. (Rex Tutor) The only thing I really do, is hang from the tips, and hang weight off the bottom. Try and make sure your hang strings allow straight down hanging, & symmetrical pulling by the weight. (Jerry Andrews)
Harry Boyd wrote that after gluing and binding he cleaned the blank with white vinegar. In the morning he removed the string cleaned the blanks once more completely with vinegar and rebound them. After heat setting the glue the string comes off and the blank is clean and ready for a final light sanding. I have just completed 4 rods for my grandsons and used this method on all of them. I have been watching the list to see comments from others regarding this technique. No one has commented. The idea of eliminating the sanding away of the glue overcame my fear of the vinegar seeping into the glue joints and ruining the blanks. The 4 rods came out without any glue lines so apparently my fears were unfounded. I've talked to Harry and he has used this method on quite a number of rods with no ill effects. Anyone out there been using this method? (Dave Norling) I reread this post from March 17, 2000, and decided to give it a try finally. Apparently Harry has been using this technique for years (assuming he still uses Nyatex) and passed this info to Dave Norling who at the time of his writing../ 2000 had tried it on four or five rods. I want to tell you it WORKS! While I did NOT follow directions and wipe after glue up, I did remove the string after about 24 hours, wipe down and rebind. After heat setting the Nyatex for the typical 3 hours at 235 degrees F the string simply peeled off and the remaining glue on the blank simply sanded off, no filing of string and glue. A single tip took me about 20 minutes to sand and oil! It usually takes me 8 hours to sand and tung oil a 2/2 rod blank! An overall savings of 7 hours! Labor! (Mike Shay) Though I only passed along what someone else told me, you're more than welcome. By the way, it works just as well with Epon as with Nyatex. I've used Epon for several years now. (Harry Boyd) This list is really something. After monitoring it for a couple years or so literally EVERYTHING I do has changed. The vinegar on the glue tip is a classic. How can you beat saving 6 or 7 hours of time on a rod. (Dave Norling) I do the Nyatex a little different but along the same lines. I bind and soft set using a hair dryer blowing over the blanks in a copper pipe for 30 minutes. Then I remove binding thread and scrape the blanks with a box scraper to get the extra Nyatex off. The sanding is then on the bamboo not the the rock hard Nyatex wondering where the tips are. Then I rebind and heat set in the regular way. I have used this method and the vinegar way for several years and it is light years ahead of just letting the Nyatex set up all the way in a big round glob. We in the Great Smoky Mountain area built a rod in a day several months ago and used this method for gluing There are only so many options when you want to build a rod in under 24 hours. (David Ray)
I'm getting the oven warmed up to heat set a glued up rod. I was going through my notes for time/temps. Wayne has in his book 235°F for 3 hours, the info that came with the adhesive says 300°F for 3 to 15 minutes Is the hotter shorter time for a different application other than rod making? With these two figures, can time/temps be altered proportionally? (David Dziadosz) The temp only serves to drive the reaction, acting as a catalyst. The reaction will occur at normal temps, but besides taking longer, also results in a bond with less covalent bonding, thus rendering lesser strength to the bond. The recommended temp from Nyatex seems too hot to me, as the higher temps do cause dimensional shift in the cane. I've seen straight blanks go crooked, and gaps open along glue lines, for no other discernible reason other than the temp. Haven't had those problems since I lowered the temp, and I was using 200°, though doubtless the drying cabinet was hotter than that. I now prefer 185°F, and no problems. (Martin-Darrell) Here is where differing opinions come into play - the Nyatex glue is used for a lot of applications - the friend that lead me to it is a plastics manufacturer - he makes the window seals on most American cars - his use of the glue is to adhere the flocking (fussy stuff) onto plastic - and he does it on the run so to say - the light tunnel that he uses reaches some 300 degrees and cures the glue in the length of a 75' distance - but understand some issues - the glue is only insulated by the thickness of the flocking - So when I started using the glue on fly rods - I did some mathematics on the distance to core of the largest cross section of rod I figured that I would be using the glue on - .375 across the flats - using a U value similar to maple lumber - the values can be obtained from the Wisconsin lumber research lab - with this information at hand and using the drying time line from Bill at Nyatex - I came up with what I thought was a reasonable combination - that mixture of low enough heat not to damage the cane - one that was just high enough to cook out any lingering moisture and times long enough to heat to the core of the matrix - initially I tried samples of different time/temps - and what resulted was one that a) fit the lifestyle that I made rods - and b) gave me what I tested (as crude as that was) to yield the best results. The tests were - HDT - Heat Deflection Temperatures - and Apparent strength - the HDT can be tested with an oven - gradually increasing temperatures until glue failure - I saw this - air cure HDT 135 degrees - the 16 - 24 hour air with 3 hours 235 degrees - yielded a HDT 195 degrees - Strength wise - I saw what I felt was about a 25 % increase in yield - but remember - all tests were conducted with the lab equipment I had readily available in a tool kinda guy's basement - a vice and a Snap On Torque wrench with adaptations - the explanation I have for the increase in strength is that the molecules are 'Cross Linked" or aligned by the heat - as I illustrated with the magnet and iron filing example - so that explains that - now where did the 16 hour air drying come from - well - if I glue rod parts just before bedtime - it is about 16 hours by the time I would get home from work - and if I then put them in the oven - in about 3 hours I had time to settle in for the evening - spend time with the wife and kids - and then they would be ready to continue - See part Rocket Science - part connivence - Right or Wrong there is where it came from - Hey - remember to have fun with this stuff . . .(Wayne Cattanach) I have talked to Nyatex on a few occasions about this and they told me there that the 235 temp was fine for curing the glue for bamboo. I also was told by them that there IS NO shelf life problems with Nyatex as well. (Bret Reiter)
Hal Bacon, thanks for the sketch of the glue-up stretcher, this looks interesting. I would like to possibly try this. Do you put 15# of tension on the braided nylon casing then heat cure? And your blanks come out kink and twist free? Do you do any twisting or bending to the blank before putting it in the stretcher? The stretcher seems like it would have the same effect as hanging a weight on the end of the blank while it dries. Seems like those that use the weight hanging method have had limited success. I have placed a blank section in my steel forms to dry, using a spring clamp at each 5” section. The blank comes out twist free but the bends remain. Is the stretcher really that much more effective than these other methods? (Kyle Druey) I've applied my dim powers of reasoning to the problem of getting a straight section out of glue-up, and here is what I've concluded. 1. INDIVIDUAL SPLINES MUST BE STRAIGHT TO BEGIN WITH. If you have a crooked spline, no amount of tension while the glue sets will make it straight once the tension is off. 2. What works for others might not work for me (or you). 3. Rolling the section with a hard rubber roller, ala Howell's book, is a good way to make the splines nest together. 4. A perfectly straight section laying on the bench may get bent just by picking it up to to hang it. It think is more of a problem for slow setting "slippery" glues like Epon than for tacky glues like Resorcinol. 5. Laying a straight section in the groove of your planing form and clamping/weighting it will work, but unless you have several planing forms you can only do one section at a time. My current solution, which is still evolving, is a horizontal "rack" made of a 2x4, a screen-door spring and a couple ball bearing swivels. After a real cursory hand untwisting & straightening, the rod section is "put on the rack" and stretched by the spring as it lays on the 2x4, and I check for twist then roll with the roller, rotate and roll some more, all under tension. I use resorcinol and have to work pretty fast. But its all done in 5 minutes and I'm on to the next section. (Frank Stetzer, Hexrod, Taper Archive, Rodmakers Archive) I was thinking the same thing Frank says in #1 about the splines needing to be straight going into the glue up process, since straightening bamboo whether in spline form or blank form requires heating then over-bending, to get it to rebound back to the point of straight. When planing or milling, a strip rides into the groove or template as the plane passes over or the roller guide directs its path into the cutters, so we may or may not worry about whether the sweeps in a strip are straight before glue up. It's optional. 2x2x2 or 3x3 node spacing might be advantageous in that sweeps are usually somewhat consistent in adjacently split strips so when bound together you might assume the pressures would work to offset each other and arrive somewhere in the area of a straighter blank. I know that doesn't always happen, but it sounds good in theory if you were wanting to promote 2x2x2 or 3x3 node spacing. Maybe this is one more reason so many rod companies used 3x3, to reduce the amount of final straightening. (Chris McDowell) I think this is more of a theory. I've not used other node spacings to confirm that 3x3 is advantageous for the reasons I stated. I'm just speculating. If the sweeps were not in plane with the enamel side of the strip but actually tailing off right or left, then 3x3 might actually lead to a twist in the blank rather than a straighter blank. I don't really know, I was just guessing. (Chris McDowell)
Has anybody actually used a couple of Jacob's chucks with weight on the bottom chuck to hang a freshly glued blank vertically to cure straight? (Tony Young) I bought a few chucks to see about making a rod "stretcher", never got around to it yet. Jo Jo and I did a lot of discussion on it. As far as hanging weights, I have had good and not so good results. I think when I had good results it was because I had the blank good and straight. When I had so so results is because I did not get the blank as straight as I thought. I did not use a chuck to hang the weight. Just made a loop with the binding cord that came off one side and up the other side so that equal weight would be on the tip. Put a cup hook in a plumbers lead stick and hang it in the loop. Give it a try, you have nothing to loose. (Tony Spezio) I think you'd need to have things reasonably straight to begin with else the splines would have to move too much to allow the blank to cure straight. The reason I thought the chuck may be better than a loop or string is it shouldn't develop a long graceful curve along the length as sometimes happens with loops. You're right though, I'll try it and see. (Tony Young) I've hung rod sections with 15 pounds on them, doesn't help a bit, and don't ask me why not, I haven't a clue. All logic points to the sections coming out straight as an arrow, but it doesn't work that way. (John Channer) As Tony Spezio said, he and I have discussed it all before, as have you and I, John. I've gone as high as 25 lb. on each section and it didn't make one whit of difference. I believe this is because the strips cannot slip against one another, being bound at both ends, or within a sleeve of some kind. (Martin-Darrell)
I just finished removing the dried glue from a blank using a Brownells curl scraper. Looks like a chisel with a 90 degree bend in the handle. It worked better than I ever could have imagined. The time savings was scary. One or two passes and the blank was ready for sanding. I was concerned about not having control, or having it take off too much material, but it would actually just slip along the surface and take off only the glue. Much cheaper than a scraper plane. Part number 080-076-500 at their web site. No financial interest, but when I sent the wrong payment with my last order they sent the stuff anyway with a politely worded request that I send them the balance due within a month. They seem like excellent folks to do business with. (Jeff Schaeffer)
I just completed Hal Bacon's straightening jig with rope stretch and pulley's. Wow, Hal didn't warn me what a task it is to get the rod section up the inside of the rope. It took me 25 minutes and I had my wife helping me too. About every inch the tip end would get caught up in the nylon and I would have to back off , then I couldn't get the rope to slide down the rod shaft. It just stuck there like a thumb screw. I finally made it, but if that would have been a tip section I would have broken it four times over. (Mark Dyba) If this is the method with the braided poly rope that was in Best of the Planing Form, the article mentioned using a glass or graphite rod section to feed the tip into the rope. Just a thought. (John Channer)
With the caveat that I am new to bamboo rod building, I thought I would throw out (up) the technique I used to glue up a very straight (with one exception, see below) first rod. (I used Gorilla PU glue.) I simply took a piece of straight 1" angle iron and set the freshly glued, bound section in the "V," sandwiched between two pieces of wax paper. I was careful to get the twists out first. For the butt and one tip, I used a 1"x1"x48" piece of hard-core foam insulation to put a bit of pressure down onto the section to push it flat. I put pressure on the foam using spring clamps all along the length. On that tip, there is a slight bend where (from the impression on the foam) it is apparent the tip wasn't perfectly in the corner of the "V". For the second tip, instead of the foam, I set a second piece of angle iron on top, it allowed me to shine a light down between the two pieces to visualize the section to ensure straightness and placement, and used a thin, stainless ruler to gently push the section into the corner along it's length. I then used the spring clamps to apply pressure. I also did NOT use the wax paper. This tip is is straight as an arrow. The problem with the first tip, I think, given the resulting impression in the foam, was that I didn't first crease the wax paper but (stupidly) simply allowed to find it's own spot in the "V" when the pressure was applied. On the second tip, I didn't use the wax paper and could visualize the piece along it's entire length. It was also apparent that you need to align the top piece of angle iron with the tip of the rod so that there is no space between the ends to achieve equal pressure along the length of the section. Otherwise, if the tip of the rod, for example, is several inches down the iron, you get little pressure on the tip and it wasn't held fully down. It takes only a few seconds to set it in, visualize the placement and ensure the straightness. (David Smith)
What was said earlier about glue lines made sense. I suppose it is possible that the glue is so completely absorbed by the bamboo that we have effectively have bamboo on bamboo. Perhaps especially so with very thin glues. But I don't think that's the case with the Epon, Nyatex, or Polyurethane glues I have used. I've looked quite a bit at sawed off bamboo sections from the over length butt ends. Under magnification the glue seams are obvious in cross section, even when no glue seam can be seen when looking at the rod section normally. ________________ ___ How large those seams are, or how much we should allow in setting our forms is another question. Might it depend on which glue we use? How much binding pressure? Heat set or not? Temperature and humidity? (Harry Boyd) It might be a matter of what glue you use, but still it seems to me no matter how thick a glue is if it isn't setting up as you bind it should get squeezed out and allow the bamboo to bamboo contact if your splines originally fit together without a gap. I also use polyurethane glue sometimes. Binding pressure might be the determining factor - hard to say since there is no way to measure how much binding pressure I use as compared to how much you use. I bind with monofilament fishing line and try to get a little stretch on the line as I bind. Maybe glue lines are in the eyes of the beholder... Let me ask this - when you go into a fly fishing store that sells bamboo rods do you see glue lines in the new bamboo rods? Orvis, Thomas & Thomas, Winston? (Darryl Hayashida)
I find one of the sort of tricky bits of rod finishing is maintaining a sharp hexagonal section through all the steps of varnishing, sanding, and polishing. It is just so easy to lose the sharp corners. I made myself a wooden jig/tool to hold sandpaper and cloth to make the job easier, and it worked pretty well. Much smaller and firmer and more rigid than the hard rubber sanding blocks. But I was at the local upholsterer's shop a couple of weeks ago, and there he had a bloody great box of leather offcuts that he was about to throw out; so I bummed a stack from him. I cut some to size to fit the jig, and mounted a piece pretty tight, with the nap side facing out. Then I just dipped the leather into whatever polishing compound I was using at the time (tung oil and Tripoli, Perfect-It, or Finesse-It) and went on with the polishing. I marked each strip with the compound used on it so as not to get them mixed up; I would reckon that I will reuse each piece dozens of times before it wears out, and the nap leather holds the compound really well. Just a thing that worked really well for me, and thought I'd share it. (Peter McKean)
I'm not satisfied with the straightness of my rods after gluing. Has anyone tried to design a form in which to place the rod while it dries? I thought about using a piece of aluminum angle. Place a layer of waxed paper over the inside corner (groove) of the angle, place the glued and bound rod on the paper, cover with another piece of waxed paper, and then weight the rod down with just enough sand to hold it snugly in the corner of the aluminum angle. Not so much sand as to move the glued strips apart and create glue lines, just enough to hold the rod against the aluminum angle. This would only work perfectly with a straight taper (in which the diameter of the rod decreased at a constant rate). Would the error imparted by "forcing" the rod to dry against a straight taper be more noticeable than small kinks and curves in the rod? The error would probably be noticed on a swelled butt, but would it be noticeable in mids and tips? What it you held the drying rod against a planing form covered with waxed paper, so that the form reflected the true taper? Surely many of you have thought through this (discussed this?) before...? (Greg Peters) To straighten glued up sections, I GENTLY heat the bend or twist over a heat gun on LOW setting, continually rotating and moving the section to avoid a localized hot spot. I use a glove on one hand, and keep the other hand bare. I use my bare hand to gauge the temperature of the section – it should be hot, but not too hot to hold. While heating and checking the temp, I frequently gently bend or twist the section (depending on what I’m trying to accomplish) to attempt to correct the bend/twist. Tips take very little heat to bend, so be very careful. Butts take more, but usually less than you’d expect. (Chris Obuchowski) Chris has it right, but one thing that you should understand, is that the process I should be only over a very short length of the rod. That is straighten two or three inches, resight the section and move on a few more inches. Trying to straighten a long curve by see sawing the section over the whole length is very counter productive. It is a slow repeat slow process. I have taken over an hour to do just one section Practice!!!!! (Ralph Moon) The most useful post I ever saw on straightening tips was a while back, regarding using a clothes iron on the "cotton" setting. Do it on a flat surface (like a planing form) and it works miracles. (Chris Obuchowski) If I recall, Wayne Maca in Twin Bridges had some contraption for vacuum packing his blanks straight. I did not see it when I was in his shop, I was probably busy drinking the beers that we were cracking at 11 am. Anyway, What if you had a shallow groove in that sticky UHWD (sp?) plastic stuff. Bind the blank as usual. Vacuum seal the blank flat down into the groove. Is there a viable way to do this? I know nothing about vacuum sealing or its capabilities. Maybe Robert Kope saw the set up? (Bob Maulucci) Vacuum clamping is pretty straight forward. Just a heavy plastic bag and a vacuum source. There are a couple of sites out there with instructions for making your own bag. I don't have them bookmarked, but I have to believe a search would turn them up. I have used a vacuum to hold wood pieces while they are being worked, but I have never had occasion to need a vacuum clamp. (Larry Blan) We use vacuum pressing in the shop to glue up curved mill work, it is wonderful what one can do with this tool. I still have not made a rod yet, but can see the possibilities. Our pump came from Veneer Systems. It was quite expensive. To make rods as a hobby I don't think I would spend money on such a tool, lucky for me though I have one I can use when ever i want. Like Larry said, there are lots of sites about vacuum clamping. It can be done on the cheep. (Daniel Durocher) HVAC evacuating vacuum pumps can be picked up cheaply on Ebay. Most of the good ones are fairly expensive if you buy them new. Hmmm.... Lots of glues on the site that Daniel listed. PVA's, catalysed PVA's, Melamine, and a couple of Urea's. (Larry Blan) You recall correctly that Wayne used a vacuum to clamp his blanks, but I don't recall his setup either. Regardless, it is not a difficult thing to do. There are a number of methods used to hold blanks straight while they cure: I seem to recall that Winston hangs weights on them, a number of list members have clamped them to forms, Ray Gould's book has photos of a pretty slick binder developed by Jack Byrd that binds and holds rod sections straight inside lengths of hollow braided polypropylene rope under tension, and I'm sure a search of the archives would yield other methods as well. I prefer to simply bind the sections straight and hang them up to dry. (Robert Kope) What I do most of the times is protect my regular planing forms with masking tape, pressing it in the groove, and placing my rod in the forms. I don't use sand to hold them down, but masking tape over the rod and secures to the sides of the forms. Makes nice and straight rods most of the times. (Geert Poorteman) Lotsa guys increase the taper in their forms to accommodate the glued sections, and do just as you have suggested. I've never given it a serious try, but some guys swear by it. Perhaps it would be prudent to learn to straighten glued sections. Don't wear gloves, and never let the bamboo get too hot to hold. It's a little like splitting bamboo well. Once you learn how, you're amazed at how simple it really is. (Harry Boyd) What I do to help straighten sections after glue is hang with a weight. I tie a loop to each end on opposing flats and hang an old cast iron flat iron from the other end until the glue has dried. I also did this on my last rod for heat treating, the strips were perfectly straight and laid out flat in the planing forms. (Pete Van Schaack)
How straight should I expect my blanks to be? Most graphite blanks are far from straight and I wonder how much time and effort I'm wasting ATTEMPTING to get my blanks straight? Also on my next glue up I've thought about laying the wet blank in my 1st form attempt. I thought that I could lay down a layer of Vaseline on the form then place a board on top of the blank. Any reason this would bugger anything? (Lee Orr) After glue up I lay my rod section in the form covered by wax paper. I put another layer of paper on top and cover the rod section with old stocking filled with a little sand. (Mark Dyba) I'm only speculating here, your idea sounds reasonable to me, but instead of Vaseline, why not wrap the blank in some sort of food grade plastic wrap. This way you would avoid a messy clean up and prevent Vaseline from contaminating your blank and making it hard to finish. (Doug Brooke) I agree, Vaseline can be hard to remove so it doesn't contaminate the finish. Messy stuff. I'd just lay plastic wrap on the form and put the blank on top. Open it up a bit so the blank fits down in a way to keep it straight side to side, and tape or weight it to keep it straight up and down. (Neil Savage) I seem to recall Wayne saying that if it is not straight it is not straight. It is sort of like being half pregnant. No way!! either you are or you are not. (Ralph Moon) Has anyone thought of a commercial venture for making fixtures to place the glued sections into for heat treating like the strip fixtures. (Dennis Aebersold) I made up a couple from 5' lengths of red oak. I ran them over a 60 degree router bit on a router table. Used them when I was gluing up with Elmer's. Now I use MD's Fixtures. These boards are easy enough to make. The first ones I made were a straight 60 degree groove. I made a set for a friend that had 60 degree tapered grooves. The router table was set up with a 10' 1X6 clamped to the top of the router table. In the center 1" from the edge of the 1X6 was a hole for the router bit. The fence sat against the 1X6. The board that the groove was to be cut had a 1/8" shim glued on one end and a 1/16" shim glued in the middle. This gives you the .001 per 1" taper. Using a feather board to hold the wood to be grooved against the fence, feed the wood through the router bit. The end with the 1/8" shim will be the shallow end and the other end will be the deep end. The router bit is set for the depth that you want. The taper is formed by the shims riding on top of the 1X6. If your groove board is wide enough, several grooves can be made by moving the fence away from the router bit. (Tony Spezio) For those of you who have visited some of the commercial shops; how do they straighten their rods? I can't imagine them taking the time to straighten each section by hand. (Mark Dyba) Winston hangs their glued up blanks in a drying cabinet. On the ends they place weights. (Joe Byrd) I guess that we must abide by the old adage that "straight is straight." However, I find that once you put the guides on it is easier to make the rods appear straighter than they really are. What glue are you using? (Bob Maulucci) I've used gorilla glue so far, just because it was readily available. My binder worked fine, but I don't have cradles (next project), and working time is not an issue. The straightness issue came after I rolled the blank on my work bench. I then tried straightening the blank by sighting down it, made it worse. The more I screwed with it the less progress I made. It became obvious that it wasn't an efficient or effective way to get the blank straight. Trying to straighten by hand just seems to move the bow to another part of the blank. Uniform pressure would have to be the way to go. (Lee Orr) It should work, but I usually put on a strip of masking tape. I push it in the 'V' between the forms to protect them against the glue. I also put strips of masking tape on the rod to hold it down firmly. Do not put too much tension on the tape you apply to hold the blank in the forms. I don't know but i think it might squeeze it out of shape. Put the tape from one upright side of the form over the rod till the other side of the form and tighten a bit. Make pretty straight blanks for me. I don't do much straightening. (Geert Poorteman)
Some one suggested using a plane style scraper for glue removal. It works great. For years I've used a hollow-ground bearing scraper. Worked OK - but a Lie-Nielsen just takes the work out of the job. I don't recall who suggested it, but tis a great idea. (Don Anderson) God bless George Barnes and the card scraper! (Darrol Groth)
I've just completed my first rod glue-up using epoxy. My problem is there is a slight bend (~1/8 in.) in the last 12 inches of the thin end of the tip section and also a slight bow in the butt section. Unfortunately, I've heat tempered the epoxy already. When I tried bending a test section I made up using a heat gun, I could not create a permanent bend. I tried heating more and more until the epoxy finally gave up. Needless to say, I'm reluctant to try this approach on my rod. Any suggestions? Is 1/8 inch insignificant to performance and just an aesthetic issue? (Al Baldauski) If you continue to use epoxy on future rods, sooner or later you'll have to learn to straighten. Try less heat and longer exposures. Also, be sure to hold an inverse bend for several seconds, allowing the rod section to cool considerably before releasing. (Harry Boyd) Next time, don't use epoxy. Since you talk about "heat tempering" the epoxy, it sounds like you used Nyatex. Several years ago somebody did a test of heat resistance with several glues and Nyatex fared the worst. Unfortunately, the results of that test were posted to the list about 2 days after I ordered some Nyatex. My recollection is that Epon had pretty good heat resistance. I never opened my cans of epoxy and have only used resorcinol and polyurethane glues. I've never had a problem with glue failure because of heat straightening, and I have had to do some pretty serious straightening when I was binding by hand. (Robert Kope) It is also not a bad idea to iron the splines before gluing up. Having them straight to start with helps! (Geert Poorteman)
Does anyone have a tip for sanding the very end of tips? I am always afraid of rounding my corners. (Scott Wolfe) I have a long hard rubber sanding block that I use for sanding the flats, yes it came from Harbor Freight. The tip section is laid on a flat surface on one of the flats. With a spring clamp the butt end of the tip section is clamped to the flat surface (an oak board clamped to the work bench). This keeps the flat side from rolling. It will also show a twist if there is one. The sanding block with whatever grit you prefer, is passed on the flat only in one direction, that being from butt to tip. Be sure you pass over the tip and away from it before lifting the sanding block. This will keep you from catching the tip with the back of the block. When you are satisfied with that flat, turn the section to the next flat and next till the section is all sanded. (Tony Spezio) I had assumed the tip section is glued up and not a single strip. A single strip is done in the planing form. If you are trying to remove glue, scrape the flat with a single edge razor blade before sanding. Makes life a lot easier. (Tony Spezio) I assumed the tip to be glued up also. A glued up tip section will fit just fine in the butt strip side. Maybe you'd have to close it up a little. When you get that glued up section in your planing form and see how nice it fits in there and how nice it holds it for sanding you will like it. Especially down at the very tip you just hold the block parallel and if the tip is just barely protruding over the surface of the form you can't screw it up. (Dave Norling) Put the tip section in your planing form this holds it very precisely and makes it easier to keep the sanding block parallel to the dead flat surface of the planing form. It is really nice when you get up to the very top. (Dave Norling) I remove glue from the flats with a file. Then I use one of Bret Reiter's little hardwood sanding blocks. I also use various squinting and tongue protruding methods. (Timothy Troester) I think that Tim hit on the real secret. For my money, sanding tips is an exercise that is fraught with peril no matter how one approaches it. Those "various squinting and tongue protruding methods" are the real key to any of the methods I've seen posted (or tried). (Larry Blan) I always try to be careful in that area. ;^) (Brian Creek)
How long after gluing up with Resorcinol do you have to wait before unwrapping and doing some preliminary scraping work? Rod section stored in 50 degree, dry workshop. (Scott Turner) You can take your strings off and do some scraping in 12 hours but that is pushing it. I usually wait 3 or 4 days. I hang mine in a cabinet with a light bulb. It stays 90+ degrees in the cabinet after a day or so i lightly run my hand down the blank and as they dry they make a nice singing sound. Keep the left overs in the bottom of the cup and you can watch it dry. After a couple of weeks it gets much harder. If you wait that long to scrape the glue is harder to get off. I would give it 2 or 3 days anyway. If you can't wait be gentle with the tips. Sometimes, I wait too long and sometimes i can't leave them alone. I have never ruin one. Keep a little tape wrapped at the top so a separation doesn't get started. They will zip apart. If this happens use some Elmer’s glue and bind it back by hand. It is possible someone has done some scientific study on resorcinol and has some conclusions to share. (Timothy Troester) Yeah, I agree Tim. Garrison book had a 24 hour drying time, but 3-4 days to cure fully. Interesting point about the glue drying so much that it's harder to take off than after a day or two. I'll be as gentle as a surgeon on the tip. (Scott Turner) You might want to check your instructions, 50 degrees seems to me to be too cool for resorcinol to set properly. (But maybe I misremembered.) (Neil Savage) You should wait at least a day. I would suggest you bring the sections into a warmer area than 50 degrees also. (Bill Taylor)
I just wanted to share a sanding method I have not seen mentioned, or have run across on the tips site. I was sanding my wraps between coats on rod's #2 & 3, and going through a lot of paper in the process. Being the frugal guy I am(cheap & cheaper as my wife refers to my father-in-law & myself, I was thinking there has to be a way not to burn through so much paper, as I was holding my popsicle stick wrapped with 600 grit wet/dry sandpaper. I tried the wet sanding method on a couple wraps and it seemed as though the sandpaper was not as aggressive, and did not clog up either, lasting quite a bit longer than dry paper and smoothing out the finish without taking off as much Urethane. It worked so well, I tried the same method in between coats on the entire rod. So far the finish is turning out much better than on my first rod. I'm going to apply one last coat, sand with 1500 grit(s), then buff out. This may not be a "new" method, but the great thing about being new to this craft, this is a new discovery to me. If anyone else has done this, let me know what your preferred method is, or if there are any long term ill effects I'm not aware of. (Chris Hei)
Some of the guys that have been around a while might already know this but, I just figured it out and it works like a charm... I was taking off the glue on a couple of blanks this morning and ran out of sandpaper ( I scrape with a card scraper then sand). I did have some 3M fine drywall screen and gave it a shot. The stuff worked great! Didn't have to scrape first and it doesn't load up like sandpaper. (Mike Givney) Have you been able to find the drywall sanding screen in a format fine enough for rod use? If so, would you mind sharing your source? Seems the smallest screen I can find is about 180 grit, and that's pretty coarse for actually sanding bamboo. I find that anything more coarse than 400 will show up under a thin coat of varnish. I have used the drywall sanding screens to rough out cork grips with good results, though. (Harry Boyd) Thanks for the idea about shaping cork with the drywall sheets - I'll try it. As far as the "grit" of the sheets, the 180 is as fine as I have seen. The blanks were glued up with epon and had a pretty heavy residue. This is what I took off with the screen without actually taking any/little bamboo. I have gone back over the blanks with fine sandpaper to finish the work. The screening seemed to just peel off the glue without removing rod material. (Mike Givney)
It's 11:13 on Tuesday night and I just finished sanding the glue off my first rod - I need to tell someone since my wife said it was "neat". It went amazingly well. I made a PHY Midge with only 1 tip (I messed up too much of my first culm learning to split to get 2 tips). This was supposed to be a practice rod, but so far it has turned out really nice. I can't find any glue lines, my dimensions came pretty close on the tip(.005 big) and almost dead on the butt (.001 over), and it's a ton straighter than I expected. The tip is ridiculously small. If I hadn't made it myself I would never believe that it's six strips put together. Unbelievable. Or as my wife would say "nice". As far as straightness goes, I know Wayne says that straight is straight, but I really wish someone would come and tell me if my sections are straight. I'm 99.99% positive that they aren't twisted, and by looking at them I can't see any bends. However, if I put my butt section on the top of my cast iron table saw I can see I spot of light 1/16"+ or so near about 6 inches from the butt when I roll it. Should I work to get this out? If so how? I glued this first rod up with poly glue because I could get it locally. Can I heat poly glue to straighten? With a heat gun? How hot? Anyway thanks for listening. My ferrules, cork, and guides should arrive tomorrow so I'll be on to the next challenge and probably posting more questions along the way. (Aaron Gaffney) Congratulations on your progress on your first rod. To answer your question about straightness, just remember it is a relative term. Sight down your blank, and if it appears straight to you, then it probably is. Also roll the blank on a flat surface, and observe it. Bends and/or kinks will show up readily. (Joe Byrd) Congratulations. I have watched this list and others for several years and cannot recall anyone announcing their desire to start building rods, and then getting as far as you have so quickly. Especially impressive since you built your own forms. My limited experience with PU glues is that although the glue appears dry, it will continue to cure for about a week. If you are going to straighten any irregularities now is the time to do it. And I would fix the one thing you have found. It will become much harder if not impossible after the glue completely cures. I use Gorilla Glue, which I believe will take more heat than ProBond. In talking with the people at Gorilla they indicated that it will let go at about 350 degrees. I have used ProBond once and did start a delaminating with much less heat than that. I suspect that either glue will let go at lower temperatures before it fully cures. Still, you can put reasonable heat to it at present and get it straightened without delaminating it. Regarding twists. Put your blank on a flat surface and pin it down at one end with a finger. Then, put another finger on the blank about 2' away and push down with it, simultaneously releasing the other finger. If the blank has a twist, it will roll slightly. Gradually move your fingers closer together to determine exactly where the twist is located. When you have pinpointed the locations heat it and twist it straight, hold until it cools and retest. Using this procedure I have found that twists are not all that difficult to remove. In fact, I find them easier than bends. I use a heat gun to do this work. If you hold the blank further from rather than closer to the gun you can heat the blank all the way through without putting too much heat on the blank. One way I check to see that I am not overheating is to touch the heated section to my lips or forehead. If I can't hold it there it is getting dangerously hot. I would use my chin just below the lip but the beard insulates too much. If you feel that your .005 oversize tip is too big, you can sand it down a little. I would not remove all .005, maybe half of it to prevent from getting into the power fibers too much. (Steve Shelton) Let me add my congrats to the rest of them; you are well on your way. If you are going to try to straighten your little bend in the butt section, wait till you get the ferrule set on the blank (this will allow the glue to set a bit more). Probond will take more heat than you should use on the bamboo. Rather than using my heat gun I set the toaster at full dark and rotate the rod section over the slot. I heat the rod till it is a bit unpleasant to the touch but wouldn't burn my fingers. Bend just past straight. For butt sections you may need to repeat this several times. Just take your time. The idea here is to heat the section all the way through without overheating the outside. (Doug Easton) As tempting as it might be to ignore the wazoo under the grip, you might not be very happy when you try to turn a grip. I'd let that be my guide. Besides, what better place to practice! (Larry Blan) As Larry said, it is your choice, but, I would not ignore the small bend in the butt section. On my first rod, I had a small mistake and I went ahead and finished the rod without correcting it. Most people who look at the rod can not tell, however, I know it is there, and it drives me CRAZY at times. In answer to your second Q. I would not put a sealer on the rod until you have installed the ferrules, cork and reel seat, then decide on the type of finish you want on the rod and go from there. If you put a sealer under some of these items you could have problems with adhesion of the glued. This is advice from a novice builder, so take it with a smile, but, from what I have read and seen this is the way most builders operate. (Denny Reiter)
Once I completely finish sanding (I've got a couple of spots I want to touch up) should I put some type of sealer on the sections. Wayne mentions Tung Oil. I use Boiled Linseed Oil quite often for other woodworking projects, would this work as well? (Aaron Gaffney) I always put a light coat of Tung oil on my blanks once I have finish sanded them. This will keep out excessive moisture, etc. Plus also it will give me an idea how the blank will look when varnished. My workshop is in my basement, and during some times of the year I have high humidity. (Joe Byrd) My process is that same as Joe's. When I get the blank sanded, I put one or maybe 2 coats of Tung Oil on just to seal the blank. It may just be in my head, but I feel better about having the Tung Oil on the blank. (Todd Talsma) This observation is one that probably caused a controversial reaction in 2001 to Milward's book, Bamboo: Fact, Fiction, and Flyrods. I've been reading the book while traveling. On pages 133 - 134 Milward cites a 1987 study in the magazine Fine Woodworking. The Forest Laboratory tested 91 finishes for moisture retardation. On a scale of 100, Tung oil gets a 2, while polyurethane gets a 43. Epoxy (which I use for glue) gets a rating of 66. Indeed, "one or two coats of Tung oil actually increased moisture absorption." Well, following popular advice in books, I have been "sealing" my blanks with pure Tung oil from Woodcraft, after removing the string and Epon glue. If the laboratory is correct, the scraped or sanded blank is going to absorb moisture until it reaches a relative equilibrium in a few hours with the environment, despite the Tung oil, polymerized or not. So if moisture causes anxiety on a very humid day, now we understand why some makers store the unfinished blank in desiccant, or in a drying cabinet at low heat, hoping to evaporate the moisture. I'll probably continue with the Tung oil, since that fiction makes me feel safer than leaving the bulb burning for days in the drying cabinet. (Paul Franklyn) I still consider myself a newcomer on making rods, going on six years. I prefer to seal the sticks as soon as I can. I use Epon to glue up. Clean the sticks before I heat set while the Epon is still soft. No glue to remove before I apply the sealer. The sealer I use is Formby's Tung Oil Varnish. It is applied as soon as I remove the binding string while the sticks are still warm from heat setting. Like you, I prefer to coat the blank ASAP. (Tony Spezio) I think I'll stick with the bulb burning in the drying cabinet. Just one more variable (major variable) to eliminate. (Mike Canazon) I take the glue off the blank after de-stringing with my L-N 212 scraper, and that gives a pretty good finish. But the next thing I do is to polish the blank with a thick slurry of pure Tung oil and what we call Tripoli powder, which I gather is very like rottenstone. I go out to my local upholsterer and get (bahsheesh) off cuts of upholstery leather. I cut a block of hardwood about 1" X 4" and glue a piece of leather, ROUGH SIDE OUT, onto the block. I then use this block to polish the blank with the Tripoli and Tung oil. When it's all polished I just wipe off the slurry and polish the blank with a soft cloth - I use old flannelette sheets. It gives a deep sheen, imparts some color, and provides a magnificent base for the varnish to follow by polishing off most of the surface irregularities. (Peter McKean)
Possibly due to my ready use of the band sander on the outer enamel, I seem not to suffer unduly with open seams and not at all when I'm actually concentrating. But what, I wonder, is the general view on the causes of this unwelcome phenomena? From one of the pictures in Mr. Hatton’s very valuable contribution to rodmaking literature, it would seem that the estimable Mr. Dickerson, in his dotage at least, worried about these very little. Sadly it does not therefore follow that I can buy an original Dickerson, resplendent with an open seam or three, for a bargain price. Why, oh why, do we all have to be dead before we are properly appreciated? (Robin Haywood) I couldn't help but notice in the new Orvis catalog that the 150th year anniversary Orvis bamboo fly rod appeared to have a couple of open seams, aside from what appears to be resorcinol glue lines. Apparently Wes Jordan wasn't put off by open seams either. Not to mention a cork handle with a lot of fill. On the positive side it made me feel better about my rods! Now if I could just figure out a way to get $4150 for mine. (Tom Mohr) I think Gary is building the Granger rods and those for LL Bean. Not sure who is building these Orvis rods, but I don't think it is Gary. (Harry Boyd) According to John Zimny, who has done some serious research of the industrial literature and personally interviewed dozens of industrial chemists (and according to Daryl Whitehead, who is a highly talented crusty old rodmaker who does and has done much of the rodmaking for Bellinger), Resorcinol is still the BEST wood/bamboo laminating adhesive yet to be developed (others may be as good, but so far no glues are better). Just because the rods are made with resorcinol doesn't mean they aren't fine, and just because a rod is made with resorcinol doesn't mean open seams are to be expected. (Chris Obuchowski) I have been rather creeping towards that conclusion myself. Since I have used the stuff on boats for ages I don't know why I'm being reticent about trying it, perhaps its just that Titebond is so piss easy to use and clean up, and Resorcinol is so the converse that my idle nature is holding me back. (Robin Haywood) Resorcinol is all I use, and it's not that tricky. I go by the Garrison/Carmichael recipe, with up to 10% denatured alcohol. The way I do it is by volume. I buy a box of cheap plastic teaspoons. One goes in the liquid, one in the powder (it's three parts to four parts, but without looking at the can I can't remember which is which) level the powder teaspoon with a flat edge. One teaspoon of denatured alcohol into the mix. Stir continuously for 5 minutes, apply with an old toothbrush while brushing the strips for 5 minutes (first coat heavy to coat the strips, the second coat lightly to make sure of thorough coverage, the last brushing without adding more glue to smooth out the application). Wait 5 minutes, then bind. Hang the sections for at least 24 hours, then pull off the string and scrape off the glue (I use glazed cotton binding thread and it doesn't stick to the Resorcinol). (Chris Obuchowski) By a long way the most useable guide to using the stuff I have ever read, everyone else wants me to sift the powder, add walnut dust, oofle dust and perform unpronounceable incantations over it whilst weighing the ingredients to about a thousandth of a milligram. I just hope that what we call methylated spirits is what you call denatured alcohol, or you'll hear the swearing from there. And I just love the prolonged setting time. And you've gone public! (Robin Haywood) Methylated spirits is Methyl alcohol, as opposed to denatured alcohol which is ethyl alcohol with a taste of methyl alcohol added to make it undrinkable. The difference is that Methyl alcohol will evaporate MUCH more rapidly that Ethyl, shorting your working time. (Al Baldauski) Besides the issue of evaporation is there any other reason not to use methyl alcohol? (Stephen Dugmore) I don’t think so. The effect of a non reactive dilutent in a reactive mixture is to space the reactive ingredients apart so it takes a longer time to cure. So the methanol (methyl alcohol) will be just as effective as long as it exists. I just won’t be around as long. (Al Baldauski) I have used methylated spirits to thin resorcinol phenol formaldehyde glue and it works fine. I used up to 15%. There is much confusion across each side of the pond on this issue of definitions, perhaps the text below will help. "Methylated spirits ("metho") is a mixture of ethyl alcohol (95%) and methyl alcohol (%5). The methyl alcohol is poisonous and is added to prevent the methylated spirits being used as cheap drinking alcohol. Ethyl alcohol Ethyl alcohol, or ethanol, is produced by the fermentation of sugars, or from direct synthesis from ethylene. It is a renewable energy source. Ethanol's formula is C2H5OH. Its boiling point is 78.5 degrees C, and its melting point is -117.3 degrees C. Ethanol burns with a hot, pale-blue flame. It is miscible with water. Uses include consumption in alcoholic beverages, a solvent, an antifreeze solution, and a fuel. Ethanol is used as an additive to car fuel and is burnt with liquid oxygen in some rocket engines. When Ethanol is burnt in air, the results of combustion are carbon dioxide and water. Methyl alcohol Methyl alcohol, or methanol, is also sometimes called wood spirit. It is produced by the destructive distillation of wood, or by a synthetic process which involves reacting carbon monoxide with hydrogen gas. Methanol's formula is CH3OH. Its boiling point is 64.6 degrees C, and its melting point is -97 degrees C. Methanol burns with a pale, non-luminous flame. It is poisonous and, if consumed, causes blindness, insanity, and eventual death. It is commonly used as a denaturant for ethyl alcohol, and is miscible with water. (Gary Marshall) Thank you for the clarification. I was of the impression that methylated spirits was synonymous with methyl alcohol (methanol). My bad. My comments otherwise still stand regarding methanol Vs ethanol. Additionally, I would agree, then, that methylated spirits are equivalent to denatured alcohol and therefore interchangeable. (Al Baldauski) Do you screen the powder to get the big pieces out? (Steve Weiss) All I ever use is resorcinol and here in the UK find the Humbrol brand' Extraphen' the most convenient to buy. When it comes to longevity I have rods built 18 years ago that are still holding up even after two thousand fish ! Glue lines don't bother me but then as an amateur I am not actively seeking customers, they just appear! (Paul Blakley) I don't doubt its efficiency, although I have noticed that it doesn’t gap-fill as well as epoxy. This is why I switched to epoxy for boats. As my Extraphen is now 6 years old I think I shall have to go shopping! It might also push me into making some nodeless sections. (Robin Haywood) Resorcinol will not fill gaps, you need tight bonds and good clamping. If you want to hide your edges, use EPON, URAC, or Nyatex. If you want to celebrate your meticulous craftsmanship, by all means PAINT 'EM PURPLE! That's what I do. (Chris Obuchowski) In the case of hand planing, open seams are caused by the enamel side of the strip not laying dead flat against the groove. This can be caused by a high node, or a low spot on either side of the node. In other words, not being dead flat against the form makes it take up more room in the form. It is "thicker" when in the form. It therefore sticks up higher, so gets planed down more. Undersized. So a gap of some size and length appears. A careful eye can see this before the damage is done, and adjustments can be made to the strip to prevent this from happening. (Chris Raine) For what its worth, that is what I thought was the cause, but I am always wary of opinions, especially my own! (Robin Haywood) Seeing much discussion about open seams, I've got to throw in my 2 cents worth. In my opinion open seams are not a good example of craftsmanship and we builders should not sell rods that have them. They may be structurally OK but still do not look good. It's like driving a car with a dented up chassis but it still runs OK. We need to always be proud of our skills. (Ray Gould) I must side with Ray on this. It has been my experience that open seams are caused by ether a node that has not been properly prepared or by a kink at the node. Both these failings are exactly that, failings. If the strip is properly prepared, it is darned near impossible to end up with an open seam. Secondly Those who are afraid to use resorcinol because it will show open seams are fooling no one but themselves. (Ralph Moon)
After 5 years and 25 or so rods, I had my share of rodmaking disasters, but I always found a way to finish the rod so that it was at least fishable. Tonight I had my first disaster from which there is no recovery. I was sanding the tip sections of a PHY midge. The string had gotten stuck to the blank because I had left it too long, and the loops at the end were getting in the way. I decided to trim the blank to length then and there (not my usual process). The Midge is 6'3", but I was looking at a 5'6" inch rod laying on the bench, and thought 5 x 12 is 60, then plus three, so half of 63 is... Yep, cut it too short. Way too short. Insanely short. I decided that a one piece rod was OK, so went to work on the second tip, only to find that was almost 10 thousandths under at the tip, and to boot the hex shape had somehow transformed itself into a quad about 4 inches from the tip. I even marked each side and counted the dots to make sure I wasn't seeing things. The dimensions were due to the fact that I was sanding string, and got impatient and went to 180 grit sandpaper. I got the string off, but obviously took off too much cane. The quad conversion remains a mystery. Two strips just dived to the center of the blank. So it was really a double-built quad conversion. My only consolation is that I finally landed and released my first steelhead yesterday (4 for 5 actually, including a 9 lb. fish). (Jeff Schaeffer) Landing the steelhead makes it all worth it.... Have some more single malt and enjoy the moment. (Don Schneider) You're not the only one. I have been working on the finishing process for my latest rod. Having completed it yesterday, I pulled it out of my drip tube this morning before leaving for work, and after inspecting it and being quite pleased with myself, something, I repeat something, looked amiss. Upon a closer look the inscription on the rod was made on the wrong flats and it looks totally stupid, just like the guy that did it. Admittedly this is a Frankenstein rod made just for me and although the mistake is not as catastrophic as yours, it is the principle of the thing. My question goes out to all on the list. Can this be sanded out and refinished by brush without ruining the overall finish? I would hate to strip down the whole thing just to move the signature. The signature is on the wrong side of the rod and it makes it look like it's upside down. (Bill Bixler) Remove the varnish on the wrong part and then write again. I always write on a first layer of varnish. Then wind signature wraps on the spot where you started scraping off the varnish. Varnish a second time. I would rub on some varnish with my finger... That’s how I usually varnish my rods. (Geert Poorteman)
Look at this picture
That's more than I like to see. (Martin-Darrell) I agree. I had just asked about the sanding because even my Hardy, HI Tonka Queen, or SB/Cross rods aren't sanded that much. (Bob Maulucci) I guess I may be missing something. I thought that the power fibers would always show up. (Martin Jensen) I am just saying that in my own experience (obviously nowhere near Howell's), I would be inclined to stop way before coming to this point. When I see this streakiness and those light colored fibers coming through, I stop sanding and get the dip tank warming up. Maybe my monitor needs tweaking? Or maybe my head? (Bob Maulucci) I see what you mean but I think it's just some very dense cane. The first 2 rods I made 15 years ago going by the Garrison /Carmichael book have way to much enamel left on the cane. I was so afraid to take one more swipe with the file because Hoagy made it sound like (at least to me) if you cut into the power fibers the rod is worthless. I learned fast not to believe everything I read in print. (Marty DeSapio) I do not see the streaks from the power fibers in most of the rods I have seen others make. I have never considered sanding this much. I never said anything was "distasteful", but now that you bring it out of me, this rod looks one step above the PAIN rod that was the topic of last month's laughs. I am not trying to discredit anybody here, as we all know I am no Gary Howells, but I have to repeat a comment I just made to someone off list. "I guess what I am trying to say is, I could make a heck of a lot nicer rod if sanding the bejeebers out of it is now acceptable. How come I did not get the memo on this one?" (Bob Maulucci)
I have a problem that is going to cause me to remake a tip section for my rod under construction. Upon inspection of my drying rod sections after glue-up, I discovered a significant gap in one of the seams on the tip section. This gap isn’t something that I can avoid or ignore, a replacement piece must be made. I was very disappointed to see this and really didn’t expect to have this happen, but I’m past that and will try to figure out what happened so it doesn’t happen again. Here's what I did (looked for) while preparing the strips:
Back to the mallet and froe I guess. (Scott Turner) Several possible scenarios come to mind. Simplest is that somehow some trash got between two of the strips, be it bristle from glue brush, splinter of bamboo, or even tape or binding cord. One List member uses cheapie toothbrushes as glue spreaders, but colors the bristles black with a Sharpie to make them easy to see when (not if, but when) the slip out. It's also possible that one or more of the strips was not equilateral. When using one of the "V-blocks" on my caliper, I found that though my numbers were accurate, sometimes bad angles slipped by me. Could be a crooked node that wouldn't allow the strips to nestle together. Could be inadequate binding pressure. Finally, could be shop gremlins. They're bad little buggers. (Harry Boyd) Given the precautions that you took, my suspicion is that you somehow knocked a splinter off the edge without noticing it. The open seam is too long to be reasonably explained by a foreign object, like a particle, or even a fiber from the glue brush in the matrix. If you have cleaned off the glue, measure the strip and see if the dimensions are out of whack. A hump in the taper would suggest a foreign object in the glue. Even dimensions suggest a missing piece. (Tom Smithwick) I'm thinking that the note above might be the issue. I never considered if I had knocked off an edge. The other likely candidate is a bad angle (simply due to the length of the gap, a foreign object doesn't seem really likely (however, my wife was brushing on the glue as I was rolling out the first section). I'm going to clean up the section and see if more comes to light. Flaming a new culm tonight. (Scott Turner) I read somewhere (might have been this list) that they heard somewhere else that if you knock off the peaks of your strips, then you will have tighter glue ups. Maybe your case is what they were referring to. If you knock off the peaks, then there is less to go wrong. You can even take off a lot more than just easing the peaks seeing as the pith adds nothing to the power or strength of the rod. (Shawn Hawkins) I've been using a razor blade as a scraper and have since glued up 5 blanks with no glue lines. That solved the problem for me. And constantly checking angles. (Lee Orr) I have had the same experience. It is very easy to miss a gap. I had a one rod whose strips fit together perfectly, and the butt ended up with the Grand Canyon of glue lines. The gap was there before glue up, but I simply did not see it when inspecting the section. There was no other explanation. These days I dry fit the sections, tape them together, and inspect each seam under a strong light with a magnifier. If there is a rough spot I put a pencil mark on it, and take the strips apart and work on that area. It is amazing how a strip can be that far off after final planing, but it is also amazing what can still be fixed. I usually end up in this situation if I have not done any planing for a while. (Jeff Schaeffer) I'm not sure if this is the same thing, but ... Sometimes when I am planing a strip, if the blade is not quite sharp or the angle is not quite right (or the gremlins are chanting, "screw-up, screw-up") one edge on the enamel face will develop a "wing." The angle of the center of the flats can still be good, but the faces come together in an elongated point. That point is flexible enough so that it is hard to plane it off, in fact, that's how I believe it develops. As I plane down, the wing has a tendency to come off as a "string" or "fuzzie." If a string is not entirely off the strip, and I grab one end and pull, I'll take both the fuzie and the apex off the strip and create a glue line. Such a glue line is most likely a cosmetic and not a structural problem, IMHO; it's OK for a personal rod. I a discussion of fuzzies some time ago, it was suggested that you could rotate a fuzzy strip between leather gloved hands and remove the fuzzies without creating glue lines. It can also help to run your threading gage up and down the apex. These work for me especially if I do them before final planing. By the way, it is not an uncommon problem. I once saw a $1,500+ rod by a current, highly respected (and deservedly so), famous maker with a 6" glue line almost up to 1/16" wide just above the signature wraps. (Grayson Davis) Knocking a splinter off a strip sounds about right , I had a problem much like Scott’s, but I found mine to be caused by removing the cotton string I used to hold the section together before I put the masking tape on . The string had caught the thin edge of the outside apex of a strip and peeled off a long sliver. I have since stopped sliding the string up the section. (Gary Lohkamp) I have recorded the "possible" reasons for the glue line so I can take a look at the list when I get ready to final plan my new tip section (flamed the culm last night). I thought I had inspected each strip in the tip section carefully during and after final planing, but obviously something went wrong and until I sand off the glue and look at the section under magnification, I'm only going to be guessing (I still may never know what happened!). However, I do have a list of a half dozen traps to avoid on future sections and that was what I was trying to achieve! So a hardy thank you for all your help. (Scott Turner) P.S. I'm just picky enough that I wouldn't finish this strip even if it was for my own use (as all my rods are intended at this point). At some point, a fellow fly fisherman will want to inspect my rod and I just wouldn't be proud. That's the litmus test for work I do.
I'm frustrated.......I'm working on rod number three and have a problem that is driving me crazy. After gluing, my sections are still a little crooked. I've tried everything I can think of......rolling while still wet, weighting the strips when I hang them, and nothing seems to help. Then to apply heat and straighten the section after I have the enamel off is nothing short of a recipe for disaster. Could I use the M-D aluminum strips, lash my section to it, and heat it again in the oven? I realize that this, too, has it's potential problems, but I am tired of this problem. The first two rods turned out pretty good, but I can still detect a little "movement" in the sections. (Todd Grisier) One thing that may work is to iron the section -- literally. Just don't use SWMBO's good clothes iron. You can pick up a cheap iron for about $15.00. Put the section on your planing form and iron it flat. Kind of depends on the kind of glue you used though. Some glues, so I understand, don't allow much heat straightening after they are set. (Neil Savage) I use a clothes iron I picked up at the local Thrift shop for $3.00. It works just fine on the tip sections but I keep the heat at Medium. I found that the Hi setting will darken the cane. I lay the section in the metal planning form and lift it to straighten as needed. For the thicker butt sections I use steam. I live near Denver so the steam is around 180 degrees F. I have used steam on finished (wrapped and coated) sections with no adverse affects. The size of the pot I use is dictated by the nature of the bend. For very localized straitening I use a tea kettle with the whistle removed. You risk darkening the cane by using a heat gun. (David Gerich) I have used them to heat set the glue and get straight sections. It should work if you are using a heat set glue. For the tip sections, use a scrap strip to hold them down in the groove. (Tony Spezio) I'm relatively new to this as well. I've just finished rod 14. I have the same problem. I've tried it all rolling, lashing to aluminum strips, ironing, you name it, it doesn't work for me. If it was on the tips site, suggested here or in a book, I've tried it. What seems to be simple for other folks- as in "do this! works like a charm every time". Doesn't work for me. My final solution was a bunch of little things. I use less binder weight and make sure that I don't bend the tips when tying off in the binder or there after. I then hang the sections with weight, between two binder clips. The binder clips make sure the weight is hanging straight down. (When you hang from the binder string the sections will often cant slightly to one side.) I did this on my last rod and didn't have to straighten at all. But when I do have to straighten, I use the heat gun method but support the section with a block of wood so that I don't have to hold it in my hand. This works better for me than holding it by hand as I can heat it up and leave it. I think when it's in my hand I'm too impatient. See the picture below.
I've also switched from 3x3 node spacing to Garrison. I know folks will say that it doesn't matter but I've made two rods with Garrison spacing and they've turned out the straightest of the bunch. Like they say, "if it ain't broke, don't fix it." This seems to work for me. Not an expert opinion, so take it for what it's worth. (Jim Lowe) It's not a great deal of help now. But what I have found is if you use to heavy a weight in your binder, you can have one hell of a job getting the rod straight after it. I don't use a binder. I hand wrap and my rods are a lot better for it. With practice, I can hand wrap a rod in 5 minutes. When it comes to getting them straight, it's one of those things you get better with practice. (Gary Nicholson) I'm not sure heating the sections again while they are lashed to the MD fixtures will accomplish your objective. I hate to admit it, but Neil is correct -- a clothes iron works well for tip sections (thanks for that one, Max). How are you attempting to heat and straighten the glued sections? I've shared my methods several times in the past, and in this article. Basically I heat over the heat gun on low till the section is just a little short of "too hot to hold" and put in an inverse bend. Hold a few seconds till things cool. And work slowly on short sections. (Harry Boyd) Before you get too frustrated in your search for straightness, you should perhaps try the "finger trap" arrangement for getting your rods straight. It seems to work pretty well, but I must confess that if I have failed to straighten the sections well enough after gluing, I don't hesitate to do some heat straightening later on, and so far I have not encountered any problems. I use Epon epoxy as a glue, and it is very forgiving. I use a Bosch heat gun, never on anything higher than Medium setting, and I continue to be amazed at just how short an exposure will suffice to soften the section enough for tweaking! (Peter McKean) When all is said and done, the fish *won't care* if your rod isn't perfectly straight. Sometimes "well enough is good enough" to quote my Grandma. (Neil Savage) I think that there are several suggestions here that are wonderful. Jim touched on something that is important to bear in mind when trying any new technique that "works like a charm!" If something works great for someone but not someone else, this often has a lot to do with process. In other words it works for that person because they are comfortable with the technique and it is part of a larger plan that, in the end, works for them. Types of glue used, etc. often play a part in something that works great for someone but not someone else. Since that doesn't really solve anything for you, then the only new offering I have is this... My greatest enemy to dead-straight rod sections is nodes and node work. If the nodes aren't perfect, the blank won't be either. You've got more rods to your name than I, so you probably know this already. Nonetheless, the take home message is to remember to back off and see the forest now and then... don't be scared to look elsewhere for a solution to whatever difficulty might arise. (Carl DiNardo) OK Peter, what is this "finger trap method" you refer to? (Larry Puckett) Oh, OK, sorry. This "finger-trap" consists of threading the glued blank down a strip of hollow braided rope, then attatching the length of rope to a static bottom support and a turnbuckle at the top (or at least some means of pulling the rope under tension). You pull it straight and let it dry. Ray Gould's book "Constructing Cane Rods" on page 59 deals with the mechanics of the thing. I personally find the method to be a bit Heath-Robinsonian, but there are a lot of builders who swear by it. (Peter McKean) I steam my blank sections with the clothes iron set on steam, then lay them in a planing form. Set some weights on top and let it cool. They come out laser straight. In fact, I check them with a laser leveling device. One of those things where it projects a straight line on a wall to check if a picture or cabinet is level. I project the line down the middle of the blank. The steam really makes the blank go limp, but I do have to do some hand straightening at the bad kinks (if any) and the twists. Sweeps are always gone when the blank is cool. Sometimes if I overdo the steaming I dry the blank still in the form with a heat gun on low or a hair dryer. (Darryl Hayashida) A lot depends on what glue you're using and if you're using epoxy it depends on how you mix it. I use epoxy and mix it 2:1 for maximum strength and if I heat-cure it without first straightening that's it. The bend is permanent. I've tried the ironing method, the heat gun with reverse bend method, etc, etc and I get the section straight but after a few casts the bend comes right back. I've found that I have to be VERY meticulous about straightness before my epoxy is set. Patience comes with practice. Of course this doesn't help you now! (Al Baldauski) Sorry if I'm beating a dead horse, but I've glued up my last three rods using Titebond II Extend. What does everybody think about heat curing in an oven after glue-up is complete to help straighten the blanks. If so, any suggestions on temperature and time? (Todd Grisier) I have used Titebond II extend on over a dozen rods with no problems. However, I can tell you that if you are over aggressive with a heat gun in straightening it can cause the glue to expand and create a small gap. The gap will remain, and be filled with glue which drys, the strength of the rod doesn't seem to be affected (I haven't had any delamination problems). However, it does affect the cosmetics! Therefore, based on my experience; I would be very careful putting the blanks in an oven. I have had good luck just using a lower setting on my heat gun and using an iron with a low heat setting for straightening. (Tom Mohr)
In sanding the flats on my blanks I have used a 1 X 2 X ¾ sanding block and wet-or-dry paper lubricated with paint thinner. While this does an admiral job, I have always been concerned about rocking the block and rounding corners. So I’ve been trying to think of a way to prevent this possibility. Well last night I came up with the answer! (I’m sure someone will have already thought of this but I haven’t seen or heard of it). I placed my rod blank onto a foam rubber pad about 4” wide by 24” long. The pad is resilient enough that when you place your block on top of the rod and rock it back and forth the blank rolls back and forth so the flat always stays parallel to the block! You, virtually, cannot round the corners! (Al Baldauski) Another trick is to open up your planing forms so that the blank settles down into the groove a bit. Then just treat your sanding block like your plane. Hold it the same way, and push the sanding block down the strip. (Mark Wendt) I always sand my blanks as if I were handling a pool cue. Lay the sandpaper on your bench (grit up), and hold the section between the fingers of your left hand -- forefinger on the top flat. Your right hand "shoots" the section back and forth across the paper. No rocking or rounding, perfect leveling. (Bill Harms) Thinking about this a little more, I wonder how one of the waffleboard looking router pads might work? Might accomplish the same thing, but also keep the section from sliding around on the bench. (Harry Boyd) That would work too. With the foam pad on the bench, the blank doesn’t slide. (Al Baldauski)
I glued the sticks last night and they have been hanging in string for 24 hours. I don't wish to heat cure as my heat gun oven is not reliable. Can I leave the section hanging for the recommended 7 days, and then remove string/straighten, or can I remove string/straighten now and then rebind and rehang? I am not in favor of the second option because I fear that rebinding will introduce new kinks. (Louis DeVos) Remove the string now if you still can. The first rod I made I had a hell of a time getting it off. Rebind and hang, then straighten. I usually bind, straighten and remove twists as best I can, hang for 6-8 hours in my drying cabinet heated with a 100 watt bulb, remove string and then rebind. (Tom Kurtis) You can rebind if you want but I think it is too early to straighten. The Epon is still pretty soft and the rod can delaminate if you stress them too early. Epon really does need the 7 days to cure at room temp. (Frank Stetzer, Hexrod, Taper Archive, Rodmakers Archive) Take the string off now so it’s easier to scrape off the epoxy residue. The glue is set up plenty good after 24hrs. Just keep the section on a flat surface. Once scraped, you don’t have to rebind if you’re NOT heat curing, just wait a few days more before you start bending it. (Al Baldauski) If you were going to heat treat after scraping excess epoxy would you rebind the rod before putting in oven? (Ethan Feinsod) Yes. But make sure you don’t bind too tightly and the section is straight after rebinding. If you bind too tight you may induce a bend where there wasn’t one. When you subsequently heat cure you will set the bend into the section. As they say, “don’t ask me how I know!” (Al Baldauski) I rebind a bit tighter the second time than I do at glue up with a four string binder. With the Garrison, you have to be careful not to bind too tight you can get a twist. If you have a potential glue line, You can bind that small area tight by hand. The heat setting in most cases will close the line. Scraping the glue can be done with a single edge razor blade making a single pass on the flats. This will leave a clean surface. (Tony Spezio) I've found that you can continue to straighten without any heating for another few days to a week (your mileage may vary depending on curing conditions), one of the virtues of Epon. I had made myself a Ray Gould tensioner, but it doesn't help much with Epon (though great for fast-curing glues) because after a day of being kept really straight you can still add or subtract straightness just by bending the tip or catching it on something, one of the vices of Epon. (Henry Mitchell)
Anyone have this happen to them - bend in rod while drying? (Louis DeVos) I’ve found that if the section is not straight when wrapped, no amount of tension will make it straight when cured. And this is especially true if you bind tightly. When tightly bound, the strips can’t slide against one another to achieve a straight, unstressed condition. When you apply tension to a section which is not straight you “unbend” it causing a greater tension on the inside of the curve. When your glue is cured and you remove the tension the nonuniform stress makes the stick bend back to where it was. The moral of the story is: If you want it straight coming out of the string, it better be straight while in, no tension applied. Some of the techniques like using a roller while the wrapped section is in a V-groove or tapping the section while lying on a flat surface or in a V-groove help to allow the strips to slip relative to one another and get to a straight condition. BTW: Epoxy, unlike solvent-based glues, does not appreciably shrink when curing unless it has been diluted with a solvent. (Al Baldauski) I don't know if you hang them in a box with a heat source but I use a bulb and routinely shift them around if one side is drying faster than the other it seems that I will have some problems also I have wondered about the weight not pulling down on a rod dead center or not being hung from the top dead center. the variations I have noticed have been nothing more than a minor annoyance but still I hate to try to eye-ball-em straight. (Timothy Troester)
I glued up a butt section 3 days ago (Epon and hanging with weight to dry), and when I took it down after 48 hours to destring/scrape glue, it had a nice bend in it (actually it bent up and a bit sideways) along 2/3rds of the length. When I hung it to dry it was 95% straight, and I used about 1 pound in weight at the bottom. How did it get so bent just hanging (shrinking of glue somehow affected it)? I'm puzzled because this is the same routine I follow and usually get straight sticks. I did notice that when the weight was hanging off the bottom, the stick was not exactly in the middle of the loop I had made, close but not exact. Maybe that's it? (Louis DeVos) I’ve found that if the section is not straight when wrapped, no amount of tension will make it straight when cured. And this is especially true if you bind tightly. When tightly bound, the strips can’t slide against one another to achieve a straight, unstressed condition. When you apply tension to a section which is not straight you “unbend” it causing a greater tension on the inside of the curve. When your glue is cured and you remove the tension the nonuniform stress makes the stick bend back to where it was. The moral of the story is: If you want it straight coming out of the string, it better be straight while in, no tension applied. Some of the techniques like using a roller while the wrapped section is in a V-groove or tapping the section while lying on a flat surface or in a V-groove help to allow the strips to slip relative to one another and get to a straight condition. BTW: Epoxy, unlike solvent-based glues, does not appreciably shrink when curing unless it has been diluted with a solvent. (Al Baldauski) I once had a tip section that I wrapped too tightly and it dried with a long bowed set. I heated that thing until straight and hung it up. The next day the bow was back so I heated it again until straight and then hung it from the ceiling with a seven pound weight attached and left it there for two months. It was straight for a few days and then back comes the bow. I have since wrapped my strips with much less tension and have had better results. Still this can be one of the most frustrating tasks in rod building. (Mark Dyba) What I have started doing a good while ago using Epon is after gluing up, bind the sections a bit loose. After hanging overnight, clean the sections then bind tighter for heat setting. I have gone to a 4 string binder now but was doing the same with the Garrison. I seldom get a section that I have to straighten. (Tony Spezio) Would you recommend your gluing/binding method above for all types of glues, or just Epon? (Duke Normandin) I would think it will only work with glue that takes time to set up like the Epoxy glues that are heat set. What I should of mentioned is that after the second tighter binding, the sections are heat set in the oven. This softens the glue and the tighter binding pulls them together. I have been reading that Titebond takes several days to set between the strips, not sure this will work using that type of glue. Wish I could give you a better reply. (Tony Spezio) No worries -- I was just checking. To me gluing and binding cane strips into straight sections seems to be a hit-and-miss exercise. So I'm always on the lookout for any techniques that I can learn to insure consistently straight strips after the glue has dried. (Duke Normandin) Before I started using Epon, I used Elmer’s Carpenters glue on my rods. That was 9 years ago. I used to glue up one section and lay it in the form groove with shot bags on the section. I always came out with straight sections. I really watch to get my sections straight as possible before hanging them. I had tried hanging weights in my early days and found that if the weight is not directly below the section, it will bend the section so I gave up on that. What I am doing now seems to work best for me. (Tony Spezio) Using shot bags over the freshly glued blanks while in a 60 degree slot sounds like a heck of a good idea. Thanks for the tip. (Duke Normandin) Do you have any idea how much tension you use on your 4 string binder? I use one, too, but still have problems. My last best tip section I built was hand bound lightly. When I took the string off and scraped it, it was straight as an arrow. Then I rebound it with my 4 string and heat set it. I wasn’t super careful about straightness after rebinding and wouldn’t you know, it came out of the oven with a bow in it. I think it was from too much tension and/or unequal tensions. (Al Baldauski) I have no idea if this is the correct amount of tension but I will share it so we can generate some responses! On my most recent rod the weight was 5 ounces (my daughters little pink pail with 5 quarters in it). To set the tension I tipped my 4 string binder up and held it in a vise so that I could hang the weight by each of the threads one by one. I would gently hang the weight to an ‘S’ hook on the string. When the tension was just enough to let the weight pull out the string I would go on to the next one. Used Epon and rolled it in my forms widened double the taper plus .004”. The rod tip came out straight. What other tensions/methods? (Ralph Tuttle) I have long since shunned the pink pail and quarters method... though popular for its time. Currently, I employ the cattail method. Tie one end of your binder string to a stray cat's tail and if it lifts more than 3 feet off the ground, loosen the tension. Be sure to stand well back of the binder while testing. Great for small gatherings. (Yes, I'm kidding, but you can tell what kind of a kid I was...) (Mike St. Clair) I was using a fishing weight (half oz I think) to set the spools but it seemed that there was too much tension. I just go by feel now but not enough tension to have the rod section try to rotate while it is wrapping. I also find as there is less thread on the spool, less tension is needed. I have the feel down pretty good, it is real light for the first wrap, for the second wrap after cleaning the flats, I give the wing nuts a half turn and this increases the tension quite a bit. It does get a bit tricky on my 1 wt tips. Not too technical but it works for me. I think I may give the quarter weight thing a try on the next rod. I get no twisting at all and I would say 99% of me sections are straight. Another tip, I leave a tag end after the section comes out of the binder on the twisted thread that is coming out of the binder tube. This tag end then is on the beginning of the next section coming out of the binder tube. I have the binder mounted on some peg board on the wall. On the peg board, I have some of the shelf peg board hangers that line up with the outlet tube. As the section is coming out of the binder, I grab the tag end and pull the section straight out of the binder. as it comes out, it rests on the hangers and keeps from putting a bend in the section. At the end of the section, it is pulled out enough to leave a tag end on the section and enough to leave in the binder for the start of the next section. You also have a tag end to hang the glued section. The twist is centered on the section end so it hangs straight. (Tony Spezio) I found through long and bitter experience is that the correct amount of tension is just enough to pull the sections together, and no more. That may be five quarters, or a 1/2 pound sinker depending on your setup, but if you are going to make a mistake go with less, not more. I now pre-bind by tying the sections together with 3 or 4 ties of thread. That allows you to lower the tension even further. Another thing that seems to be important is constant rotation- once you start, don't stop the binder unless you absolutely must. There is some inertia there that must be overcome when you stop and start- I am convinced that this leads to to different tension on one part of the section. And heavy weighting or stretching the section seems to not work at all. At least for me. (Jeff Schaeffer) Did you ruin a strip and have to make a replacement? I had a tip section that was straight when I hung it up, but but the next day it had a set that kept retuning for some time. For the longest time I couldn't figure out what had caused it. But some time later I had the same experience and realized that I had to discard one of the original strips. I rough planed a new strip, heat treated it, planed it to final dimensions, and glued up the rod all within a couple of hours. The replacement strip had a cosmetic blemish, which was why I hadn't used it in the first place, so I could subsequently identify it in the glued-up tip section. I had the same experience with this tip, but realized that the replacement strip was on the outside of the returning curve. The original strips had had several days to equilibrate with ambient humidity after heat treating, but the tip section was glued up almost immediately after heat treating the replacement strip. As it absorbed moisture, it kept expanding and that's what caused the mystery set to keep returning. Now if I need to make a replacement strip, I wait at least a week before final planing so all strips have the same moisture content when I glue the rod up. (Robert Kope) That may be it!! I did have to use a new strip, but if I remember correctly, the strip waited at least 24 hours after heat treating while I planed the final taper, etc. I guess that wasn't enough. (Louis DeVos) Yeah, that would do it. A freshly heat-treated strip will have 0% moisture. Around here, this time of year, your strips will eventually absorb 4-6% moisture which will cause your strip dimensions to increase about 3 to 5%. And that’s a lot! But it takes nearly a week at 40% relative humidity to stabilize an unvarnished strip, longer as the relative humidity goes down like it is now. (Al Baldauski)
I just finished gluing up my first tip section and I am pretty happy with it except for a noticeable seam/separation that is at one of the nodes towards the tip. If this rod is going to be for myself and I am OK with the cosmetics of it, is there any structural problems that I may have with this piece? I will make another tip regardless so that I have two tips but was just wondering about how it will hold up under normal fishing conditions. Another thing to mention is that this will fall in line with a guide so it will be wrapped as well and may hide the seam and add support to it as well. Do I scrap it or fish it? (Greg Reeves) Fish it. What have you got to loose other than the time to finish it and wrap the guides? (Neil Savage) Fish it. (Mike Shay) Fish the #@&* out of it! (Joe Arguello) Sounds like a good experiment. finish it and fish it then tell us all what happened. (Timothy Troester) FISH IT UNTIL U HAVE 2nd TIP FINISHED. If first tip is unsatisfactory, U can do an autopsy on it, and maybe see if cause is a bamboo splinter, adhesive filler particle, or if planing is off significantly from 60 degrees. (Bob Nunn) The fish will never know. (Tony Spezio)
I have a tendency to sand my tips undersize if I am not very careful when removing the string. Does anyone have a better technique than sanding? (Dennis Bertram) Scrape. I lay a plane blade on the blank bevel up, then carefully lift to enough of an angle to bite. Working carefully will scrape / peel the glue. Then a light sanding. (Pete Van Schaack) I glue with Epon. after about 15 hours I put the section in a plastic pipe and pull on the string it all unrolls the glue is still a little sticky I put the section back in the planing form and scrape the glue off with a 212 scraper followed by sandpaper and steel wool. I rebind it and either heat set the glue or just let it cure. The whole process takes about an hour. (Dave Norling) I do the same remove the string before its fully set HARD you can do this with epoxy. (Gary Nicholson) I use my Lie-Nielsen scraper, set the blade depth with 2 thickness of paper. It's amazing how much control you have doing it this way. I also bind using a 4 string binder so unwrapping the string is not an option. I just lay the strip on the bench and do about a foot at a time, starting at the small end, all the way around the blank, move down and do another foot or so. I glue with Titebond III and you can scrape just until you get to the cane, clean up with a light sanding. Gluing with Titebond I can glue, 24 hours later, scrape and go on from there. (Joe Arguello) I, too, use a four string binder. The strings go on in pairs. I use two different colors and it makes it easy to see the pairs. After 12-15 hours I cut the strings and grab the “top” pair and unwrap. Then grab the other pair and unwrap in the opposite direction. It’s a snap! I then use a sharp, stiff steak knife as a scraper to remove excess epoxy. (Al Baldauski) That's interesting, I really never thought about it that way, it just looked to me like a tangled mess! Anyway I have gotten so used to just scraping it off with my scraper that it is a snap. I really haven't had any problems doing it this way. (Joe Arguello) On my 4 string binder, the right wheel has green upholstery thread and the left has pink. Makes it easy to unwind it. I just glued up my first blank with Titebond after mainly using resorcinol (my resorcinol went bad). Resorcinol was definitely easier to clean off the blank, because it was harder & you could see it. (Frank Stetzer, Hexrod, Taper Archive, Rodmakers Archive) If I remember correctly, Harry Boyd suggested to oversize each planed strip by 0.001 inch on this list or in an email to me many years ago when I started making rods. I now use that approach and find that when removing string and sanding I get fairly close to the final glued up rod dimension. I hope this helps. (Frank Paul) I use URAC and allow it to dry overnight. At the very end of each section I use a scalpel cutting away the string and then start too peal each string away from the fat end of each section only. I then place the section tip first into a horizontal, 1/2" X 4' long, plastic pipe that is attached to the side of my work bench and starting with the outer string pull it away and once it is removed then pull the second string away. I've never had a string break. I bought what Golden Witch calls a tri scraper which looks like a triangle file but is sharp on the edges and is used as a scraper. I use it to get most of the glue off. Just be careful at the thinnest part of the tip sections where I scrape in one direction only and usually just once or twice for each flat. This does not get all the glue off but then I switch to my sanding block and then sand to final dimension. (Doug Alexander) If using Epon or other two part heat setting glue, remove the string after 18 to 24 hours. The glue is still soft. I use a single edge razor blade on each flat in long sweeps. This removes the glue down to the bamboo nice and clean. No bamboo removed. If using other glue like Titebond 2. After gluing and binding , remove as much glue as you can from the outside by wiping the bound blank with a wet towel. Remove the string later before the glue sets hard. Scrape the glue as above without flexing the blank and re bind till the glue is set hard. The thread will come off clean except in spots where a bit of glue bight still squeeze out. I remove the string by clipping one end, pulling it off in one length holding the blank cupped in my hand and the string between my fingers letting the blank roll in my hand. One of these days I will put two cup hooks to my workbench to hold the blank while removing the string. (Tony Spezio) I was hoping Tony would chime in. This is what he and Mark Wendt taught me and it has worked well. It is simple, cheap and very effective. Any grit of sandpaper strong enough to remove glue will also leave scratches in the bamboo and will require further sanding with increasing grades of sandpaper. (Scott Bearden) Glad you mentioned that, the scratches will show up when you apply the first coat of sealer. I always use a new razor blade to leave a smooth finish.. A used blade may have some nicks in it and leave scratches. (Tony Spezio) I usually roll my sections on newspaper to straighten, while I'm gluing, like Howell suggests in The Lovely Reed. I also takes most of the excess glue off. After a few days I cut the string, at the butt end then pull it to unwind, (See Garrison) It takes very little sanding to get the residue. I'm using Titebond III. (Terry Kirkpatrick) Since I started using URAC I've been filing the hard glue residue off. I seem to have better control that way. The hard stuff also comes off easier than when I used Titebond II or III The TB glop seemed to stay kinda sticky. (Larry Swearingen)
I'm sure this has been addressed before, so apologies ahead of time. That said, I was gluing up a tip section last night, and this morning I started scraping off glue (Titebond III). It took me a while, but I eventually noticed that one of the strips was flipped sideways. DANG! This is only my second rod, and I did plan for this to be a two tip rod, so it's not the end of the world. I'm curious though, what are the consequences of the flipped strip? I intend to finish both tips out, so I will find out eventually, but I KNOW I'm not the first to do this. What happens in the long run? Weaker action? More likely to break? Merely cosmetic? (Tyler Beard) While I haven't done it, yet, I've talked to several good rod makers who have. All said they fished them and other than the bruises to their egos, noticed little if any difference. I can't attest to their honesty in that regard, but they did admit to having done it, so why lie about the results. (John Dotson) Go ahead and fish it. I think you will find that it's mostly cosmetic. Russ Gooding (owner of Golden Witch) sold a rod on Ebay last year with the same problem and he's been building rods for quite awhile. He stated that it was strictly a cosmetic thing. (Will Price) Power fibers ( June '06) has an article by Tapani Salmi about inside out building where all 6 strips are rotated so that the power fibers radiate out from the center. Interesting work. He built a pair of rods to test the difference in the two methods. The inside out rod was slightly softer, but that may have been because he reported loosing more bamboo while scraping the string off. The the exposed pith is softer and tends to be eroded quicker by the scraper... something top be aware of as you finish the string removal. He proposed it as a method of building a rod who's taper could be altered after gluing and testing. Developing a purpose specific taper that way would be a lot easier than building entire rod blanks to test each modification. I don't see much from him since '07. I hope he is still looking outside the box and building rods. (Larry Lohkamp) More about inside-out building can be found here. I really have tried different even asymmetric compositions of strips - interesting and informative work during dark and cold winter time! Still making experimental rods - they are just fishing poles! (Tapani Salmi) Oddly enough, I was quite wary of the issue as I was gluing. I was using some off-brand, blue masking tape to tape things together, and the stuff just wasn't very sticky. It was like herding squirrels, trying to get the strips together and oriented properly. Once I had done so and had it taped up, I thought I had 'er whipped. Alas, it was not so. I'll definitely finish it up and fish it. Honestly, even knowing the strip is flipped it is hard to see. I'll be curious to see if the varnish makes it more obvious. (Tyler Beard) Try regular white masking tape to hold the strips together. The blue masking tape isn't very sticky as it is painters tape that is made to peel easily without lifting drywall surface and because it lets almost no residue behind. The only thing I use the blue tape for is to hold guides in place when wrapping and to mask ferrules in preparation for the dip tube. (Will Price) 3M sells a “green” tape that is the stickiest of all. I does a great job and doesn’t leave a residue on the rod strips, or anything else that I’ve noticed. (Al Baldauski) I just lay a piece of ordinary white masking tape sticky side up on my bench and carefully place the indexed strips enamel down on this. No problems juggling them or tearing about like a one armed paperhanger trying to get them in register when you do this. Once I have the first "permanent" wrap of masking tape around the section I take the indexing strip off, as it is seldom accurately placed, and neither is it tight enough to hold the strips through gluing. (Peter McKean) Know what you mean about trying to roll and nestle all the strips properly. I solved this sometime problem by nipping a small section off an "MD" fixture as someone had wisely suggested. Now if the strips don't want to cooperate I just whip out this little asterisk shaped tool and round 'em up. When properly oriented, I can just pull out the little piece of fixture and - voila'. Thanks to whoever suggested this. I know many don't have MD fixtures and many still wonder what they are. Perhaps Harry could "sacrifice" a rod or two, cut them into 1/2 sections and offer them to the community for a buck apiece + SASE. Would be a good deal all around. (Darrol Groth) I was wondering about how to make the little gadget that Glenn Brackett uses in the video Trout Grass. I was going to try and make something like that with some sheet metal but a little cut off of the heat treating fixtures seems like it would be worth a try. (Greg Reeves) I took a single-edged razor blade to a wine cork and got by. Still have all my fingers, too! (Steve Yasgur) I'm ahead of you. Was thinking of posting something similar, but doing so looks like self promotion. And y'all know me -- I'd never promote myself. ;-) I've already cut a coupla fixtures into short pieces. Gave out a handful of them at SRG this year. Be happy to send a piece to anyone willing to pay for the packaging and shipping. Biggest trick for me will be finding the bag full of shorties! (Harry Boyd) I have a rod that I am building that I flipped a strip end for end in one of the tip sections. It is a 4 piece rod. I am still going to finish it out & I will almost guarantee that I will not notice a difference in the tips. (Bret Reiter) Unless you take that section to a lab, where they have the precision equipment to measure the deflection characteristics, you probably won't notice much of a difference, if at all. You'll have less of the power fibers on the outer part of the "beam" than you normally would if the section was glued up correctly, but it may not be enough to be noticeable. It might show up as a slightly weaker side when you determine the spine of the rod. I seem to recall somebody on the list, maybe it was Tony Spezio, made a rod with all the splines like that, and didn't notice a difference in that action of the rod. (Mark Wendt) I've gotten into the habit of using a Sharpie and darken the bottom of every strip so there is no mistaking node spacing. After final planing I pick up the Sharpie and darken the enamel butt about 1/2" so there is no mistaking where the outside of that strip is suppose to be. Yep you make that mistake once. (Doug Alexander) Let us know how it fishes. I am betting you won't notice a difference. Shoot have somebody try it without telling them and I bet they won't notice either. Since it was a tip section the majority of it will be power fibers anyway. There might be some pith toward the butt of the section but, that’s no big deal. I do like the suggestion you received about using a Sharpie to mark the enamel side. That is going into my bag of tricks I have gotten from these master builders. (Pete Emmel) The second rod I built. I used the blue tape and when I got it in the binder it came loose. It seemed all was well till I took of the string and gasp not one but 2 strips flipped and this was a butt section. I finished it out anyway. I have been fishing it for two years for bass and steelhead (its an 8'6" 7#) and have not problems in fact I like it alot. Many people have cast and looked at it an unless I tell them they don't know the difference. I even forgot about it till your post Use it. (Rick Barbato) I've been trying a new technique and it seems to be working. I use the tape to set the strips initially, but then I use some of the binding string and put 3 or 4 clove hitches or other tightly tied knots around the cane at those places, removing the tape thereafter. That allows the strips to slip against each other while they're spinning in the binder, unlike what the tape does, where they're held in position at those few points and won't slip under the string tension. That holding seems to cause a twist in the rod. The only potential downside is if the knots get big and the section must jump over hem as the section spins. (Art Port) I use the blue tape on my sections before I bind. I cut it into 1/4" wide X 2 1/2 -3" long strips. I'm careful not to touch the sticky part Then I nestle the sections together starting at the butt section and working my way up gently rolling the sections together with my fingers every two or three inches and apply the tape every 10-12 inches. When together I take a sharp razor and cut a seam on a straight line thru the tape along the section laying them flat on the bench covered with a section of wax paper. Brush the splines clean and apply glue and roll the section back together. Then I run thru the binder without removing the tape. This seems to help, I don’t have to stop and remove the tape every time it approaches the string on the binder. After the glue is cured and the string is removed the blue tape sands off quite easily with the residual glue. Another plus for using TB 111. (Mark Heskett) I've been doing more or less the same thing as Art. Only I tie up a half dozen or so loops with slipknots (for each section) with inch or so tag ends and hang them on a peg on the wall. I slip the loops on one at a time slide and them into place 6 or 8 inches apart, tighten 'em up and tie an overhand knot with the tag ends. To me, it is much easier to make up the loops before gluing than to try to do all the knot tying with glue all over everything and it is much easier with an extra set of hands (and it gives my buddies an excuse to come over and raid the shop beer-fridge). Once the loops are all in place, the tape is removed and the sections are ready for the binder. I find that the strips stay nestled together much better doing it this way. This is especially helpful if you hollow-build. By the way, I use the same technique to secure roughed strips to my heat-treating forms when I bind them, I just use heavier string. (David Atchison) I use a slab of granite 8”x48”x1/2” as a flat work surface, it’s easy to clean up and less mess than News Paper. I cross tape masking tape sticky side up every 6” or so just to hold the strips while applying the adhesive with a soft tooth brush. I don’t use any masking tape to hold the bundle. Using a 2” long piece of heating fixture start the bundling of the strips and tie a clove hitch just beyond the piece of fixture. Once the clove hitch is in place check again that no strips have flipped, remove the piece of fixture, tighten the clove hitch if needed and feed the strips through a piece of 1” PVC about 3’ long or what ever length you need into the in-feed of the Garrison type binder. The PVC keeps the strips from wiping around for the first pass of the binder, don’t need the PVC for the second pass. Using Robert Kope’s genius idea of flipping the section after the first pass without cutting the binding cord finish binding the section. (Don Schneider) Thanks for all the thoughtful comments and help guys. I've never been a part of an email list that I stayed subscribed to for more than a few days because the volume of email overwhelmed me, and it wasn't that useful. This list is entirely different for me. I love getting all of these emails, I think because so many of them are so useful. What I've learned is that I need different tape, my generic blue tape just was not sticky enough, and there are some slick ways of getting the strips to line themselves up nicely for taping. I've also learned that making a bold mark on the ends of the strips will help avoid making the flipping mistake in the future. Harry, I'll be calling you later today. I've been tempted to get the heating forms for a while now, and the trick of using a drop from the form to help align the strips seems like just the excuse to finally call and order. (Tyler Beard) Be careful with the super sticky tape. It can tear the outside fibers if you are not careful when removing it. The way I have ended up with flipped strips was when I wasn't paying attention. It usually happens when you are binding and there is glue all over. Then the marks won't do any good unless you catch it. (Jerry Foster) I've had a flipped strip and it was on a blond rod. I find it is not a problem on a flamed rod( easier for my old eyes to see I guess). On my blond rod, it was barely visible and only I know it is there. Rod fishes fine. (Bill Bixler) Good choice, you gotta go with Harry's fixtures. To me they are better than sliced toast. I use them and my sections are almost perfectly straight once they are glued up and rolled. They come out of the fixture good and straight. I leave my rough planed pieces tied up in them until I am ready to final plane. (Pete Emmel) Well, if you planed a bit off the apex, which I always do, then you have a rather big glue line which won't look nice. If you didn't then you have one strip which looks a bit different from the others, but probably only to another rodmaker. Otherwise any variations will be completely lost in the maze of material and production tolerances which mean that getting one rod within about 10% of another is a rather a matter of luck. (Robin Haywood) Before my final planing, I mark each strip with the number of the strips position (1 to 6)on the first 1" of the strip. I start assemble at the biggest end using my 1 to 6 marking as a guide. After I have assembled the strips and secured with bands of masking tape. A quick look at the end shows the 1 to 6 markings on each strip and shows that all the strips are correctly positioned. (Gordon Gove)
I just finished planing a Sir D 7042, all the measurements are correct, all the strips are made from the same culm (which I got from Golden Witch). The tip section is really floppy, I mean really floppy, as in spaghetti floppy. The glue I used was Gorilla glue, I didn't heat treat it, but it is flamed. The butt section is just fine. Did I miss something! or is it supposed to be this way? (Joseph Freeman) Nope, should not be floppy. I use Gorilla Glue with very good results. (Pete Emmel) I built the Sir D. 7643 as a PMQ last year. Before you glue them up, the individual strips are floppy, even after heat treating, but gluing them up adds a lot of stiffness. Short answer, no, it shouldn't be floppy. What did you do wrong? That's a tough one. There's nothing wrong with Gorilla Glue, I used it on one of my PMQ's, although I prefer Titebond III now. I think heat treating would have helped, but I doubt that it would be that significant. I used the .95 conversion factor, but anything between .93 to .97 makes a fish-able rod. Without examining the section, and verifying the measurements, it would seem that you either miss calculated the measurements, or you got hold of some weak cane. You could post us the measurements you used, and we could verify the numbers, if that would be helpful..... (Paul Gruver) I worry about Gorilla Glue in this application due to its UV sensitivity. Here's the technical sheet. On the first page under Application it says: "Exposed glue line must be protected against UV-light (direct sunlight)." I wonder if anyone has experienced joint failure or discoloring of the joints with Gorilla glue? The varnish UV protector may help in the short term. But near the tip, the glue line makes up a large part of the rod and is likely the spot which will show as being inferior and will affect the casting properties the most. I had an experience with what I believe was the commercial use of the equivalent Gorilla urethane system (due to the color of the glue) on my aluminum overhead garage door. My attached garage is unusual in that I have a lot of windows to blend with the house design. As a result, the back of the garage door gets an unusual amount of UV exposure., compared to most garage applications. A few years ago, My 2 car garage door began to tear (literally big rips in the aluminum) itself apart with each use. I looked at the door and discovered glue failure after about ten years of installation. So I tried Gorilla glue after spraying the joint lightly with water, which helped temporarily as those joints were closed. It just moved the pressure to other joints and they failed, as often happens in a system of joints. Eventually, only steel bars and bolts were enough to stop the metal from tearing as more joints failed. My conclusion, UV deterioration of the (aromatic based) urethane, which is well established, led to this problem. There are UV resistant aliphatic (think straight chain hydrocarbon) urethanes, but they are expensive and likely not used in construction joint adhesion. Gorilla glue's technical sheet tells you their adhesive is not UV resistant so it is an aromatic (think benzene) based urethane and will continue to degrade over time as long as the edge of the joint is exposed to UV.. Use Gorilla glue inside your house in dark corners which get no UV exposure, never on your deck, roof or elsewhere outside.. A friend of mine had a very disappointing result when he used Gorilla glue to fasten his beautiful Zebrawood hex rod case. It was beautiful outside with perfect joints but Inside the case, all the joints were covered with unremovable, expanded yellow joint material. A horrible and unusable result. Gorilla glue's "joint filling" capability gone awry. Make good joints, as these were, clamp them as he did, and you will not need this "capability". Maybe with crude construction joints this is a useful property. My point of all this is, there is no good reason to use Gorilla glue in this application, other than its neat name, where UV exposure of the joint (however slight) is possible. This is especially true if you want your grandchild or someone else's grandchild to use a rod you make. There are lots of other good and proven adhesives out there. Avoid Gorilla Glue for this use. (Dave Burley) Great explanation Dave. Thanks for going to the trouble. Strangely, many a good rod has been made with Gorilla Glue. I know a professional rod maker (JF) who uses it exclusively. I use Urac and/or Epon, but made one or two rods with Gorilla Glue. It worked fine for me. I suspect Joe's problem had to do with not heat treating the bamboo. (Harry Boyd) It does not surprise me that Gorilla Glue works OK. It is a good adhesive, but, my point is, long term UV exposure may cause a problem, which will only time will tell. Why take the chance, when other alternatives are so readily available? (Dave Burley) I believe the estimable Denver Dave (Mr. Collyer) builds with Gorilla Glue and has spectacular results. Maybe Dave can offer his opinion on UV vulnerability. (Gary Nowak) No, it isn't supposed to be like that. Two possibilities - The glue didn't bond right and/or you didn't get enough heat into the bamboo during flaming. I have managed to do both in my short career as a bamboo butcher. There is a maximum open time and minimum clamping time for any glue. If you are too slow with the binding process, you will exceed the time limits and the glue will not grab the way it is supposed to. The resulting blank will take sets easily, be floppier than usual, and break under load. The breaks with glue problems often follow the glue lines, making it easier to rule of other problems. My rod with too short a heat cycle took sets and stayed that way. It was also softer, but wasn't weak enough to break when flexed. One of the Titebonds doesn't like being flexed until it is fully cures. I don't know if Gorilla Glue has the same limitations, but it is a good idea to glue, bind, straighten, and then leave it well enough alone until the glue is hard. David pours out some of the left over glue so that he can test it for hardness. (Larry Lohkamp) I used the dimensions for a hex to make a two-strip quad, is that where I went wrong! If so is there a conversion formula? I am sorry about not including this info in my original post. (Joseph Freeman) After reading all the subsequent posts, and the variety of the solutions, I think I will try again, this time heat treating them, with adjusted measurements, and Titebond III. That out to cover all possibilities, as my belief that it was a combination of errors in, all of the above. I will let you know how it turns out. I find it a bit disconcerting that the stiffness of the rod depends so much on the glue, though! (Joseph Freeman) Discussion notwithstanding, I do NOT believe that the glue does contribute much to the overall stiffness of the rod. Having tried URAC, Epon, Polyurethane and TBIII, I cannot see much difference. and some years ago I built quite a few rods using Polyurethane glue (not, admittedly, Gorilla Glue, but Elmer's Pro Bond and a product from AV Syntec) and in an environment where we see a lot more UV exposure than most, I have had no suggestion of failure. (Peter McKean) I think what may have happened is that the rod may have been floppy because when the glue doesn’t set the strips don’t behave like a laminate. The glue is sort of gummy and lets the strips creep back and forth. (Doug Easton) Here's a link to a glue test I did a couple years ago: It appears to me that there is a direct correlation between the stiffness of the cured glue and the stiffness of the rod. It's probably a nominal difference in most cases. But the Titebond difference is significant. That doesn't mean my Titebond rods won't fish. They've held up just fine. But other glues I tested were more set resistant. Larry mentioned this, but just in case, here's the link to a few thoughts about TBIII that might be helpful. (David Bolin) Thanks again for all your work and making it accessible. I think we need to review what you did and your use of the term "stiffness". Your experiment to determine if the rod would take a set, depending on the glue, was excellent. The harder glue (URAC) was the least set. However, "Taking a set" and "stiffness" are not the same thing. They may be related, but they are not the same thing. Stiffness can be measured using weights and deflection distance measurements. Do you know of an experiment which measures the bending deflection as a function of the glue? I agree with your curing discipline. (Dave Burley) A few years ago I did an experiment, limited though it was. I made two rods from the same culm, to the same taper. One was glued with URAC, the other Epon. Both rods were then put through deflection tests. The URAC rod deflected approximately 20% less in all tests. (Harry Boyd) "The URAC rod deflected approximately 20% less in all tests." That’s very interesting. 20% difference is quite a bit. How did they compare when cast? Would you say the URAC rod was "faster"? Does the choice of glue significantly alter the action? (Rick Hodges) I failed to cast them side by side before shipping one off to a customer. But as David's tests and many people's experiences show, choice of glue does significantly alter the action. (Harry Boyd) Well, there is no doubt that 20% is a pretty big difference, and probably statistically significant in most test environments; certainly I never did static deflection tests, and my impression was a purely subjective one, but still I cannot distinguish a difference in action in the hand. As a matter of interest, is it the polyurethane that yields the greatest deflection? It always appeared to me, again in a very subjective sense, that it was the glue that retained the most plasticity when cured. I actually liked gluing up with PU because of the one pot ease of the stuff, but was driven away from it because it is so jolly messy and stain prone. I guess I just like Epon. (Peter McKean) I solved the mystery of the floppy bamboo, boy do I feel like a goof, I misread my calipers, (please don't ask me how I could do such a thing, the details are way to embarrassing). One, Two, Three,.... HAHAHAHAHAHAHAHAHAHA. I thank you each and every one, for being so gallant and concerned about my mystery. Sorry for wasting the Collective’s Time. (Joseph Freeman) Even though I didn't have a reply to your question, I disagree that you wasted anybody's time. I often ask guys to contribute something and they answer "I don't have anything to say" I disagree with that statement and I always say "if you don't have anything to say - ask a question" that is what makes everybody think and share their experience. So I for one will say: Thanks for the contribution and keep ’em coming! (Joe Arguello) Welcome to the club. Here's another way to screw up the measurements. I have 2 calipers, one with a V-block for measuring strips and one without a V-block that I use for measuring flat to flat on glued blanks.... I recently made a blank where the strips were dead on to my target numbers but when glued up, it was .010 over size from one end to the other. How'd that happen? After much head scratching and a couple of beers, I removed the V-block and re-zeroed my V-block calipers and started measuring random objects in the shop, drill bits, screwdriver shanks, washers, etc with both calipers. The V-block caliper (V-block removed) measured everything exactly .005 smaller than the other one. Mystery solved. I replaced the bad caliper. I now check both calipers against a .100 drill bit before I start a rod to make sure they agree with each other. (David Atchison) So, David, how's that new 7 wt workin’ out for ya... ;-) It might be overkill, but I re-zero my calipers before each day's use, and also check them out against the standard before each day's use. Same for my mic's and depth gauges too. It only takes a few seconds, and it verifies in my mind that my measuring equipment is dead-nuts on. (Mark Wendt) Sometimes a screw up can be an blessing in disguise. I built a couple of rods and screw up setting my form, I ended up with the bottom of the tip larger than the small end of the butt. I was poor in those days and could not afford either the time or materials to just toss them away, so I ferruled and finished the rods, To my surprise they were easy to cast a thin bow and pretty good distance. Later I find that this is an approximation of the Castle Connell Kick taper. It is my wife's favorite rod. So all is not lost. (Ralph Moon)
Sitting here reading about plane angles and removing glue after the glue up process reminds me of a trick we used in the cabinet shop. Buy a package of Paraffin Wax in the Grocery store and apply (rub) wax to the enamel side of the strips just before you do the glue up. It keeps the glue from sticking to the enamel and any traces can be removed with lacquer thinner. (Joe Redburn)
One old timer brit I used to help told me to hang a 7 pound weight on to my bound drying strips? Bought and used the Cattanach book and took it that hanging big weights is not the done thing? It makes sense to me and it would not only stress and tension, but it may just take a lot of my straightening work out of the total effort! Why not use this method? Finally getting good epoxy is like trying to find rocking horse droppings in the UK. (Paul Johnson) I use a spring-powered stretcher which does about the same thing as hanging with a weight. What I've found is that if your strips are not straight before gluing, no amount of weight will make your glued section straight. After you remove the weight, the bends will come back. But if your strips are straight and the bound section is straight, the weight will keep it true as it dries. (Frank Stetzer, Hexrod, Taper Archive, Rodmakers Archive) I have tried the weight hanging thing without success. As Frank says the sections must already be straight and weight only maintains this. You will notice that to straighten sections it is necessary to overbend them slightly to get the splines to move so when you release the pressure the strips are hopefully straight, adding a weight does not achieve this. From my own experience I have never found adding weights to be necessary or helpful. What are you wanting epoxy for, I may be able to help? I'd take issue with you over game fishing being a rich mans sport and I'm a life long coarse fisherman. It is certainly true if you want to fish the chalk streams the cost is silly but elsewhere it is not so bad and if you are near South Wales the Passport system gives access to miles of water much at around £15 per day. The Dove near me is a mixed fishery and a Burton Mutual ticket is £60 per year and there are many others. Many coarse anglers spend more on bait. I make coarse and fly rods on the same forms (sized for fly rods) the only problem being the need to reduce the bolt and dowel diameters near the butt end to allow space for the larger sections so I am not sure why you would make forms specifically deeper but they may give your strips better support. By the way I'm sure RW went on to make a MKVI Carp rod but I think you mean a MKIV. (Gary Marshall) As I'm sure Gary perfectly well knows, RW thought that the MKiv was perfect and made no attempt to improve it at all. He considered that if it was OK for his 44 lb record fish it was good enough for anything. The subsequent record, caught by my old chum Chris Yates was 50lbs+ and caught on the much lighter Avon version. With a reel on the point of seizure! I know because I fixed it for him. What it was not any good for was "modern" methods, which seem to involve casting 4 oz leads over the horizon with self hooking rigs. A suitably scaled up version would be, and the tapers would mean a lot less dropped fish. Sadly, fashion dictates rods of extreme length, which merely provide the fish with more leverage, not the angler, and with crude fast tapers more suited to the design of ice-cream cones. You can catch any barbel that has ever swum on a MKiv carp rod, and enjoy the experience a lot more than using one of these obscene Bass rods that are now so fashionable. A suitable epoxy for sticking sections, but not ferrules, is UHU Endfest 300, and you can heat cure it too, if you want to. Keeps my nodeless hollow sections together perfectly well, but so does almost anything else. If you heat it to about 100 degrees C you can straighten it easily. I prefer to do this in the string. (Robin Haywood) The epoxy that’s readily available here in the UK is UHU 300 Endfest. You can get it at your local Morrisons Supermarket! (Paul Blakley)
Any thoughts about hanging weights from sections while they are drying? For those of you who do, how much weight do you use? (Pete Bates) Are you talking about while glue is drying or soaked strips drying? I have hung weights on bound glued up sections using the long lead Plumbers Solder bars with a cup hook on one end and also used springs in a frame for tension. The sections still were not straight when the glue was set. I was using Elmer's Glue at the time. I did get straight sections by laying the section in my forms with shot bags laid in top of the section to keep them in the groove. This allowed only one section at a time to be glued up. I have since gone to Epon and worked out my straightening process to where I don't worry about it anymore. (Tony Spezio) Yes, I was thinking about drying sections after glue-up. I have been rolling sections and using the artists "rolling pin" until everything looks straight and twist free, then hanging with about a pound of lead weight. It may be superstitious behavior on my part. I use Nyatex, so have some time to fiddle with the sections before they set up. Tony what is your current procedure? (Pete Bates) I once got fairly ambitious about this when I get my hands on an old high school gym locker during a construction remodel. I ran a section of allthread rod through the bottom and top of the locker so I had a place to hook springs too. I used springs like you see in large auto drum brakes, medium pressure I would guess, with long straight "hooks" on either end. I had several different spring lengths for different length rods. After glue up I straightened on my bench the best I could while still being able to work them, then put them in the locker hooked up to the springs where they looked nice and straight while "stretched" between the springs. I did this on several rods before I abandoned the whole aggravating process. It just didn't work for me; the blanks came out just like they went in. I still had to heat straighten the blanks later. Straightening right after glue up the best I can and then hanging the blanks to dry from a wire stretched across the ceiling works equally as well for me. I have plenty of time now to straighten with epoxy (at the time I was using Urac) and I use every minute of it I can before I hang the blanks. If it takes an hour to get a blank as straight as I can, so be it. (Tom Vagell) From previous discussions about this I think there are few who use hanging weights to help straighten sections. I do. I generally use about 3-5 lbs. and I find it does help straighten my sections in a subtle way. However, I have had to learn to suspend the weights from the sections with the weight equally distributed - or it will just cause a kink. To insure equal weight distribution, I fashion a small piece of string with slip knots in each end and tie them on the end of the section with the knots directly opposite each other. This forms a loop from which I can hang the weight - less for tips, more for butts. If I straighten very well before, and hang the weight carefully I find that sometimes I get no (or very little) spine. It helps but you gotta learn how to do it carefully.
I feel like I may be becoming a pest with all my requests for help lately, but the learning curve is not being climbed very well I guess. I just finished cleaning my blanks after heat treating the glue on my sixth rod (I use Nyatex). I know I had good measurements on the individual strips as I was planing to final taper. But upon checking the finished blank, I see this pattern: Toward the tips my measurements for what the flat to flat distance should be is right on or within 2 thousandths. Toward the middle of the blank I begin getting oversized by about 6 thousandths; and then at the butt I am as much as 10 thousandths too large. I know it is not my measuring tools as I have two and both come up the same. I know it is not the depth setting on the planing form, as I have two depth gauges and each calibrated to their standard and on this rod I double checked with both (but that should not be an issue if I measure the strips correctly during planing). I considered whether I am crushing the apex of the strips as I am measuring the strips during planing, but that does not explain why the tips are so very close but the butts way off. I wonder if there is more glue in the joint as the blank gets bigger thus accounting for the increases as I get toward the butt. I do know that this particular culm was pretty gnarly at the at the butt section, but it did measure out during planing. One fix for future rods may be that I just set my planing form a few thousandths smaller as I approach the butt, but I would like to understand why this is happening. Without knowing why this happens it is like aiming to the left in golf to cure a slice. Its better to fix the swing. Any ideas as to what is happening so that I know the correct fix? (Doug Hojem) Here's some thoughts. Are you measuring your strips 3 ways to assure you have good equilateral triangles all up and down? Try dry binding your strips and measuring those flat to flat dimensions before you commit to gluing. I find that often turns up a problem the individual strip measurements didn't show. (Mike McGuire) There are two other possibilities. One theoretical since I haven’t observed it and one quite practical. I haven’t worked with Nyatex so I don’t know how viscous it is. If it is a very viscous epoxy, then there will be more glue squeeze-out at the tip then at the butt. Since your binding string pressure is constant you get more force on a smaller section than a thicker one. This would become apparent if you do as suggested: measuring your bundled section without glue. if it measures correctly without glue and then larger when glued, you know you’ve got a thick glue line. The other cause could be strip growth due to moisture re-adsorption. When you heat treat your bamboo you drive off a lot of moisture which results in shrinkage. if you immediately plane your strips to final dimensions and glue up your rod it will measure correctly. But as the rod sits around it begins to re-adsorb moisture from the air. How much and how fast depends on the area of the country, the season and the ambient humidity. The moisture in the rod will equilibrate in a matter of days to months. I have measured as much as a 4% increase in size. 4% of 0.060” is 0.0024” growth. 4% of 0.300” is 0.012” growth. Things to consider. (Al Baldauski) Bang on with the swelling part. I have a couple of suggestions that has helped me. I take about 4 light passes on the inside apex of the base strips after I reach final size. I also take about three light passes on the tip section and mids also if a three piece. This prevents the strips from not seating completely. Another question is if the strips were dry during the planning and if you happen to wet the strips for glue up. When I used Elmers Ultimate I would wet the strips just before glue up. It would cause the strips to swell a bit until the moisture dried out of the strips a few days later. I was surprised how much they would swell. I use Urac 185 now and set with heat so it’s not an issue. (Mike Monsos) I should have been more clear that I use my block plane set for about .001” per pass on the inner apex. The rod section will have a pinhole void in the center when the strips are bundled before glue up. After glue up the void is filled with glue I would guess. (Mike Monsos) I also ran into this problem when I first started. I deducted .002 from my form settings for the butt and came pretty close. I am using Epon Glue that is like Natex. The butt being larger will hold more glue than the tips. (Tony Spezio) I agree with Tony and Mike. I would add that you cannot possibly see if you are crushing your apexes. And you probably are. I really find that when I stop checking my dimensions, I stop being accurate. I use a good quality English digital micrometer, and I use it a lot; it has a very light pressure to measure, so any apex damage is minimised. I always have a 19th strip when I start planing, and once I have set my forms as accurately as possible I plane that test strip down to final size. Then I measure every 5" station again and jot down on the form in grease pencil whether it is over or under, and by how much. Then I make the corrections to the form settings and repeat the plane-and-measure rigmarole again. I do this till every station is right, or as near to right as I can make it. At this point I put the test strip aside and plane the six butt strips, CHECK-MEASURING EVERY ONE and fine tuning where I have to. I know this sounds obsessive, but it keeps the strips consistent and that is what it's all about. Making a good, well-finished rod is difficult; making it good, well-finished and dimensionally accurate is not necessarily any more difficult, but bloody tedious and slow. But this is an occupation for slow. If speed is important, maybe drag racing might be better. Or bungee jumping! (Peter McKean) Several excellent possibilities have been suggested in accounting for the odd “growth” of the rod’s dimensions from tip to butt, and I’ll add another. It’s important to remember that strip height is not the only factor in the final dimensions of a rod section. It is all too easy to plane strips that are not perfectly equilateral, and if the width across the outer, enamel flat should differ from the inner flats this will result in an inaccurate rod. (Check this from time to time by measuring, not just from enamel to inner apex, but also across the other two flats as well. If the strip is equilateral, the three readings should be identical.) Although a little heretical, remember that, at the end of the day, it’s not the strips’ heights that determine the full hexagonal dimension, but the meeting of the outer corners. With perfectly equilateral strips, the assembled dimensions should meet your strip-height predictions, but with less than true, equilateral strips (even those whose heights measures accurately), all bets are off on the final dimensions. It’s possible that one’s measurements (any or all) may be yielding false reads, but it’s equally possible that some consistent planing problem exists. One step further, the two surfaces of the planing form itself may not be exactly flush. Clearing your mind to find out what corrections are appropriate is the tough part. (Bill Harms) Some great suggestions to check for here. I was also curious how you are doing your measuring? From flat to apex? Apex to apex? Are you doing it for each side? How consistent are the errors from tip to butt, flat to flat and also blank to blank (of the same taper of course)? Are you making your apex side flat or leaving the curvature of the culm in place? I'm asking because if you are measuring apex to apex, even all three sides (with perfect sixties, these would be equal), but the enamel side retains the curvature, you would be off as you describe because apex to apex is point to point and not the true length of that side including that enamel curve. Once you are glued up, the height of that curve (technically, I think it is called the sagitta) starts to add up. It's a very small amount near the tip, much larger near the butt. Likewise, if you are measuring internal flat to external apex, even on both sides, you'd miss this sagitta figure again. Finally, if you are keeping the curvature and measuring enamel (external) flat to internal apex and you are off even a little (crushing the apex or planing off a few thou) you could end up with a similar issue, though maybe less so as it is balanced out slightly by the other dimensions being slightly smaller because you are using the sagitta in your calculation of strip height. We need more information on the planing of the enamel side of bamboo. I when starting to plane, I will take off maybe 20 to 30 thousands, then with a scraper try and take the enamel side down to not have a rocking effect. When down to the last 10 thousandths. I will then take 4 or 5 thousands off the enamel side. When done planning I never felt I had a curavture on the enamel side. What am I missing.... (Lew Boyko) Finish out the rod. Cast it. Let others cast it. When asked what the taper is, answer with: "It's one I developed." I know it is frustrating. In October I put two rods aside because I just wasn't satisfied with that I had done. Nodes weren't right and the glued up sections looked a lot like one of our mountain roads. I picked up one of those sections this weekend and measured across the flats. There wasn't more than a thousandths difference between those three readings. Measured at another point and again all within a thousandth. Maybe these rods aren't as bad as I thought. I'm looking forward now to finishing them out. (Tim Wilhelm)
I have a tip for a 4 wt that I've glued with Epon and have begun to wonder if I tempered the bamboo. I made the tip with some roughly beveled strips that I had laying around for a while and don't remember whether or not I tempered them beforehand. I glued the tip a couple of days ago and today I removed the strings and scraped it in preparation for the heat setting and have become a bit concerned about the flexibility of the tip so I'm wondering if I should temper them, maybe again. I've rebound the cleaned section in preparation for heat setting. My thought was that I could bring the oven up to 380 degrees or so, put in the tip for about 12 minutes (reversing it halfway through - it's a hot air gun oven), then remove it from the oven and bring the oven down to 180 degrees before putting the tip back in for it's 4-hour heat setting. But the glue will almost certainly become very soft. Or I could just leave it alone and do the heat set only. It's nice and straight with no glue lines and I really don't want to screw it up. Don't do it! That temperature will definitely break down the epon -- flex the section once after doing it and the strips will fly apart. (Mike McGuire) What Mike said...Epon will delaminate at around 235-240 degrees F. Heat it up to there flex the section and you will hear a sound like a bunch of tiny little zippers being pulled as your section falls apart. Heat set the glue at the normal temps or wait a week for it to cure and see what you've got. (Dennis Higham) I have one rod that was soft. I had only heat treated by flaming the culm. Fighting a fish would be enough to put a set into it on the tip section. So I would never fish it. I decided to throw the whole tip into my heat gun oven with guides attached and ferrule and tiptop. I use epoxy from Lee Valley and heated the section at 325 for 8 min. It came out of the oven like a wet noodle so I just straightened it out and let it cool. Other than discoloring my wraps it looked good and it was now all most impossible to get a set. I don't how my clue differs from Epon but I have heard from some one else that he will re-treat his section at 250 with out a problem. (Ken Paterson) What you're saying about heat treating again after rods are finished is correct a rod will neutralize to the humidity it's in because of this I take all my rods about once a year and put them in my oven at the lowest temperature I can get it at for about a day, day and a half and they come out crisp is just as if they were just made. (Doug Hall) Definitely, don’t do it. However, I think there’s a good chance that the problem may only be that the Epon is not fully cured yet, which will make the section feel too soft. You could just wait a week, but I think the better plan is to do the heat set. My guess is you will be fine. (Tom Smithwick)
My latest project, an 8'-6" 2/2, has 'grown' +.002" to +.013" from tip top to bottom of butt section taper after glue up. Do any of my fellow rod makers keep track of glue up expansion and how do you correct for it to keep you taper? I'm thinking this amount of 'swelling' pushes the taper out to at least one more line weight if not more. (Don Smith) I try to follow a consistent process during glue up. That means same binder weight from rod to rod although I do use a lighter weight for tips than for butt and mid sections and have the glue at the same temperature each time. I use my heat gun to have the glue comfortably warm to the touch in the glue pot (actually a small glass jar). The warm glue gives a thinner glue line than cold glue. I record all strip dimensions and resultant glued up rod section dimensions (after final sanding) at the 5 inch stations as well as tip and butt of each section (if they do not on fall on planing form stations). Based on past records and experience from the previous rods I adjust the planed to dimensions to account for glue thickness in the finished sections. But then I do use epon which I guess tends to give more of a glue thickness problem than some other choices. But epon has too many good points, as far as I'm concerned, to consider switching to another type of glue. For me tips don't grow much at all due to glue line thickness. Its more of a problem with mid-sections (on 3 piece rods) and even more so on butt sections. Just keep in mind I have only built a dozen rods along with a few other odd rod sections. I usually get within 0.002 or better on tip sections and within 0,004 or 0005 (especially at butt end) on butt sections. (Joe Hudock) I use Unibond 800 glue. The temperature in my glue up and binding ares right now is running in the 50 degree to 55-degree range. I mix for longest working time and actually bind fairly tigjt. I lightly moisten the strips just before applying glue. I'll give the butt and tip a few days more drying time then remeasure the stations again. The dimensions may vary. I don't want to sand or scrape too much off the power fibers as it is. (Don Smith) There is little doubt in my mind that your strips did NOT grow as much as you report below. Your measurements for the finished section are likely correct, but your pre-glue measurements are too small. No matter how gentle your touch, how soft your hands, how good your calipers or micrometer, you CAN NOT measure a single triangular shaped strip of bamboo without crushing the apex. It just cannot be done. It took me lots of rods to figure that simple fact out, but it is true. To avoid the problem of crushed strips you have two choices:
Testing to prove or disprove what I write above is easy. Plane two square or rectangular strips of wood to 1/2"; or even of bamboo to 1/4" or 1/8". Measure flat to flat. There are no apexes to crush. Record your measurements, then glue the two pieces together. You will find that there is almost no discernible growth from glue. Harry is spot on with his post. I agree with him 95%. The one thing I would caution anyone about is the use of a "V" block. It only works if the strip apex EXACTLY matches the "V" block angle and the bisector of that angle is perfectly perpendicular to the it opposite flat. In other words, the strip geometry and the block geometry must be near perfect. (Jerry Drake) I believe what Harry has said is true. When I planned my first strip, I was winding up with glued up rod that was 5 to 6 thousand over at some stations. I measured each station any number of times and realized that there no way to measure a strip without crushing the apex with my calipers. What Harry said about bundling up the strips real tight and then measuring them is the best way. My next rod which I have all planned up and ready to glue, I am going to sand down the apex carefully before gluing. I will let you guys know how that turns out. (Lew Boyko) My question (newbie here, go easy on me) now becomes, if I purchase a v block attachment for my calipers, AND I use it to measure all three flats to apex at each station, work/plane them until all three flats to apexes measure the same at the numbers for the taper I want to make, will that make my rod sections correct, even after glue up? (Chris Diller) I use a v-block to measure the strips from my MHM, so I can’t tell you if measuring all three flats will accomplish what you ask. I do know that my v-block (sold by Tom Morgan for use with the MHM) measurements precisely match the measurements of the glued-up blank. For the record, I use epoxy to glue up my blanks and the glue lines have no perceptible thickness and I make no provision for glue-line thickness. (Tim Anderson) I know that it is very bad form to answer a question with another question, but who cares - do you really WANT, or need, that level of precision? We are not building Rolex watches here. As I have tried to make clear over the past couple of weeks, take the time when setting your forms to get rhem so they deliver the strips as accurate as you can practically do it. Them do tour level best to maintain consistency from strip to strip. Consistency and good equilateral triangular cross sections are very important Final critical measurements ought to be PRE-GLUING with the six strips bundled tightly, across the flats. If you get any real discrepancies at that point, re-adjust the forms and re-finish the strips. The rods will be fine. (Peter McKean) I also think the most inportant thing in accuracy is getting your plane blade the sharpest you can. Sharpen and strop often for best results. (Lew Boyko) The short answer is no. As Jerry said unless your triangles are perfectly equilateral you will get false readings. You may well create more problems than you solve. Use calipers without v-blocks to measure each side first. Correct your angles based on those measurements. I only use the v-block to make the final measurements which tell me when to stop adjusting my forms and quit planing. (Harry Boyd) Couple more things to throw in the mix...hope they are helpful. Re: moisture. How are you mixing up and applying your Unibond? I'm not 100% sure on the glue in the can, but it may contain water. Lots of people mix their NH4Cl crystals into a distilled water solution first and then mix the solution into the Unibond. Many people also spritz their strips prior to glue up to ensure proper curing. Depending on what you do before glue up and whether you heat set after, you might be adding quite a bit of moisture to your strips, causing them to swell. A day or two of rest after glue up in a drying cabinet might give more accurate results. Another thing to think about on the v-blocks. First of all, just like calipers, you can use too much force in measuring and get bad readings. Need to develop a consistent "touch" when using a V-block, etc. Also, even using a 60-degree beveler or the MHM, where the apex angles are almost certainly "correct", you have to account for the enamel side and your preferences for rod design. Is the enamel side flat on your strips? Curved? If flat, are the bottom angles of the triangle (opposite apex) also 60 degrees each (or 59.25 if you use the MHM 61.5 cutter head), i.e. did you make it flat but slanted? If curved, is the curve regular relative to the apex? If these aren't right the blank *could* end up off because of measurement differences. Or use another different and very useful approach from AJ Thramer (posted on the Classic Fly Rod Forum) in blue below. This approach still requires sound technique (still need 60s among other things) and consistent application to get reliable results. Calibrate your measuring tool and bars. no two builders are the same so each setup is unique.
example: your stick measures .212". correlate the placement of your measurement of the stick with the placement of your measuring device in the bars and adjust measurement device to .106" (1/2 dimension) Another comment about the V blocks and which calipers may have a need for them. It takes a different 'touch' to operate a dial caliper as opposed to a digital caliper. (Don Smith) I have been mixing my glue at 15:1 ratio to maximize working time. I also wipe down the strips over freezer paper with a sponge just prior to glue application just to dampen them. I am in the 'waiting period' now after my initial measurements of this particular set of glued butt and tip strips to see if they will dry to a different dimension. Just glued them two days ago... We'll see... I don't heat set them but maybe sticking them in the drying cabinet at about 90° for a day may make a difference...HHhhmmmm... I take it you’re a MHM user??? Calipers for accurate readings - you all kidding me. Thank you all for posting to my query. Refining my making process is what it is all about with me. Not just 'coming close' as in horse shoes or hand grenades. I can set my level of tolerance of settings somewhere down the line I suppose, but achieving set parameters of goals as set forth by taper numbers is what I WANT to do at this stage, not that I HAVE to do... (that is where I am at Peter...). I think I am pretty diligent in sharpening my plane blades at this point as I get smooth even shavings, no node 'digs' and (at least by my caliper measurements compared to form station settings) planing right to the numbers (±.0005" / .001"). I do sand the apexes prior to gluing and scrape the enamel off to flatten the outside prior to planing to the final taper numbers. (Thanks Timothy). I plane the heat treated and soaked wet strips to within +.008" of taper then strips sit and air dry for a week to normalize to room humidity before planing to final taper. I have been soaking strips for 24 hours prior to planing. (Thanks Jerry) Harry's suggestions stick well with me, and I WILL honor those by trying these exercises: (and NO, you are not picking on me in the least! You are one of the most prolific individuals in this craft, and you have not steered me wrong yet...)
The stiffness of a beam varies as the 4th power of its cross section dimension. This means it is very sensitive to small changes. It's not hard to end up a half or even a whole line weight off from what was intended. The list of 6 things you are going to do omits the most essential step of all--dry bind the strips (that is no glue) and measure the resulting flat to flat dimensions, writing down the results for all three ways. Almost invariably, the result for strips produced with a planing form will be oversize. Most likely Harry's thought about crushing apex is the culprit. Using the measurement info, work the strips in the oversize places proportional to the amount they are over. I scrape with a single edge razor blade. Go slow until you get a feel for how much work to do. Bind and measure again. Don't be surprised if it takes three or four iterations to get there. On the whole, I don't see where using a vee-block will do anything for you that binding and direct flat to flat measurement won't do. A simple one direction hand bind of the strips with string is easy to do and sufficient for making the measurements. (Mike McGuire) Yes, indeed, I did forget to list the dry binding sequence, but honestly intend to do so. I am not so sure I am crushing apexes as has been mentioned by Harry. I use a digital caliper which takes less force to open/close the jaws and I apply a very light touch to same... If my forms are set to a specific taper, station-to-station, and I am not removing any material with the last pass of my plane AND I am reading the digital caliper with the dimension on the form station, then I conclude I am not crushing the apex... Dry binding the strips I have completed and reading flat-to-flat will bare that out to me.... Well Don, if everything you are doing is right on the money then why are we having this conversation? You are crushing the apex. Period. Why do you think a P&W Super Micrometer has a load cell to measure measurement pressure? The groove in your form is not exactly 60 degrees. Have you used accepted metrology practices to measure the angle and orientation of the groove in your forms? Your form setting is not right on the money. However, you set it is suspect. Your setting indicator point is not exactly 60 degrees and or the adjustment of your indicator is suspect. The errors listed above are there for every rodmaker Errors however small they are accumulate. You have been given good advice by Harry and others about how to get good strips and blanks to come out on the money. So, go tape tightly 1/4" on either side of the station and measure your un-glued blanks and then make adjustments as necessary. (Jerry Drake)
I have a tip for a 4 wt that I've glued with Epon and have begun to wonder if I tempered the bamboo. I made the tip with some roughly beveled strips that I had laying around for a while and don't remember whether I tempered them beforehand. I glued the tip a couple of days ago and today I removed the strings and scraped it in preparation for the heat setting and have become a bit concerned about the flexibility of the tip so I'm wondering if I should temper them, maybe again. I've rebound the cleaned section in preparation for heat setting. My thought was that I could bring the oven up to 380 degrees or so, put in the tip for about 12 minutes (reversing it halfway through - it's a hot air gun oven), then remove it from the oven and bring the oven down to 180 degrees before putting the tip back in for it's 4-hour heat setting. But the glue will almost certainly become very soft. Or I could just leave it alone and do the heat set only. It's nice and straight with no glue lines and I really don't want to screw it up. Don't do it! That temperature will definitely break down the epon--flex the section once after doing it and the strips will fly apart. (Mike McGuire) What Mike said...Epon will delaminate at around 235-240 degrees F. Heat it up to there flex the section and you will hear a sound like a bunch of tiny little zippers being pulled as your section falls apart. Heat set the glue at the normal temps or wait a week for it to cure and see what you've got. (Dennis Higham) I have one rod that was soft. I had only heat treated by flaming the culm. Fighting a fish would be enough to put a set into it on the tip section. So I would never fish it. I decided to throw the whole tip into my heat gun oven with guides attached and ferrule and tiptop. I use epoxy from Lee Valley and heated the section at 325 for 8 min. It came out of the oven like a wet noodle so I just straightened it out and let it cool. Other than discoloring my wraps it looked good and it was now all most impossible to get a set. I don't how my clue differs from Epon but I have heard from some one else that he will re-treat his section at 250 with out a problem. (Ken Paterson) What you're saying about heat treating again after rods are finished is correct a rod will neutralize to the humidity it's in because of this I take all my rods about once a year and put them in my oven at the lowest temperature I can get it at for about a day, day and a half and they come out crisp is just as if they were just made. (Doug Hall) Definitely, don’t do it. However, I think there’s a good chance that the problem may only be that the Epon is not fully cured yet, which will make the section feel too soft. You could just wait a week, but I think the better plan is to do the heat set. My guess is you will be fine. (Tom Smithwick)
|