Bamboo Tips - Tips Area - Gluing |
|
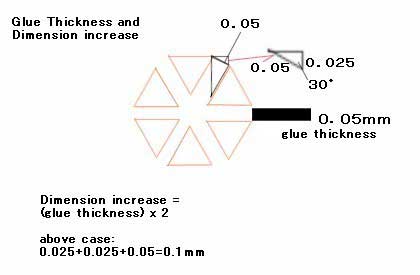
For the past number of years I watched this board a lot. I've never seen more that 2 posts on the amount of expansion created in the finished blank due to glue. Anyone ever done any work on the subject. I know that there has to be some change from the glue addition. Some glues more that others. (Don Anderson) I wouldn't call it a study exactly, but I found that Urac with the walnut shell catalyst was adding about .008-.010 to my rod sections, with the ammonium chloride and water mix I got it down to .006 or thereabouts. With Epon for about the last 2 dozen or so, I think it is somewhere in the neighborhood of .004, but about the same time I switched to Epon I also went to leaving plenty of extra at both ends so I can trim where I want. I also decided about the same time that the older the taper, the more needed to be added to it to allow for modern lines, so typically I let butts get about .006 larger than the taper calls for. As I said, this was no study, but rather an evolution of sorts. I made some rods, tried some stuff and then made some more rods. It might also be a safe bet to figure that I am more accurate in my planing now than I was when I started out, too, or at least I hope so. (John Channer) Yeah, I've seen .004 - .006 dimensional increase with Epon, too. No real study done, just empirical observation. (Martin-Darrell) I have asked that same question on 2 occasions. Most just plane to dimension and glue. Some even say that the glue line does not add to the overall dimension. I have not found the same thing. I find that Using Epon I do get an increase due to the glue. Being glue is not cane I have not been willing to reduce the amount of cane to allow for the glue. I am willing to bet that each glue going to add a little more or less to the specs. Glue also decreases over the years and shrinks. So measuring rods several years old it is almost impossible to know how much the glue line originally added. Their are some that reduce the cane to allow for the glue. This way they are right on mark with the numbers after glue up. But in my mind if your glue is adding .003" and you remove the same amount of cane this is going to change the rod more then if you just allowed the rod to measure .003" over the original #'s. After all the .003 is glue not cane. And do any of us know the MOE of each glue or how .001" is going to effect the function of the rod? I do not think so. So far using glue and not decreasing the cane has produce the action for the line weight I expected. Taking off cane to allow for glue is similar to cutting off your toes to put on a shoe that is to small. It might fit but is that actually what you want? (Adam Vigil) You pose an interesting question about the effect of the glue on the action of the rod. As a WAG, I'd say that the MOE of glue (unreinforced plastic) is negligible compared with bamboo. You would suspect that the effect is on the order of the ratio of the width of the glue line to the width of the strip so that a .003 glue line softens a .030 (across the flat) tip about 8-10 per cent. As the strip widens the "glue-effects" diminishes. An eight percent loss of MOE translates to an eight percent increase in curvature as the rod is cast, but only at the tip. Just a quick oversimplified answer. Anyone else? (Jim Utzerath) Very interesting. How about some input from those that have used various glues on the same tapers? (Adam Vigil) Having used Titebond II, Titebond II extend, epoxy, and polyurethane glue on the same taper, I would say the epoxy and polyurethane does add a bit of stiffness compared to the Titebond. Not much, and not nearly enough to go up a whole line weight. But that probably would depend on your glue lines. I typically have no glue lines visible. (Darryl Hayashida) So using those different glues on the same tapers you did not feel you needed to decrease you #'s to account for the glue thickness? Did the thickness of the glue vary much between types? (Adam Vigil) In my opinion, glue penetrates into (between the fibers) of the bamboo on both sides then hardens (sets up, crosslinks, whatever you want to call it). So, there should be no glue line to allow for. There should be bamboo to bamboo contact with glue saturated into both sides of the join. If you are trying to glue nonporous materials together, yes you do need a glue line to get them to stick together. With wood or bamboo or other porous materials a glue line means you have a poor fit. (Darryl Hayashida) Not sure I agree with you here. Nor do I completely disagree. If consistency is one of our goals, then we have to eliminate variables. In order to build to tapers other than those we develop ourselves, we use the measured dimensions as our standard. Let me see if I can illustrate with an example. Suppose the tip dimension for a P101 is .065" as measured and reported by several sources. Suppose also that these numbers are from bare cane, not over the varnish. If I'm trying to reproduce that P101, then should my final dimension for that same point of measurement not be .065" as well? If I cut each strip to .0325" (1/2*d) and glue, I find that the dimension for this same point consistenly turns out .067" (I have now made 18 P101's, and these are not really just suppositions) Have I made a faithful copy? Not in my mind. Therefore, on my next effort to reproduce the P101 I allow .001" per strip for glue thickness. My numbers fall very close to the original targeted dimensions. I have more faithfully reproduced the P101, at least in my mind. I do not know how much of the original rod on which our copies are based was glue. But it had to be some number. Face it, everyone from Garrison to Gerhke uses glue to hold the strips together. We ought to be aware of that as a potential variable, and make allowances, whether we're copying Leonards or Losers. Building rods that are different dimensions from those we copy, then judging the tapers of the originals based on our own rods, isn't fair. What is the MOE of glue? I don't know. But the original rod WAS glued, just the same as mine. Has that glue shrunk? Probably not enough that we could measure the differences. If the glue only adds a thousandth or two to the overall dimensions, then it could shrink by 50% and still change the dimensions no more than .001" I know that if the dimensions of the finished rod are not the same as the original, it will not cast the same. Perhaps it will be better. John Channer mentioned that he likes the added thickness as a factor that helps the rods handle modern lines, so he thinks that rods a little larger are better. Not me. I hit the original tapers, and find that the action is very close. (Harry Boyd) How did the first 18 P101's cast. Did you end up with 18 identical rods in there casting similarities? I really don't think that a few thousandths is going to make a great deal of difference in the feel of two rods, at least not to 99 percent of the people who will cast it. I do understand your mind set to reach targeted dimensions and obtain a degree of consistency but I believe other variables skew the end product so much that a few thousandths is an insignificant amount. (Steve Trauthwein) Identical? Well, I can't say that for sure, because I've never had more than one on hand at any time. I still don't own one. Every time I finish one, someone buys it. Working on one for myself now, and gonna price it outrageously in hopes of keeping it for a year or two. Were they pretty doggone close? Yes, they were. All of them were nice, even if I did make them. Since a few thousandths don't matter, I'd suggest we all go back to Vernier calipers. Let's quit all this worrying about thousandths, and go back to measuring in 64ths. Heck, let's quit swapping tapers altogether, and just eyeball things to make sure the rods are a little bigger at the bottom end than at the top. While we're at it, let's stop worrying about how crooked they are. After all, a crooked rod is gonna cast okay isn't it? And one more thing... from now on, let's just tell folks that we like dust in our finishes. Maybe we can even come up with some sort of pseudoscientific explanation about how dust bumps increase the aerodynamic effectiveness of the rod in NASA wind tunnels. Just funning ya, Steve. Yes, there is a point of diminishing returns in worrying about the consistency of our rods. But most of us haven't reached it yet. Maybe two or three out of the 500 or so list-members have made it there, but not me. If we're trying to recreate the low-end Montagues, then GG is our hero. But if we're making modern versions of the great rods of the past, well, I'm gonna try to hit the numbers. Every time. Just my $.02, and all in a spirit of discovery. (Harry Boyd) So to repeat John Channer's observations about classic rods not hitting the numbers exactly on every flat. If you want to "hit the numbers" then you must copy the deviations from flat to flat, rather than averaging. (Steve Trauthwein) Don't worry, I make adjustments to insure that all three flat-to-flat measurements match the original. I even try to keep the largest measurements in the same alignment. And if you'll buy that, well, I've got some nice mountain stream frontage land in Southwest Louisiana that I want to sell you. :-) I will say this... most proficient hand planers are at least as consistent with their measurements at any given point, if not more so, than the old Masters who used milling machines of one sort or another. At least that's been my experience as I measured out some old classic rods. (Harry Boyd) Attempting to make rods like they did in the past is a noble venture. But just because they look like them, and measure like them does not me they are the same as them. Their is more to copying a rod then the dimensions and finish. Some of those numbers you should attempt to hit is the heat treating, flaming, drying, same glue and finish of those classics. Now out of the 50 or so guys I have come to know on the list the only one that actually makes rods like those of the past with similar methods and materials is Chris Lucker. His dad was a maker and so was his grandfather. He uses hide glue and Pliobond, a very heavy mill shoot even Port Orford cedar. He uses traditional finishes and tapers. So what he is doing can actually be represented as being as close to what the makers in the past did. The rest of us are using forms, plastic finishes, new glues, stabilized wood and different methods of heat treating and flaming. Sure our rods look like the classics but in reality that is were the similarity ends when it comes to construction. (Adam Vigil) Are you saying then you remove power fibers especially in the tips and replacing it with glue? Some of the tapers we receive are from the actual setup and others are taken from original rods. And we actually do not know where some tapers originated from or by whom. Obviously the tapers from the setup on the mills or forms will give the actual numbers needed. Now if you glue up and find it is .006" over then what you planed it to would you on your next rod remove .006" of cane so your numbers are right when compared to a rod? Even though the actual numbers where achieved during planing? Do the makers using URAC subtract .008" and those using EPON .004"? Just how much cane do we remove to make sure the numbers are right on after glue up? I know using EPON that the rods cast the line weight and have the characteristics they are expect to posses. If I were to remove .004" to allow for glue I am fairly sure it will be closer to the action one line weight lower. So to solve the riddle we need some input from those that have used different glues for the same rods using the same dimensions. Everything else is smoke and mirrors. It just goes against my grain to remove cane for glue. And as for copying the classics accurately. I think that is something even the masters sought, yet they seldom achieved it. Look at graphite rods they are knocked off on mandrels and should be as close to clones as you can get. Yet they still vary greatly within each model. (Adam Vigil) No, that's not what I'm saying. I am saying that if you build a copy of a rod from a mic'd taper, and it comes out consistently .002" oversized, then you haven't done a very good job of copying the rod. If glue caused the consistent oversized measurements, then you simply must make allowances. Tapers from mills aren't often repeatable with forms. Mills, at least those which use carriers as patterns, have adjustments at every point, not just every five inches. The best we can do is an approximation. I'm simply saying what Barry did "But Adam, if you are using a taper that was measured from a glued-up rod (or derived from one - as virtually all tapers are) then that dimension includes whatever glue was in the original rod." Let me be clear... I'd never scrape power fibers from the outside of a rod just because I built it oversized. But I might decrease the dimensions of each strip the next time I built a similar rod. If you're using Epon and the rod is coming out .004" oversized, then either your forms are not set correctly, or you haven't taken off all the bamboo you should have. I'll try again... the dimensions of the finished rod are what matters. The size of the 1/6 (or 1/4 for quads or 1/5 for pentas) sections as we plane make no difference at all. When we start by measuring a finished rod and try to copy that, we can only know if we have been successful by measuring finished rods. To do otherwise is to compare apples to oranges. Almost every rod I build is based on an original rod which I have cast myself, and fallen in love with. For example, I don't build para's because I don't like 'em. How close can I come to the rods I am copying? I'm not going to be perfect, but I won't be consistently .006" - .010" oversized either. (Harry Boyd) I believe Harry's insight with glue thickness is exactly correct. I like para very much and am fallen in love with, though. Epon, which is my favorite, would increase dimension by 0.1mm ( 0.004") glue thickness in ordinal use. I tried post curing (heat treatment) after a while of gluing with Epon. I am not sure how the glue thickness is reduced actually, but it surely reduces the thickness of glue line, now I can't see the line. I am not yet for sure if thinner glue thickness would reduce the gluing effects. Does someone know about this? With or without knowing the effects of glue thickness, I might have smaller or larger dimension. To make an exact copy of an original rod, we should use exactly same material, same glue, same method, etc.. If it is planed on 6" station PF, we should do so, if the original maker did heat curing, we had better to do the same. (Max Satoh)
I just wonder about something. I am well aware that variances of .002 or greater are sufficient to change the character of a rod. But I had always considered the statement referred to a variance at a given location. Sill it would seem to me that if the variance was uniform and the glue was uniform, then even if the specs varied from the original, action should stay the same. I do see a flaw in my reasoning. The % difference would be greater at the smaller dimensions, and might therefore change the action. I'm not disagreeing with you just trying to sort it out in my own mind. (Ralph Moon) Good point. I guess we need to determine how much glue changes the action of the rod. Does a few thousandths of glue have a greater effect on the rod or does a few thousandths of cane? Hmmm....lets see what comes of this. I surely do not know I only have my thoughts about it. If we get our #" from a set up or a rod it may be important, then again maybe not. (Adam Vigil) You've got it straight I think... I'd rather have a rod that was consistently larger (or smaller) than one that was all over the place. Still, if we're shooting to make a copy, then why not be consistently correct rather than consistently oversized? Action would largely stay the same, but performance would vary. A four weight rod that is dead on when measured might be a 4.3 weight rod if it were consistently oversized. Does that sound right? (Harry Boyd) What I'm about to say will sound like heresy to some, but, here goes. Yes, lately I've been planing my strips .002 - .003 under 1/2 the final rod dimensions for 2 reasons: 1. My micrometer flattens the internal apex of each strip and 2. The glue may add to the final dimension. That isn't the heresy, this is-namely I've been filing the outside of an over sized rod for years with NO noticeable affect on it's performance vis-a-vis a rod of the same dimension that did not need sanding. My thinking is that if you have a rod with great power fibers, knocking off a few power fibers won't change it's action from a rod of the same final dimension but not sanded on the outside. Of course comparing rods made from different culms is always chancy due to differences in each culm. On several occasions I've had to rework a rod from, say, 8' to 7'6" and have ended up sanding the outside to the dimensions I wanted and have had every one turn out well. All this presupposes that you have great power fibers to start with. End of sermon. (Hank Woolman) As near as I can figure out, Garrison and us here on the list are the only rodmakers who ever built a rod that gave a damn about every last .001 of an inch. Look at all the tapers from old rods, and that includes Payne, Leonard and whoever, that have to be averaged across the flats, even with no varnish left on the rod, because the dimensions are so different. I really think you're splitting hairs that don't have to be split, they're thin enuf as it is. I suppose there are casters in the world, or even on this list, that can tell a few thousands difference in a rods diameter, but I think one would have to have the original in one hand and the copy in the other. (John Channer) I think that there are several points of view on this. If my memory serves me, Garrison believed that taper designs were strongly influenced by glue type, and that each rodmaker had to adjust tapers to account for whatever glue they used. I disagree. I think that glue probably does make a slight difference, but in terms of dimensions and action it is not worth considering. The effect of cane thickness at a particular point is far more important. The percent change is small, except at the tip, where it is still not that great. However, this view is based on my very limited experience. My first rod was a Dickerson 7613. I added 3 thousandths of an inch to each section because I was nervous about my planing, and thought that the Nyatex I was using was extremely thin. This taper is either a 5 or 6 weight depending on your taste, and I thought that adding 6 thousandths of an inch would have a minimal effect. I ended up with a rod that handles a 7 weight line very well, and it had an action that was entirely different from the original taper (which I was able to cast at Grayrock). Fortunately I live near a Smallmouth river in SE Michigan, so it turned out to be one of those "happy accidents". After that experience I try to come as close to the specified taper as possible. (Jeff Schaeffer) If you are using a taper that was measured from a glued-up rod (or derived from one - as virtually all tapers are) then that dimension includes whatever glue was in the original rod. Not that I think .001 or even .003 makes a really big difference, but some glues seem to add much more than that. I’ve used Titebond II and found it adds very little - maybe 0.002 on the average - though I haven’t studied it systematically. It may be that it adds more, but perhaps some of that gets removed accidentally in the process of scraping off the glue. (Barry Kling) I hear you. I think the problem is we just do not know how much a glue line exist in the rods we have tapers for. So how do we allow for it? Since we do not know the dimension added by the glue any amount of cane removed is a guess. Bob Milward was very clear in his text when he said it is better to slightly overbuild then to under build. (Adam Vigil) I don't have Milward in front of me, but didn't he say that in order to allow one to sand or scrape the rod to the desired dimensions? (Harry Boyd) Naw, he said it was important to allow maximum power fibers and if you did have to alter the rod it would give you some leeway. Harry it seems to me I have not come across info on allowing to change the tapers for the glue. I know it is there in the original rod but is seems to be an unknown. (Adam Vigil) If you use a taper from one of the archives or from the taper program, it seems to me that you have to subtract for the glue thickness from the strip dimensions to end up with the rod being the right dimensions after glue up. The old tapers included the glue so if you don't decrease strip dimensions, you end up with a rod that doesn't match the taper, same with hex rod, the stress are based on a glued up rod and what the computer shows and reality may be two different things. We calculate stresses without the proper dimensions cause no where do we take into account the thickness of the glue and that thickness changes with time. (Patrick Coffey) What I am wondering is how much do we allow for the original rods glue line? I believe since we do not know the original glues thickness how do we determine how much to decrease our dimensions for the rod we are making? (Adam Vigil) I don't know, I guess one would have to make a whole bunch of short rod section (say 3") and glue them up with various glues, measuring bound with out glue and then what the increase was after the glue up. Would have to do multiple glue ups to get accurate averaged results. (Patrick Coffey) I have read all the posts on this thread, and I think that we are all missing one critical point. The stiffness of a beam is not only due to the MOE of the material. It is also highly dependent on the moment of inertia. Now the moment of inertia has everything to do with the geometry of the beam, and particularly the OD. The farther the power fibers are from the neutral centerline, the more stiffness they will contribute to the beam. Fibers near the center of the beam contribute almost nothing to the stiffness of the section. Don Phillips book provides excellent treatment of this topic. Let's think about a synthetic rod for a second. Let's say you could use one gram of material in one inch of length. You could choose to make a solid rod of the material, and say its OD is .086". The stiffness of the section would be X. Then you could use that same gram of material over a 1" hollow section, with an OD of .125" and ID of .090". The moment of inertia would be greater on the hollow tube than it would be on the solid rod, because more fibers are at a greater distance from the centerline. But you used the exact same amount of material in each case. Is this significant? Does it pertain to bamboo construction? I believe so. If we are consistently building our rods over by .006 or .008", guess where that additional fiber is located? Not in the center of the rod section. The most dense power fibers are being placed further from the centerline -- kinda a double-whammy since the raw material we use is not consistent in elasticity, even across it's own cross-section! I could easily see how a rod could jump a line or line-and-a-half by planing it to half-dimension, and then not worrying about the final measurements after glue-up. Now, I might like this rod even better than the original, since I like faster rods in general. But like Harry said, let's not fool ourselves and call it a copy of the original taper. It will have a different character. Even if you used a glue that matched the MOE of the raw cane exactly. The effect of increasing the flat-to-flat measurement becomes much more significant toward the tip end of the rod. That is where it has the greatest percent increase on the moment of inertia, thus the stiffness. If you are over by .008 on the tip, it will have a much greater impact on the character of the rod than if you are over by the same amount in the butt. But I am a bamboo-making virgin, still, since I have not even test cast this first rod....... : ( I feel bad now, M-D, because I am talking about theory, and it may not have anything to any one individual's own experience. Perception is reality. (Troy Miller) Troy's comments above got me to wondering, so I ran some numbers. I took the taper for a Sir D 4 wt, and then changed the taper to a 5 wt, matching the stress curves at every point, to see what the effect on the rod dimensions would be. Here's the result: Sir D, 2 piece 4 wt 5 wt Station Dimension Dimension Difference 1 0.068 0.070 0.002 If the rod was planed to the final dimensions for a 4wt, but no allowance was made for glue, and the glue thickness was the same as the column labeled "difference" above, then the rod would be on line size heavier. My conclusion is that a glue thickness of .005 or so would make what appears to me to be a significant difference in the final rod, varying from one line size heavier in the tip, to about a half size larger in the butt. This is not to say that the rod would cast differently, as that probably depends on the individual doing the casting more than anything else. (Claude Freaner) Please correct me if I am mistaken.... The program takes into account the stiffness of the section, as well as the mass of everything above the point in question. So as we increase the flat-to-flat, we are increasing both the moment of inertia, as well as the dead load above that point. The increase in stiffness is more than enough to make up for the the increased in mass. Therefore, the rod becomes capable of carrying additional line load. That's basically what Hexrod is doing for us when we massage a rod into another line weight. Thanks for running these numbers Claude. Seems to make sense. (Troy Miller)
Well I just came up out of my small shop from a grim gluing session. Kind of debated before I went into the shop if I wanted to mess with gluing up the rod that I am working on this evening. The answer to the subject of this email was to get it done and go down to glue it up. So I went down and cleaned up the area that I will be working in and set up the stuff I needed. Well, the butt section went along great not problems. Then it happened - while I was binding up the first tip, the binding thread ran out. Quick what do I do? Without getting the glue everywhere I pulled off one of my latex gloves (I started out with three pairs on and had already pulled off one pair from doing the butt section.) Quickly I grabbed a ball of heaver cotton thread that my wife had put on the table some time ago with my non-sticky gloved hand and tossed the ball onto the floor (that way the ball of thread wouldn't be rolling all over the table) and tied the ends together and went on binding the tip. OK that one is done. Now I needed to find one more latex glove for my hand to finish the other tip. Opps, I used the last one in the shop. Then I went searching for the box of gloves. Meanwhile, unknown to me, the drive belt started to get real sticky during my search for one more glove. Ah ha, there they are, now the next tip. Then, with the last tip all glued up I started again having trouble while binding it Cranking on the handle on my binder was more difficult to run on the second tip this time. Then I realized what was happening, the glue started to cure on the binder drive belt slowing it down and getting everything all sticky. I helped the binding on the way to finally get the tip bound up. Then I took a deep breath and called it quits for the night. Should of listened to my first thought and done the gluing tomorrow. Oh, wait a minute, it is after three in the morning and it is tomorrow. Darn I messed up again. Nuts, I struck out of the game I am going to bed. (Robert Holder)
I think I've corrected my traction problem with my drive pulley. Little super glue works wonders. What is the rational behind taking the tape off the section when binding at glue-up? If you aren't heat setting the glue, is it that big a deal to leave the tape on the blank when binding? I'm just trying to think of a way to speed up the process a bit. If I don't have to worry about the tape, it'll make gluing and binding go a little faster. I hate getting the tape off during binding anyway. Just a question, thought it might get some on-topic discussion going! (Todd Talsma) I use to leave the tape on but have started taking it off again. Leaving the tape on doesn't allow the splines freedom to slip as needed. Consequently there is a little bend to straighten out. Can you picture what I am saying? (Timothy Troester) I used to take it off and then got mad because it was always sticking to my fingers. Gave in and bind right over the tape. No Problems. (Ralph Moon) Try a longer piece of tape with the end folded back on itself. Makes a good handle to get the stuff off whenever you do it. (Neil Savage) I just leave the tape on & sand it off after the blank dries. I do try to remove tape from the end of the tip before binding over that area - it usually comes off easily. (Tom Bowden) I didn't invent it, but I tie the blank with binding thread adjacent to each tape wrap, cut the tag ends short, remove the tape, and then bind right over the thread. (Larry Blan) It is possible for the tape to get stuck between the bamboo strips and leave a nasty "glue" line. It's really not that hard to remove. (Hal Manas) I am almost finished planing my first rod, so I have no experience behind this opinion. However, I have been thinking about this... I have loosely decided to use the tape an inch or so from the ends to position the sections and hold them for loose rolling into a hexagon and add a string binding/wrapping between the tape and the end - a few wraps and a knot - followed by removing the tape before binding. A theory at this point - I am in a little trepidation about how much of a mess I am going to make (Greg Dawson)
Tony Young once told me that his first rod has one spline that is turned 90 degrees so that the (normally) outer edge is touching the adjacent spline. He reported no noticeable difference in the rod. (I should add he did that accidentally rather than intentionally :)) (Nick Kingston) On my "Twisted Miss" experimental rod, every other strip was glued in with the pith side out, This was done intently. The rod casts real fine. See story in a past issue of Power Fibers. (Tony Spezio)
Ran into a problem with a rod I glued up last weekend. After 2 days to dry, I was able to pull the splines apart from the rod one at a time with little effort. I usually use the C-591 resin from Golden Witch with the walnut shell flour catalyst with never a problem. Well, after a dozen or so rods, I decided to use the K-6 salt because I didn't have any glue lines on this rod. My last rod dry fit perfectly also, but I had glue lines/gaps using the walnut shell, even after straining very carefully. My question is, there seems to be several recipes floating around on the use of the salt, IE: 07 grams of salt added to 10g of distilled water, added to 100g of resin. Another calls for .10g of salt to 10g of water, another is .07g of salt to 5g of water, etc. Now, the temp in my shop that day was around 80 degrees w/35% humidity. The glue is fresh. The splines show even coating of the bad glue. Does anyone else use this stuff? Any ideas would be appreciated. I'd like to use this method, the rod looked great with no lines or gaps, and cleanup is a snap. Glad I caught this before I built the whole rod! I also have a call into Golden Witch to get their opinion on what might have gone wrong. (Tom Vagell) Low humidity could be the culprit. I have to keep the shop humidity up around 40% on glue up days. I use URAC and have run into problems during the winter when the heat is on and it's already very dry here in Colorado. Just a thought. (Jeff Fultz)
Thanks to all for the response on the CR-591 resin using the catalyst salt Vs the walnut shell flour. Golden Witch was very quick to respond by telephone and email, with the consensus of everyone's opinion being I was probably too close to the limit per the manufacturer's advice for humidity and over on ambient temp. The thinking is that the glue was setting too quickly, although it was easily workable to me. The blank that failed (the one I glued up @ 85 degrees @ 35%) was completely stripped and carefully cleaned up. As I said in my original post, I haven't had any glue failures with the walnut flour, even at the higher ambient temps. I don't have AC in my shop, so I reglued @ 4:30 AM when the temp was down to 71 degrees and humidity @ 38%. (here in western CO it is already in the high nineties during the day, and humidity never goes beyond 40%). The blank came out fine as far the glue is concerned, but is off as much as .007 across the flats. Guess I wasn't as careful removing the old glue as I thought, so now my wife has this set of rod blanks for the garden. I did some further experiments with popsicle sticks at different temps and humidity, and also spraying the sticks with distilled water first. I have determined the catalyst salt is the way to go if the strips are planed well, but I also think it is more sensitive to temp and humidity than the walnut flour mixture, even though the catalyst weight ratio is the same for both and probably shouldn't make a difference. I also think that according to my "break tests" I should wait more than 24 hr. for the sections to dry. The moral of the story is to install a swamp cooler for the shop, this will cool me off and raise the humidity! (Tom Vagell) I don't know how large your shop space is but Walmart and Home Depot both sell cheap one room air conditioners for around $100. I also experienced some glue failures this past winter when the shop heat was on high. My shop humidity would drop to around 10%. URAC did not like the low humidity conditions. I bought a nice digital humidifier that I can set at 45% and the thing comes on and off by itself thanks to an onboard digital gizmo. With a three gallon tank, I only have to fill it up every three days or so. P.S. It was 103.4 in the shade next to my shop yesterday here in Denver, but a cool 71 inside thanks to the AC. (Jeff Fultz) You may be experiencing glue starvation during times of low humidity. Try brushing on a coat of glue and let it soak in for 2 - 3 minutes, then apply a second coat. Works fine for me in southern British Columbia. (Ron Grantham) It may also rust your tools. I'm in Albuquerque, also a low humidity location, and I use a refrigerated air type window unit. I have too many good tools and machines to risk using a swamp cooler. (Steve Weiss)
I have just finished cleaning up first blank - very happy with result and accuracy. One small issue - There is a very slight gap (0.01 inch wide x 0.01 inch deep x 1/3 inch long) in the joint between 2 splines at a node. It appears that the node was not quite flat enough and there was insufficient pressure in the binder to close the gap. If I squeeze the blank in a vice the joint closes and then opens again on release. I am sure it is not a structural problem given its size and especially as it very luckily falls under the grip. I would just like to know what could be done about this sort of problem if it were to occur in a visible location. In terms of regluing I think the gap is too small to get anything other than a liquid glue into? (Stephen Dugmore) I would try to get some liquid glue in the gap and gently squeeze in your vise, if only to help seal the gap to keep water out. (Pete Van Schaack) Here are a few "tricks" that I have heard that some of the pros do. 1) Cut a sliver of cane that is similar in dimension to the gap. Glue it down in to the gap and bind it with some string, let the glue cure and pull off the string. Carefully sand the sliver down until it blends in the with the gap. 2) Use some "cane colored" glue to fill in the gap. There is a glue out there called Weldwood Epoxy that has the color of cane, mix up a small quantity, fill in the gap, let it cure and blend in with careful sanding. 3) You can use a clear colored glue and mix some cane dust in with with, then fill in the gap, then blend it in with careful sanding after the glue cures. (Kyle Druey) If I find I have a small glue line before I heat set my glue (Epon) I bond that area real tight then rebind the rest if the blank tighter than I would for initial gluing. This has worked for me. I don't normally have that problem, I bind my strips before gluing and that will tell me most of the time if I need adjustment. The spots that I might want to adjust are marked so I know what strip needs some adjustment. Then with a trusty single edge razor blade, the high areas are scraped to feather them out some. A bit can be taken from the apex so that the strips will close. Sometimes it will just take a couple of scrapes to close the gap. Now I am not talking about a gap you can fit your fist in but a .001 or .002 gap can be fixed that way real easy. (Tony Spezio) I've had the same once. I took a sliver of cane, really thin, and put some glue on the gap. Then I squeezed it in with the bamboo, also sliding the cane in the gap. I used slow curing epoxy. Then I put the whole thing in a vice and squeezed the gap shut. Couple of hours and the problem was solved. Scraping and finishing as usual. (Geert Poorteman)
If an open seam or glue line bothers you, that rod section becomes a tomato stake. Make another section. If it doesn't bother you, finish and fish the rod. Ersatz fixes make for ersatz rods. Dry fitting the sections before glue up, and inspection under magnification drastically reduce the problem. Easier to plane out another strip than to make another rod section. (Chris Raine)
I allow for .004 glue thickness with Epon. I bind loose and hang the strips for 18 to 24 hours, remove the string, scrape the excess glue off. Then I rebind tighter and heat set. No glue lines and clean strips. (Tony Spezio) When allowing .004" for Epon is that from the form settings or from the final dimensions? (Henry Mitchell) I deduct .002 when I set the forms. This is a total of .004 on the final dimensions. (Tony Spezio) Does this mean that Epon has similar casting characteristics as bamboo, or that other glues also add a few thousandths to the final dimensions? (Henry Mitchell) Sounds like a glue seam that is .004" thick. (Chris Raine)
When working with glues and binding try putting on 3 pairs of latex gloves, one glove over the other. When a glove gets too messy you take it off and don't have to stop and re-glove. Jeff Wagner's binder using Dacron backing as a drive belt keeps the gluey drive cord from coming back over the blank again, winding the gluey cord onto the drive-pulley. You can still use a loop type drive cord when binding dry splines for heat treating. I'm sure other Garrison-type binders could be easily modified to work the same way. (Henry Mitchell)
I agree with the idea of straightening when wet. There was a recent post in which someone described slapping the bound wet blank on the bench. I tried it, and it seems to help. I have a table saw, but not a good router table, so I took a bunch of 3/4 by 3/4 pine strips and ran them through the saw with a 30 degree tilt in the blade. I reversed the grain and screwed them together to make one wider strip with three 60 degree grooves. No taper at all, but my blanks seem to come out straight. Just lay them in and weight them with pieces of steel to hold in place. I coated the wood with wax to keep them from sticking. I keep the bound sections right on the form when I heat treat to set the glue. If that fails the iron trick seems to straighten just about anything. (Jeff Schaeffer) But, don't forget to re-wax often. Don't ask how I know this! (Neil Savage) The Metal Supermarket sells hexagons (aluminum) bars: I just looked them up, usual disclaimer, etc. I think I'll stop by tomorrow and get some. (Dick Steinbach) The three grooves, are they different depths, thus accommodating tips in shallower grooves than butts?? (Roland Cote) Nope, they are all the same. I can't even get a tip section completely in to them. Depth is about 0.190. If one groove were deeper, it would work better on butt sections. That is a good idea, and I will fire up the table saw this weekend and modify mine. Thanks for the tip. (Jeff Schaeffer) That's what I had in mind. The other thing I've thought of is to glue 2 tapered strips to the board before routing it so that as it ran lengthwise down the router-table it would create a tapered groove. (Henry Mitchell)
There are 4 or 5 time tested adhesives. All of them will glue. I have had failures with each of them. The question is WHY? I think Chris is trying to point out that it is probably not the glue that failed but the technique. Unless the glue is out of date any of these adhesives will glue splines for our purposes. All other glues are experimental, no long term track record. They may work for 5 years and then delaminate. You can judge if you want to gamble with your rods. Most of the glues in this category you can buy at your local hardware store. (Jerry Foster) Ahh, glues, This is becoming to be a favorite subject of mine. How do we know a track record of a type of glue say Titebond for example if we are afraid to try it. Let's don't lose our pioneer spirit. If I recall I think Winston is using a simple non URAC (oh no) glue on their rods. And if I recall there are a lot of builders using hardware glue with several years of use under their belts. (Mark Heskett) I am all for innovation and experimentation.. I thrive on it. The issue is for new makers. They read this list and say " Oh wow, so and so uses rubber cement." 2 years later you read on the list that "so and so" is now building rod #3. Neither he nor his adhesive of choice has been tested. And because the PC police are in force, no one had the Guts (thank you Chris) to stand up and say, "that's really not a good idea". Experimentation is best done in a controlled environment where the changes (modification) to a known process can be observed. The main issue is one of process. You may have a process that allows you to modify certain parts a procedure. Few on this list have a full knowledge of anyone else's entire process. That's good, but to a beginner throwing out just your exceptions can be misleading. (Jerry Foster) What are the 4 or 5 time tested adhesives? Resorcinol URAC type glues Epoxy glues ??? Just curious. (Aaron Gaffney) This thread got me to thinking about putting together a spreadsheet detailing the differences in the most popular glues used in rodbuilding. I am a newbie and intend to try something other than the Titebond III that I have been using, but can never keep the characteristics of the others in order, so that I can make a decision. What do you think some of the important fields would be? Strengths (yes, I know these first two are very subjective) Weaknesses # of parts & mix ratios Shelf Life Color Working Time Working Temp Cure Time Heat Treat Needed? Recipes Cleanup Method Source (Matt Fuller) This should get you off to a fair start. (Larry Blan) That was great. I was just thinking that someone should ask John Zimny and "bingo" there it was. Thanks for the good information. (Hal Manas) I for one think it's a great idea. We get threads going on this topic all the time and it's probably one of the most common questions newbies ask right next to how long do I heat treat and at what temp. (Larry Puckett)
The last six months I have changed my glue up procedure and was wondering if anyone else has found this too. Before gluing I would tape the individual strips together in the order they would ultimately end up. Split the tape open along the same seem and apply glue. Then roll up the section and bind, removing the tape as I went along. Now I remove the tape completely before I bind and I have eliminated those pesky bends that sometimes seemed to show up from nowhere. I think the individual strips can move/slide easier with no tape attached. Anyone else do it this way? (Scott Grady) I have started to remove the tape before binding as well, but tie a few spots with the same thread as I bind with. It certainly comes off easier with a quick cut from a razor knife than the tape did. (David Van Burgel) I use guide wrapping/fly tying thread and bind right over it. (Larry Blan) Those are great ideas. It definitely would save time not having to stop on the first pass every few inches to take the tape off. It would help to bind faster and I wouldn't feel rushed before the glue starts to set! (Scott Bahn) Rush? Binding is a relaxing activity! (Larry Blan) It is when you use Epon... =8^Þ (Mark Wendt) I agree with you Scott and have had a similar experience. After gluing and wrapping the section back together I tie the strips together with short lengths of binding cord at each end and about every 12 inches along the section and then take off the tape. The string holds the strips together but lets the strips move against each other. (Ian Kearney) I remove the tape and make a couple of wraps of wrapping thread to hold the strips in place, then just wrap over them. (Tony Spezio) Duh!! I never was told to remove the tape. I don't see what throwing a couple of extra steps in is going to do anything for me except to cause twists, bows and misalignments. But then I do it the old fashioned way. I earn it. By the way how do you wrap a guide tht falls on the tape?? I just move it along. Gotcha! (Ralph Moon) Yes Ralph, you earned what you do as you have done it a lot longer than most of us. The beauty of this whole thing is we do what works for us. (Tony Spezio) I discovered, kind of by accident, that if you take a cork ring of the appropriate hole diameter and slip it onto the section, it helps a lot to nestle the strips together. I use 1 piece of tape at the big end of the section, then slide the ring up as far as it will comfortably go. As I bind, I move the ring down. I seem to have quite a few rings I don't want to use in a grip. (Neil Savage) I still have been taping. My questions is how do you keep the splines lined up properly? I always thought that was part of purpose of the tape. My last couple of rods I have bound over the tape as several had suggested either on a thread here or some where else, I don't remember. (Pete Van Schaack) If you use binding string or wrapping thread to tie the bundle in several places every thing stays in place and you bind right over the ties as has been suggested. I think this approach is better than tape unless your tape strips are very narrow, say 1/8 inch. When you have bound you strips the ability to straighten before the glue sets is dependent on the strips being able to slide relative to one another. Wide pieces of tape won't allow that and straightening will be difficult if not impossible. That's also a reason to keep your binding tension as low as possible consistent with no gaps between strips. If the string is too tight, straightening is a b***h. I know from experience. In fact, I recently bound a tip section with light tension, two wraps and I had no gaps and straightening was a breeze. I use epoxy for glue so the next day after I unwrapped and scraped off the excess, I was getting ready to heat-cure the epoxy. I decided a tight bind at this point would be best and I used four wraps (I use a four string binder with which I can do two or four wrap at a time). So I put the section in my oven for two hours and when I took it out it had a sweep in the end!! The slight uneven tension during wrapping forced the section to bend when the heat relaxed it and now I have a permanent set! So light tension is important! (Al Baldauski) I believe that it isn't so much the tape that causes problems, but the stopping the binder to take it off. That being said, what would happen if you simply bound over the tape? I haven't dared try it. (Henry Mitchell) That's what I do, leave the tape on (I use very narrow pieces of tape) and remove it when I remove the binding string from the glued up blank. I think that was a tip from Darryl Hayashida. (Bob Williams) I always bind over the masking tape, then remove it when I remove the string & glue residue. The tape peels right off (at least it does when you use Resorcinol or URAC). Don't stop the binding process, momentum is the key. (Chris Obuchowski) I wasn't going to enter in this discussion, but since my name was mentioned this is what I do. I tape closely together, about every 3 inches. I make sure the rod is straight and with no twists. This means checking the straightness at every tape station, and tape very tightly. After the taping is finished, I check straightness again. Just like in straightening after the glue is dried, but at this point only the tape is holding it together, and since it is only tape holding the blank together it is a lot easier to straighten. At this point it is easier to spot areas where gaps might be a problem. If a gap will be major, I wrap a clean rag around the area, soak it with water overnight, then tape it tightly. Usually after a day or so the spline will have straightened out and the gap is closed. This works for gaps created because of crooked splines, but it will not work for gaps due to chips or missing bamboo. So at this point I have a blank with more tape than usual, but the tape usually does not allow the splines to slip past each other or twist, and since I took the time to straighten the blank as I was applying the tape, the blank gets glued up straight. I just wrap the binding string right over the tape, and use a scraper blade to remove the tape the same time I scrape the glue off. (Darryl Hayashida) I have been listening to the comments about binding quickly or without stopping - trying to have a sense of speed before the adhesive sets up. When I first started to build rods I thought being quick (the books suggest this is important as I understood) was important before the glue started to dry (I use URAC). Anyway, after feeling I had to hurry for my early rods and having some problems with gaps, I have slowed down the process to a slow binding process - not in a hurry but with some constancy. I even stop to remove two tapes (don't need the number often recommended and the recent suggestions seem very appropriate) while slowly binding. I have found that I can glue, bind, and straighten three rod sections without hurrying the process and my rods have come out straighter and with better glue joints than my early rods. My experience suggests that the speed in gluing and binding if using URAC is not a problem, and it might be better to take ones time and go more slowly - of course this means that I have all three sections prepared and ready for adhesive application when I start the process. When I am finished I still have some useful glue remaining that I must dilute and get rid of. Just my experience. I expect others experience would not be the same with EPON or Titebond glues, so there may be other opinions from folks who use different adhesives. (Frank Paul) For what it's worth, I use masking tape to hold the strips, and when I have put my approximately 1 1/2 turns on, I fold the end back into a tab. When I cut the tape to lay out the six strips, I make my cut immediately beside this tab, which makes it dead easy to pull the tape off when you get there with the binding cord. (Peter McKean)
I've been thinking about this a little.... Does adding a scratch pattern with sharp sandpaper really increase surface area? Or is the surface area greatly decreased because only the "peaks" are surface area, while the valleys don't count? I honestly don't know......(Harry Boyd) I looked for that article before my last post but didn’t get a connection. The link you just supplied worked. The article is very informative but leaves you with the impression that a surface, in his case graphite with a gloss finish, is “dirty” unless it has been abraded. The “water break-free” test is indeed an industry standard to evaluate clean metal surfaces for plating and/or coating and it identifies surfaces contaminated with oils since that’s what’s usually found on metal surfaces. But that’s not the only characteristic it reveals. Surface tension and surface energies of the materials involved have to be balanced in order to get “wetting”. The surface of a glossy graphite rod (or varnished bamboo) may be chemically clean, but still bead up water because the chemistry of the surface repels the water. If you abrade the surface, you have changed the surface mechanically as well as chemically and the water more readily wets it. If you dribbled alcohol on the same clean, glossy surface, it would be break-free because the alcohol has a different chemistry, lower surface tension that allow it to “wet” the surface. So, abrasion does help for two reasons: changing the surface chemistry and changing the surface profile. When you uniformly and thoroughly abrade a surface you increase the surface area. Now, IF your coating (adhesive) wets the surface, it will flow into the valleys and take advantage of the increased surface area. If the coating doesn’t wet the surface well, then it may lie across the peaks and actually be less effective than no abrasion at all. Most coatings and adhesives are formulated with solvents that have a high tendency to wet the surfaces they come in contact with so they get into the abraded surface or are not repelled by the glossy surface. As a general rule, thorough abrasion leaves a scratch pattern that has grooves as deep as the distance between grooves. For instance, 600 grit paper has particles approximately 0.0012 inches in size but they only penetrate a metal surface about 0.0005 inches. Therefore, you need a scratch pattern with grooves spaced no more than 0.0005 inches apart. That’s impossible to measure outside of a laboratory but a good guide is that if you can’t see any shiny metal through the scratch pattern, if close enough. Like this ^^^^^^^^^, not like this ^^ ^ ^ ^^^^ ^. (Al Baldauski) Two things I forgot to address: Acetone and oxides If you wiped acetone on a piece of glass, dried it and found a film there are three things that could be the answer. 1. the glass had a film on it that was dissolved in the acetone. When the acetone dried, the dissolved film was concentrated and deposited in a way that could then be seen. 2. the acetone dissolved something from the wiper you used and deposited it on the glass 3. (least likely) the acetone was contaminated with something. Acetone is frequently used in laboratories to remove water from “clean” glassware. Of course it’s probably a higher quality that you get at Home Despot. Oxides are not a problem to adhesion unless they are built up to a level that can be seen as corrosion. In fact, nearly all metals have microscopic layers of oxides that actually aid adhesion since the first few molecular layers of oxide are better bonded to the parent metal than any adhesive ever will be and many adhesives bond better to metallic oxides due to their chemical nature. I agree that a surface should be free of gross oxides. Generally, if you can see the oxide, it’s too much. When you abrade a surface, you remove the gross amounts, but that microscopic layer reforms instantly. (Al Baldauski)
I used to use wax paper when gluing. Finally got real cheap and get the butchers paper. It's brown and a lot wider. A big roll will last for years. It has a slightly thinner coating of wax. Was concerned that the wax could be "lifted" into the glue causing a glue joint failure. (Don Anderson) I have a 4' section of laminate flooring that I lay the strips on for gluing. I wipe the plank off with a damp rag after each strip. Of course I've always used either Titebond or URAC which will clean off with water. You may not want to do this with a non-water clean up glue. Then it's probably easier to just throw the sticky piece of wax paper away. (Larry Swearingen) I switched to tag end rolls of newspaper. Cheap at the local NP office and what I like about it better than wax paper is that it absorbs some of the extra glue so bound sticks aren't quite as messy. Have a good one. (Darrol Groth) What I use is masking paper you can get at any hardware store in the paint department (used by professional painters), 18" rolls about 4" in diameter. I don't know how much is there but it lasts a long time. The color varies from an olive to kinda brown, not that it matters but maybe that will help you find it. (Joe Arguello) I use Christmas wrapping paper. I picked up a couple industrial sized rolls after the holidays for basically nothing. Disposable, works well and looks very festive on the bench! (Chris Carlin) I use a 1x6 piece of Ipe left over from a deck project. Carefully selected to be straight and flat. It's five feet long and I've scribed and marked lines every five inches. I use epoxy for gluing my rods and when I'm finished binding, I just wipe the board down with an alcohol-damp rag. It has a beautiful finish all the time and those markings are always handy for quick measurements. (Al Baldauski) I like the idea of a marked board. I've been using wax paper, after binding cover with another wax paper and run a veneer roller up and down it a few times for the twisties. (Henry Mitchell) I have been using freezer wrapping paper shiny side up. It's nice and wide! Make for a clean stick free surface. Also reflects light when working on other parts of the process. (Tim Pembroke) If you can't whine a roll of butchers paper from the store, look in the dumpster behind a photo processing joint. I have NO idea why it was there, but I've been using a roll of white slick paper about 20" wide for years I found there. I still have years worth left on the roll. Newsprint is cheap and you can read it after your done gluing and maybe learn sumptin! Wax paper is also nifty for keeping your cork rings from sticking to your clamp when you glue 'em. (Mike Shay)
Was pondering the other day about the number of tapes that were placed along a set of strips prior to gluing. Some things came to mind. 1] If the strips are not completely oriented and they are not straight, the tape will force a curve into the glued rod. This applies only if you don't remove the tape strips prior as you are approaching the binder. 2] After cutting the taper, I get tiny wickers of taper glue along the tape face.. Anyone have a cure for this. Could introduce a strip opening. 3] Does anyone only use one taper strip? Multi-tape strips sure would make the removal a lot less of a hassle. (Don Anderson) Well, I personally only use one strip of tape, on the big end of the section. Too much trouble trying to get the tape off in the middle of binding. After the section is glued and taped, I run a cork ring up the section (1/8" hole for tips, 1/4" for butts.) the cork seems to help nestle the strips together. I just leave the tape on the big end, it's going to be cut off anyway. (Neil Savage) It will make things a lot easier if, when you have applied each strip of masking tape to the about-to-be-glued section, you just take the time to fold back about 0.5 - 1.0 cm onto itself, giving you a non-sticky tab on each piece of tape. Only takes a second to do, and removal of the tape becomes easy, even with nitrile gloves and epoxy. (Peter McKean) The tape strips are removed except for the large end on the butt and the tip sections. I leave the large end taped with one strip of masking tape then roll a "O" ring on the end and slide it up a ways. As the wrap progresses, the "O" ring is moved up the section and off the end. This eliminates messing with the tape. This is with a 4 string binder, if using a Garrison type binder, you will need a few "O" rings to hold the strips together while it is turning the section. I have used both types but prefer the 4 string. (Tony Spezio) I've found that I get straighter strips out of the binder if I don't have to stop & take off the tape. After the rod section is glued up & rolled together, the tape is removed. The section is then bound together in 3 or 4 places from tip to butt with binding string & the ends of the string are trimmed close so they don't get tangled in the binder. Then the section is run through the binder with no stopping. I use Epon & a Garrison-style binder. (Paul Julius) Good idea, will give it a shot, always ready to try something new. I have done this with the "O" rings at times when I get to close to the "in" tube, Just bind over the "O" ring. I also use Epon, it can get messy. I agree too, if you don't have to stop with the binding, you do get straighter sections. As long as we are talking about straight sections here is something else I do. My four string is powered so I have both hands to use. The section coming from the "outlet" tube has a tag string on it. I have my binder mounted on pegboard mounted on the wall. As the section comes out, I take the tag end of the string and pull straight out of the binder keeping tension on the string and section. I also have several of the pegboard hangers that stick out straight from the pegboard in line with the "out" tube. This acts as a shelf for the section to ride on. It really keeps the section straight. (Tony Spezio) I was wondering this myself, but haven't changed anything, I use a 4 string binder and just leave the tape there, sometimes the sections come out perfectly straight and sometimes I have to do some straightening after the glue sets up using a heat gun. Really not too much of a problem I guess that's why I haven't changed. (Joe Arguello) I lay four strips of tape out on the bench. then place the strips on the tape, then cut the tape along the the edge of the strips being very careful not to cut in to the bamboo, then roll the strips up to form a section, then I turn the end of the tape in on its self to form a tab, tape can then be removed very easily when binding. A lot harder to explain than to do. (Larry Downey) I might use 5 or 6 pieces of tape spaced evenly on the same section. Wind the tape in the same direction starting on the same strip. (I figure out where I started and draw a line on the outside of the tape, with my Sharpie, to mark that strip where I started). The trick is to fold the tape over at its end so it is easy to grab hold of when opening for gluing and later to remove during binding. When I tape a section first I make sure the tips are aligned and the ends are at the same length, and start with my first piece of tape in the middle of the strip. Then I work my way back toward the butt, because it is ridged, and then toward the tip. You bring up a good point that you could tape a curve into the strips and this is why I hold the tip, allowing the section to hang, while taping toward the tip. You're kind of feeling the alignment, then hold it firm while you tape that section. Then use the same process as you move toward the last piece of tape. (Doug Alexander) I use only two strips of tape when gluing and binding the tip section. The first strip is at the butt section of the tip and I leave it there during the binding. The second piece of tape is about eight inches from the first. I stop and remove that as I bind. I slow my binding speed and let the strips fall into place as I work my way down the rod. I use Titebond ll for adhesive and a Garrison style binder. (Mark Dyba) The last time I glued up sections, I took some advice from Larry Blan and used some thread to tie the sections up at a few locations along the blank where I normally would have tape. After tying the blank up, I removed the tape and went right to the binder. Worked slick as snot! I bound right over the top of the tied string and the blanks were straighter than I've ever been able to do before. I was using a Wagner binder with my cordless drill/driver attached to the take-up reel. Once started, I didn't have to stop to pick tape off the blank. Glueup and binding was a relaxing experience. (Todd Talsma) Get some heat shrink tubing (used in the electronics industry) in various sizes i.e. 1/16" for tips etc etc. Get some rubber "O" rings in various sizes. Process for a tip section:
I usually leave the shrink tubing on after binding I get very straight sections using this approach! (John Vorndran)
Has anybody bound over the taped and glued section (accidently or intentionally)? What was the result? What was the harm? (Roland Cote) This is the way I have always done it. Sometimes the sections come out straight sometimes they don't. I try to make sure to keep them as straight as possible when taping them. As stated earlier getting them straight with a heat gun is no problem so I haven't changed my method. (Joe Arguello) I will not bind over tape. Keeping the tape on will prevent you from straightening the section, provided it has a bend, after binding. The tape will come off very easy, even wearing nitrile gloves, if you fold over the end so you have something to grip. (Doug Alexander) I usually try to take the tape off, but sometimes leave it on and have no trouble straightening. Unless you have a big kink under the tape, you'll be OK. (Tom Bowden)
Looking for tips on re gluing strips. here's the situation. Glued up 2 tips and a butt on Thursday and the glue has not hardened. I am looking into why but my concern right now is re-glueing them. I have separated all of the strips and am cleaning them up by scraping with a razor blade down to a clean surface. Is there anything else I should do to them before I attempt another try? Background info: I am using Urac using a 10:1 ratio with ammonium chloride solution (also 10:1 distilled water to a/c.). Always possible I mixed the ac solution wrong but I suspect a bad batch of ammonium chloride). (Marv Loopstra) Looks like your amoninum chloride ratios are correct. As long as you are at 1% of AC to resin, the glue should cure. I do not mix up an AC/water solution. I simply mix 1% of dry AC by weight and let the resin dissolve it. I have never had delam problem but it sounds like you are doing all you can to prepare your strips for regluing. (Lou Barbaro) I mixed a new batch of a/c solution and glued a short test section with it. I pulled my test section out of the oven and have determined that I must have mixed my original a/c solution wrong somehow. As this was a new container of Ammonium Chloride it (or the way it was mixed) was the only variable from previous rods. I cleaned up the strips and reglued them and have just finished removing the thread. The new solution worked well (although I am hot happy with the sections after the reglue). But at least I know I have ammonium chloride and not baking soda! (Marv Loopstra)
I've always avoided various types of solvents or cleaners when gluing up rods from the fear that the solvent will penetrate the glue line and perhaps cause a failure if the glued up blank is wiped down. I know there are folks who wipe down Urac with water, Epon with acetone or vinegar and urethane glues with paint thinners. Any thoughts of possibility of failure? Anybody experienced failure? (Don Anderson) At one time I had the same worries about getting the vinegar in the seams.I don't bother wiping down any more. I used to do it. The glue is soft enough that the string comes right off and the glue will scrape off the flats in one or two passes. Back when I was using White vinegar to wipe down the sections I bumped the container and spilled a big puddle of vinegar over the glued and bound sections. I posted this on the list and was told by several list members that I should go with heat setting them. That rod has been used a lot in the 12 years I have used it and it is still in one piece. (Tony Spezio) Gee, I'd recommend slicing some boiled potatoes and dicing some onions. Then throw them in with some bacon and a bit of sugar since you got the start for the making of a German potato salad. Especially since you've already got the stirring sticks. I'd recommend apple cider vinegar next time though. (Eric Wolfsbane) I just glued up a Martha Marie with URAC. What I do is use the 12" rolls of painter's paper to cover my bench top (about 5-6 layers). After the first pass through the Garrison single string I'll roll the shaft out on the paper to wick up the extra glue and check for twist (then pull up that laver and toss it). I'll then run the section through the binder again and roll it out again, from there into the drying cabinet at about 95-100 degrees for 12 hours. The string peels off relatively easily. The biggest problem I have is cutting the half hitches. I have very little residue left on the rod in my opinion to cause any headaches. A quick light pass with a 150 grit will remove the excess before I move to the finer grits to finish sanding the shafts. (Mike Monsos) I have glued up dozens of rods with URAC and am currentlty using it's replacement, Unibond 800. After running the shaft through my Garrison style binder twice, I wipe it down with water to remove excess glue. I simply cradle the shaft in the wet paper towel and do not squeeze it tight. I then place the shaft in my oven at 175 F for one hour. When it comes out it is dry to the touch. I still have some glue left to sand off but the string comes off relatively easily the next day. So far I have not had any delam problems. (Lou Barbaro)
Sorry to keep pestering. I've got rod sections that were given to me when I bought my equipment. I've been measuring it and trying to decide if it is a known taper or a modified one. Dabbling with Hexrod, I think it is a 4-6 wt rod, but....? Here is the taper: 0 0.800 Butt Here is what I am thinking. Cut the tip section at about the 40 inch spot and cut off the butt at about the 85 inch spot and make it a 7ft rod. I think the .007 difference between the tip and butt is doable, maybe with a padded 15/64 ferrule or a skin and bones 14/64. If I could tighten the glues lines to 41 or 42 inches I'd feel better about a ferrule. Any other ideas that I'm missing? (Sam Nielson) I bind with polyester thread This will shrink with heat. After I glue up, if I find a spot that might be "iffy" I bind that area real tight by hand and tie off. Then run the section through the binder for heat setting. Heat setting will shrink the thread and tighten the seam. Sometimes I will find some extra glue around that area that has seeped out but no glue line. I am not sure it will close a bad gap but you can give it a try. You have nothing to loose. This might only work with heat setting type glue. (Tony Spezio) I've built out a number of different rod types and pretty familiar with most of the traditional actions. My problem is I crave the different and unusual (parabolics being one example). So, what I'm thinking is that I need to experiment with unusual combinations. One such is where I read about a rod that has two pieces that make up 7' dry fly, 2-piece that when you add a third piece in the middle it becomes a 7'8" parabolic. That has started me wondering about taking some two piece tapers and doing something like that and experimenting with adding a longer tip or two that would make a medium fast progressive into something slower or parabolic. Does anyone out there do that kind of experimentation on a regular basis? (Bill Walters)
|