Bamboo Tips - Articles Making Furled Leaders |
|
< Home < Articles < Making Furled Leaders
Making Furled Leaders By: Claude W. Freaner I was first shown a furled leader by Hans Weilenmann and was instantly impressed with the limpness and lack of memory of it. After doing a little searching I found instructions at Martin Joergensen's web site in which he had made some modifications to Henk Verhaar's instructions. I sent several questions to Henk about the process and he was gracious enough to take the time to answer them in detail. These instructions may be considered an update to Henk's original work.
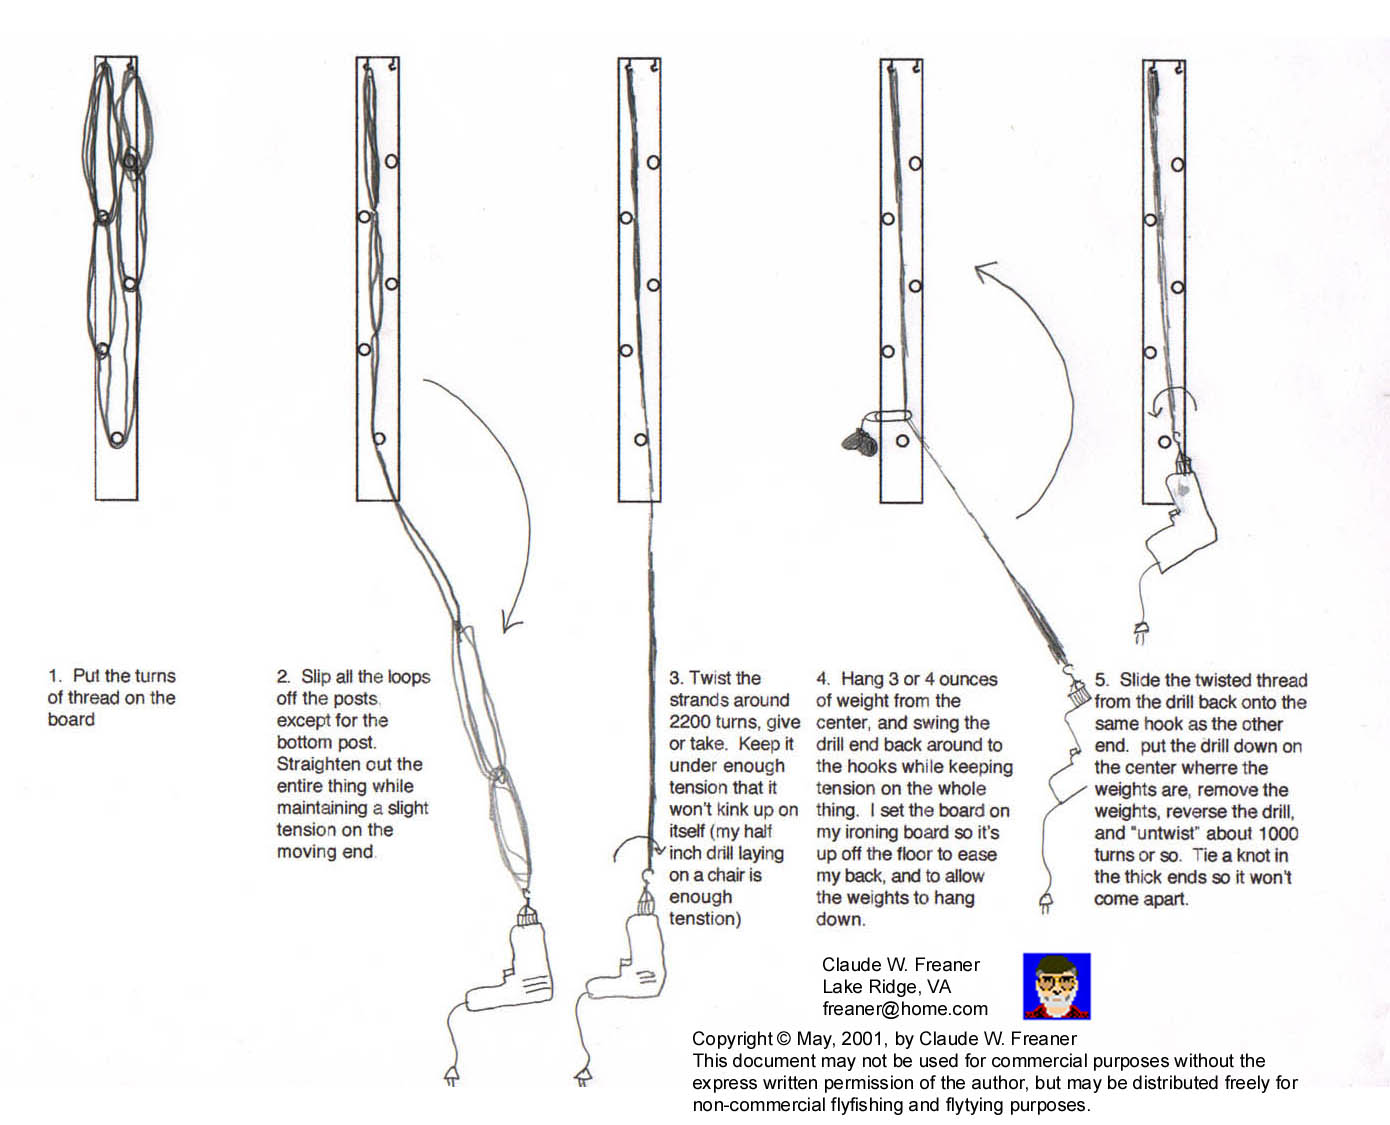
I'll be referring to the sketches in the accompanying drawing (also above), so I'd suggest you download it and print it so you can follow along. I took a scrap piece of 1" by 4" lumber I had that was around 10 feet long and used it as the basis of my furled leader jig. A quick trip to the lumber store for a 36 inch long 1 inch diameter wood dowel (you could use an old broom handle), and I was nearly ready to go - just had to root around in the "messy drawer" to find a couple of cup hooks I knew were hiding therein. I took Henk's original measurements for dowel placement and marked them on the board. The dowel was cut into 4 inch long pieces; I then found some 1.5 inch long wood screws and drilled a pilot hole in the bottom of each dowel piece that was slightly smaller than the screw. Moving to the 1x4, I drilled a hole at each marked location slightly larger than the screw diameter, and then a countersink hole on the bottom of the board so that the screw head would be recessed and not scratch the furniture. I screwed the cup hooks into one end of the board, and I was ready to go. The original measurements of Henk's ended up as a 10 foot long 5X leader when I finished. I've also provided measurements for creating 8 foot and 12 foot leaders. The only decision left is what material to use in making the leaders. My first choice was 2 pound test Berkeley Trilene mono (standard mono fishing line), as I could buy it in a 400 yard spool. This turns out to make a decent 1X leader butt. Alternative materials I've used, and now prefer, are standard 6/0 and 8/0 Unithread (used normally for tying flies...) The thread leaders are even limper, and seem stronger, than the 2 pound test mono. I'd suggest the 6/0 thread for leaders fished with a 5 wt or heavier line, and the 8/0 for leaders on 4 wt or smaller line. Color is your choice; I've seen yellow used (the whole leader is a strike indicator), and I've used pale blue, light gray, and white. Since you're going to add a couple feet of mono tippet to the leader, it doesn't really matter much, in my opinion. Let's assume you're using 6/0 Unithread. Tie a large (3 or 4 inch) loop in the end of the thread using a figure 8 knot, surgeons knot, square knot, or whatever and put the loop onto one of the cup hooks. Now, take the thread down to the first dowel on that side of the board, go around the dowel and back to the cup hook, then back to the dowel, etc., making a total of 5 turns. As you pass the dowel following the 5th turn, continue on to the next dowel, go around it, and back to the first dowel. As you go around the first dowel, drop the thread spool through the first set of loops to interlock the loops - go back to the second dowel, around it, and back to the first where you drop the spool through the first loops again. Henk's original formula has 2 and 1/2 turns for this second set of loops - my spreadsheet analysis seems to show that 3 and 1/2 turns would make a more uniform taper to the leader. When I asked Henk about this, he agreed, but said that he had noticed no difference in fishing, and using the 2 and 1/2 turns, he could make 3 leaders from one 100 meter spool of thread. So, my conclusion is that you can do 2 and 1/2 turns or 3 and 1/2 turns - take your pick. Whatever you decide, when you do that number, go past the second dowel to the last dowel (the one in the center of the board), go around the last dowel and up to the closest dowel on the other side of the board, go around it, back to the center dowel and go around it, back to the second dowel on the first side, and as you go around it (from the inside to the outside - always), drop the spool through the previous loops to lock the loops together. Now go back around the center dowel at the bottom, and up to the closest dowel on the other side. If you pause to count, you'll see a total of three strands of thread between this dowel and the center dowel at the bottom, and three strands of thread between the center dowel at the bottom and the second dowel on the first side. Continuing on, make either 2 and 1/2 or 3 and 1/2 turns between the next two dowels on the second side, making sure to always drop the thread spool through the previous loops to lock them together. Then finish with 5 and 1/2 turns between the last dowel and the second cup hook. Cut the thread, and tie a 3 or 4 inch loop in the thread end and slip it over the cup hook. If you start with the first cup hook and count strands of thread, you'll see it starts at 11, goes to either 5 or 7, then to 3, goes around the center dowel at the bottom, increases to either 5 or 7, and ends with 11 again. Since the dowels are offset in distances, this will give you the taper when you finish. Now, close to the center dowel at the bottom, hang a weight on the thread (either side of the dowel), to maintain the tautness as you proceed to the next step. I used a couple of 1 ounce lead sinkers, hung from a paper clip (1 sinker for the 8/0 thread). Carefully pull each set of locked loops up off the dowels and toward the center of the board. You'll end up with the thread attached at the cup hooks on one end, going around the center dowel at the other, and kept tight by the lead weights. Go to the cup hooks; on either, slip a paper clip onto the little loop where it goes around the cup hook - this is so you can take the loops off the cup hook and have them fall apart. Keeping the thread loops tight (just tight enough to not get messed up) walk around until you're standing in line with the board and about 14 feet away from the cup hooks. At this point place the paper clip onto a cup hook that you have previously placed in the chuck of a reversible electric drill and left sitting here. What you should see is: connected to your drill is a paper clip attached to a fat bunch of thread that becomes a thinner bunch of thread loops, and then fattens up again as it approaches a cup hook around 14 feet away. Maintaining a slight tension on the thread with the drill, turn it on and twist up the loops. Look at the label on the drill and see how many rpm it does. You'll want a total of around 2400 revolutions for a 10 foot leader, maybe 2100 for an 8 footer and maybe 2700 for a 12 footer. keep the drill on however long it takes to get that many turns. You can make sure your thread doesn't get too tight and break by holding the drill in one handing and constantly "tapping" on the revolving thread to check its tension. Expect to have the thread shorten by about 10%, or 16 to 18 inches, when you reach the correct number of turns - so be prepared to continually ease the tension on the thread by moving the drill slowly toward the cup hooks. When you reach the right number of turns, carefully place the drill on the floor, a chair or whatever, maintaining the tension on the twisted thread (THIS IS VERY IMPORTANT). Move up to the half-way point and make sure your lead weights are attached here via the paper clip and are hanging off the side of the board. If you have another person around to help, now is the time to use them. Letting the weights or the other person help keep tension at the midpoint, walk back around to the cup hooks with the drill. Carefully detach the paper clip from the drill and slip it over the cup hook that has thread twisted onto it (not the empty cup hook). If possible, clip the thread loops onto the cup hook so you can remove the paper clip. KEEP THE TWISTED THREAD UNDER TENSION AT ALL TIMES; otherwise it'll kink up on you and you can throw it away. Once you have the two thick ends on the same cup hook, take the drill down to the thin part that your weights or other person is holding. Attach a paper clip to the line at this point, and slip the paper clip onto the drill -keeping everything under tension. Reverse the drill motor so it will now "untwist" (spin counterclockwise). Give it around 800 turns for a 10 foot leader, 600 for an 8 footer, or 1000 for a 12 footer. What you are doing here is actually allowing the twisted strands to kink, but in a controlled fashion. When you finish, set the drill down, unhook the paper clip from the cup hook in the drill, and, holding the twisted thread a couple of feet above the paper clip, let go of the clip and let it spin free - it should only twist one direction or the other for a very few turns. Move your hand another couple feet up the leader and let go of the paper clip again - continue to the cup hook. Before you slip the leader off the cup hook, insert a paper clip into the little loops so that the two twisted strands can't come apart. The small end of the leader won't come apart, but the heavy end will. Tie a loop of choice in the heavy end; I prefer a figure 8 loop, but a surgeon's loop and perfection loop knot will also work. This loop can then be interlocked with a loop on the end of your flyline. IMPORTANT: DO NOT TAKE THE PAPER CLIP OFF UNTIL YOU'VE TIED A LOOP KNOT ON THE HEAVY END (it'll unravel on you). On the small end of the leader, you have a 1X tip so you should add a 12 inch or so long piece of 3X tippet to this, using loop knots, blood knots or whatever, and then finish with 4X or 5X tippet, or even add another length and end up at 6X or 7X. After you've made a couple of these, the total time you'll spend is around 15 minutes to make a leader - and that includes time to go get the drill, open up a beer, adjust the TV volume, and so forth. Here is another drawing (also below) that I made to help illustrate the process.
These leaders will turn over a fly just casting with your hand - no rod needed! Drilling the extra holes in the board for the 8 foot leader and the 12 foot leader will allow you to move the dowels as necessary for making longer or shorter leaders. If you have any questions about this process - you can email me at. Claude W. Freaner This document may not be used for commercial purposes without the express written permission of the author, but may be distributed freely for noncommercial fly fishing and fly tying purposes.
|